日本語
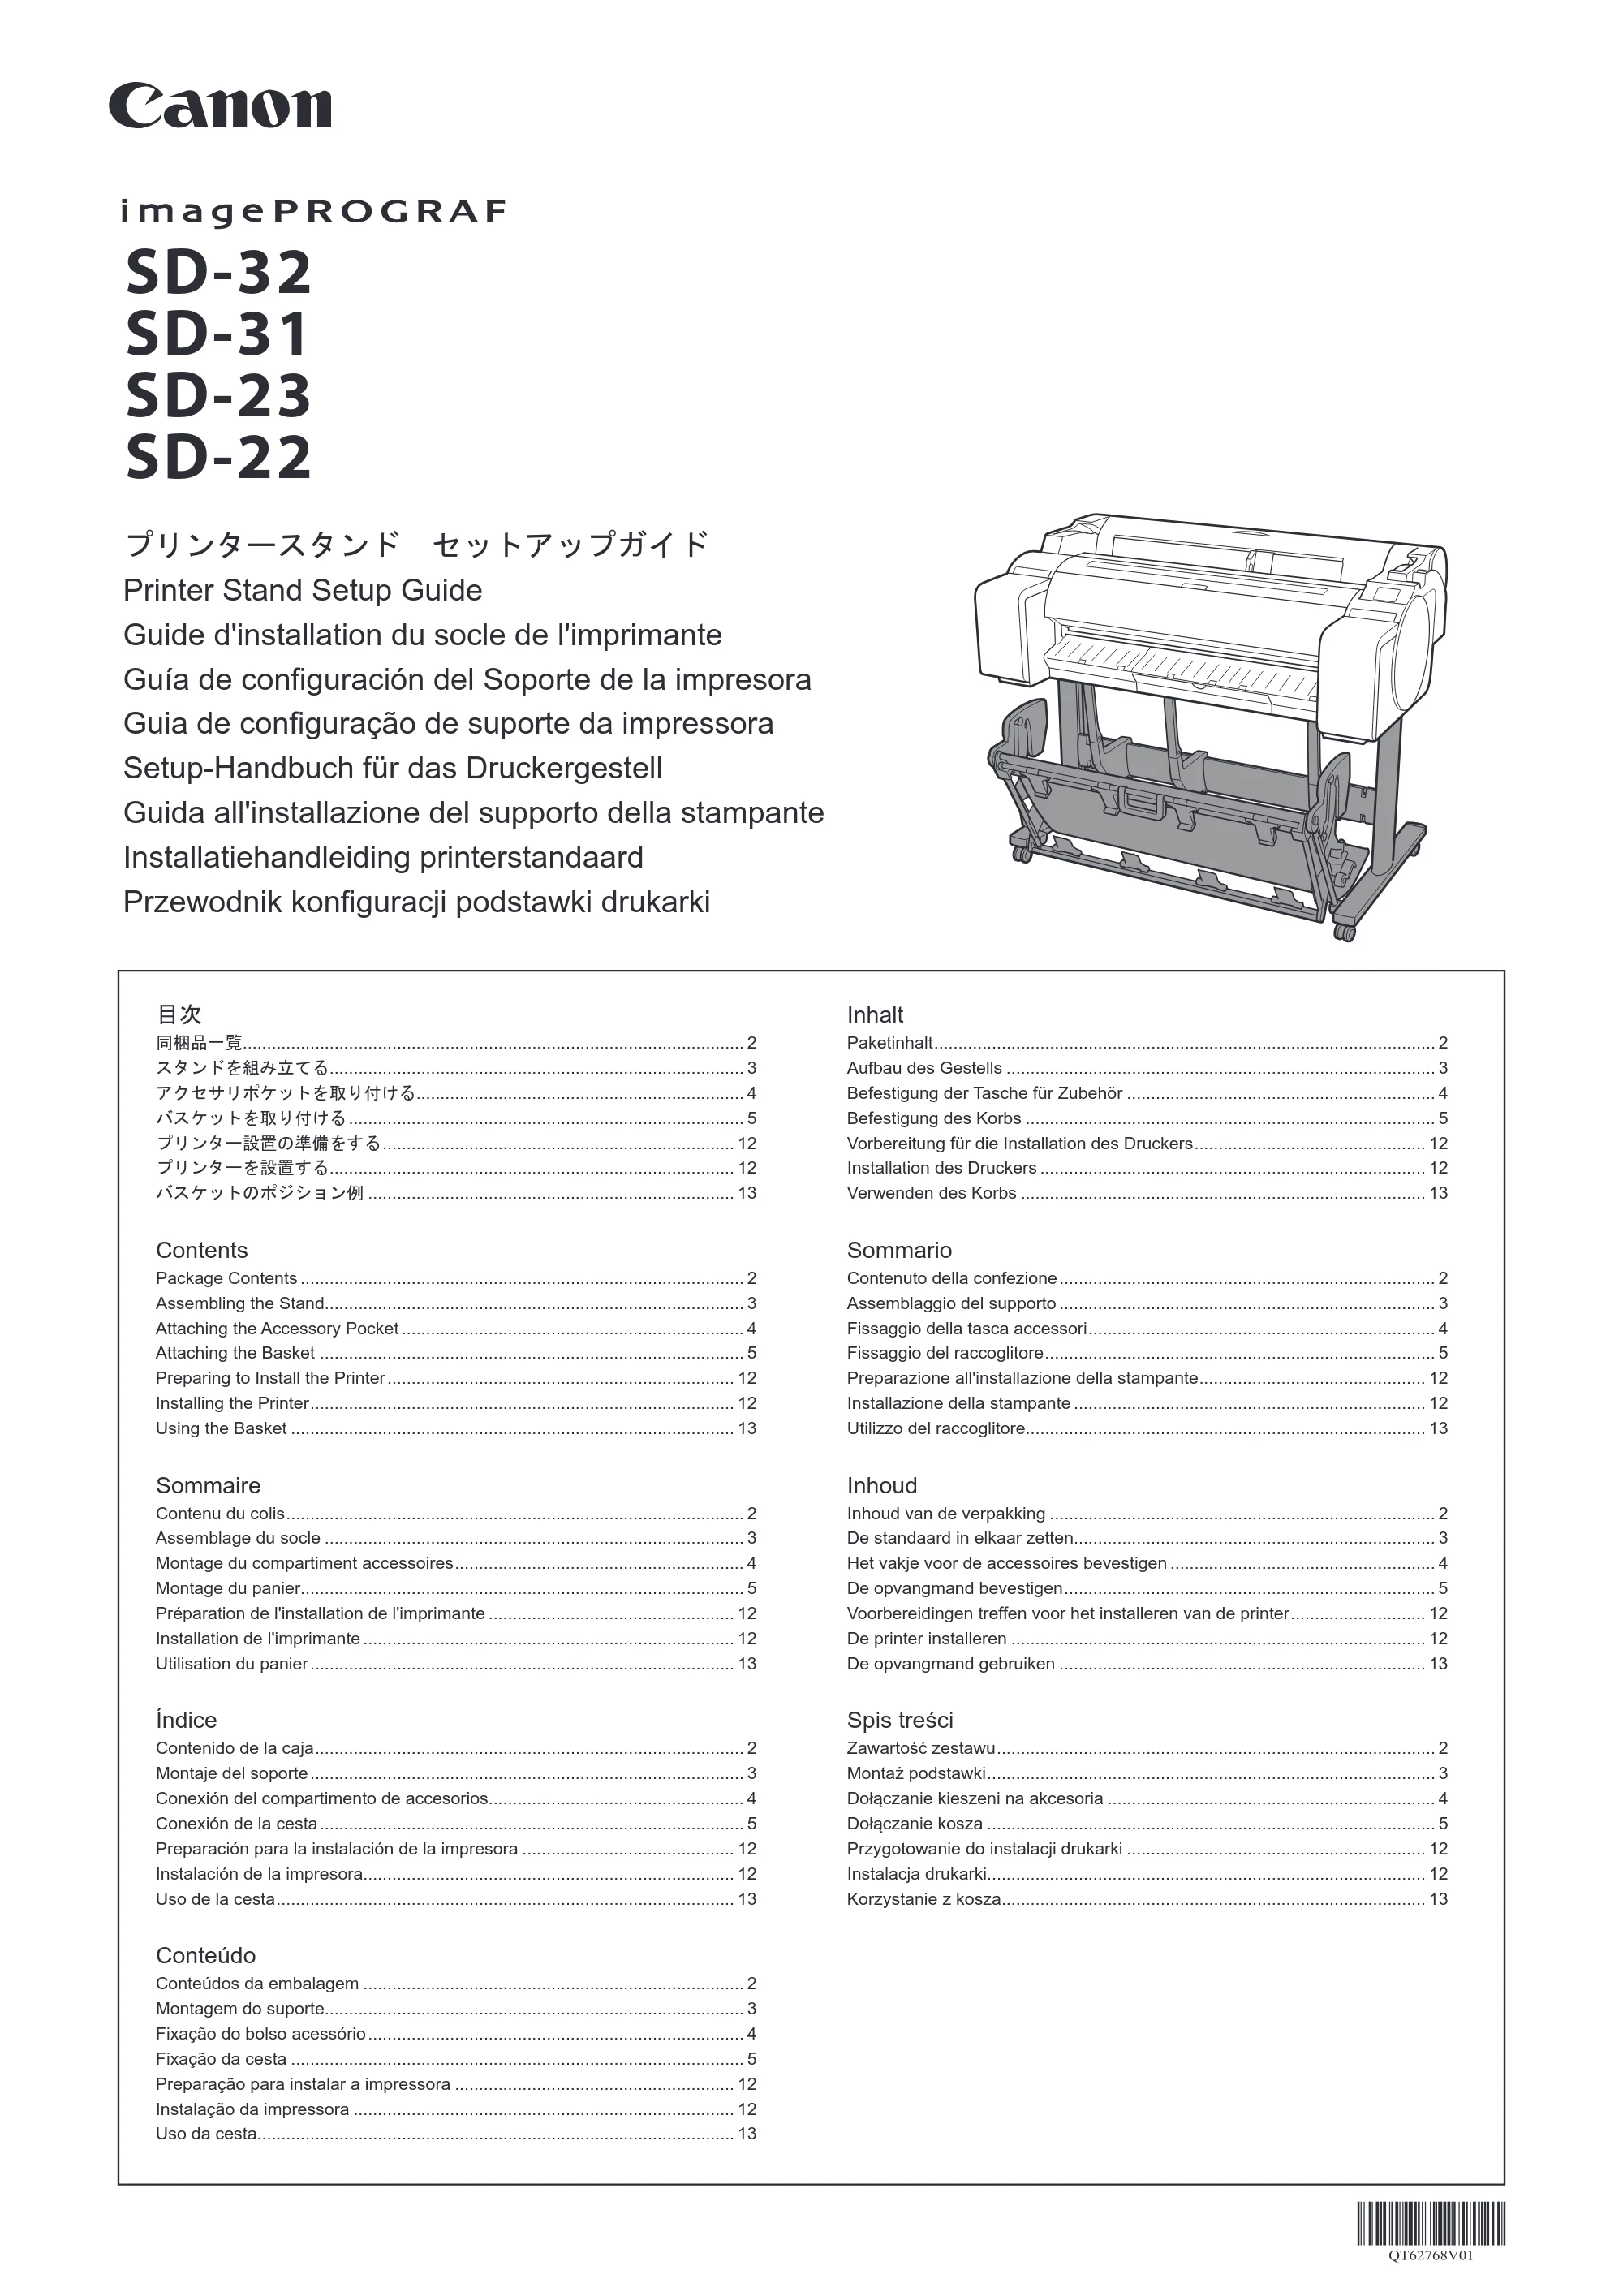
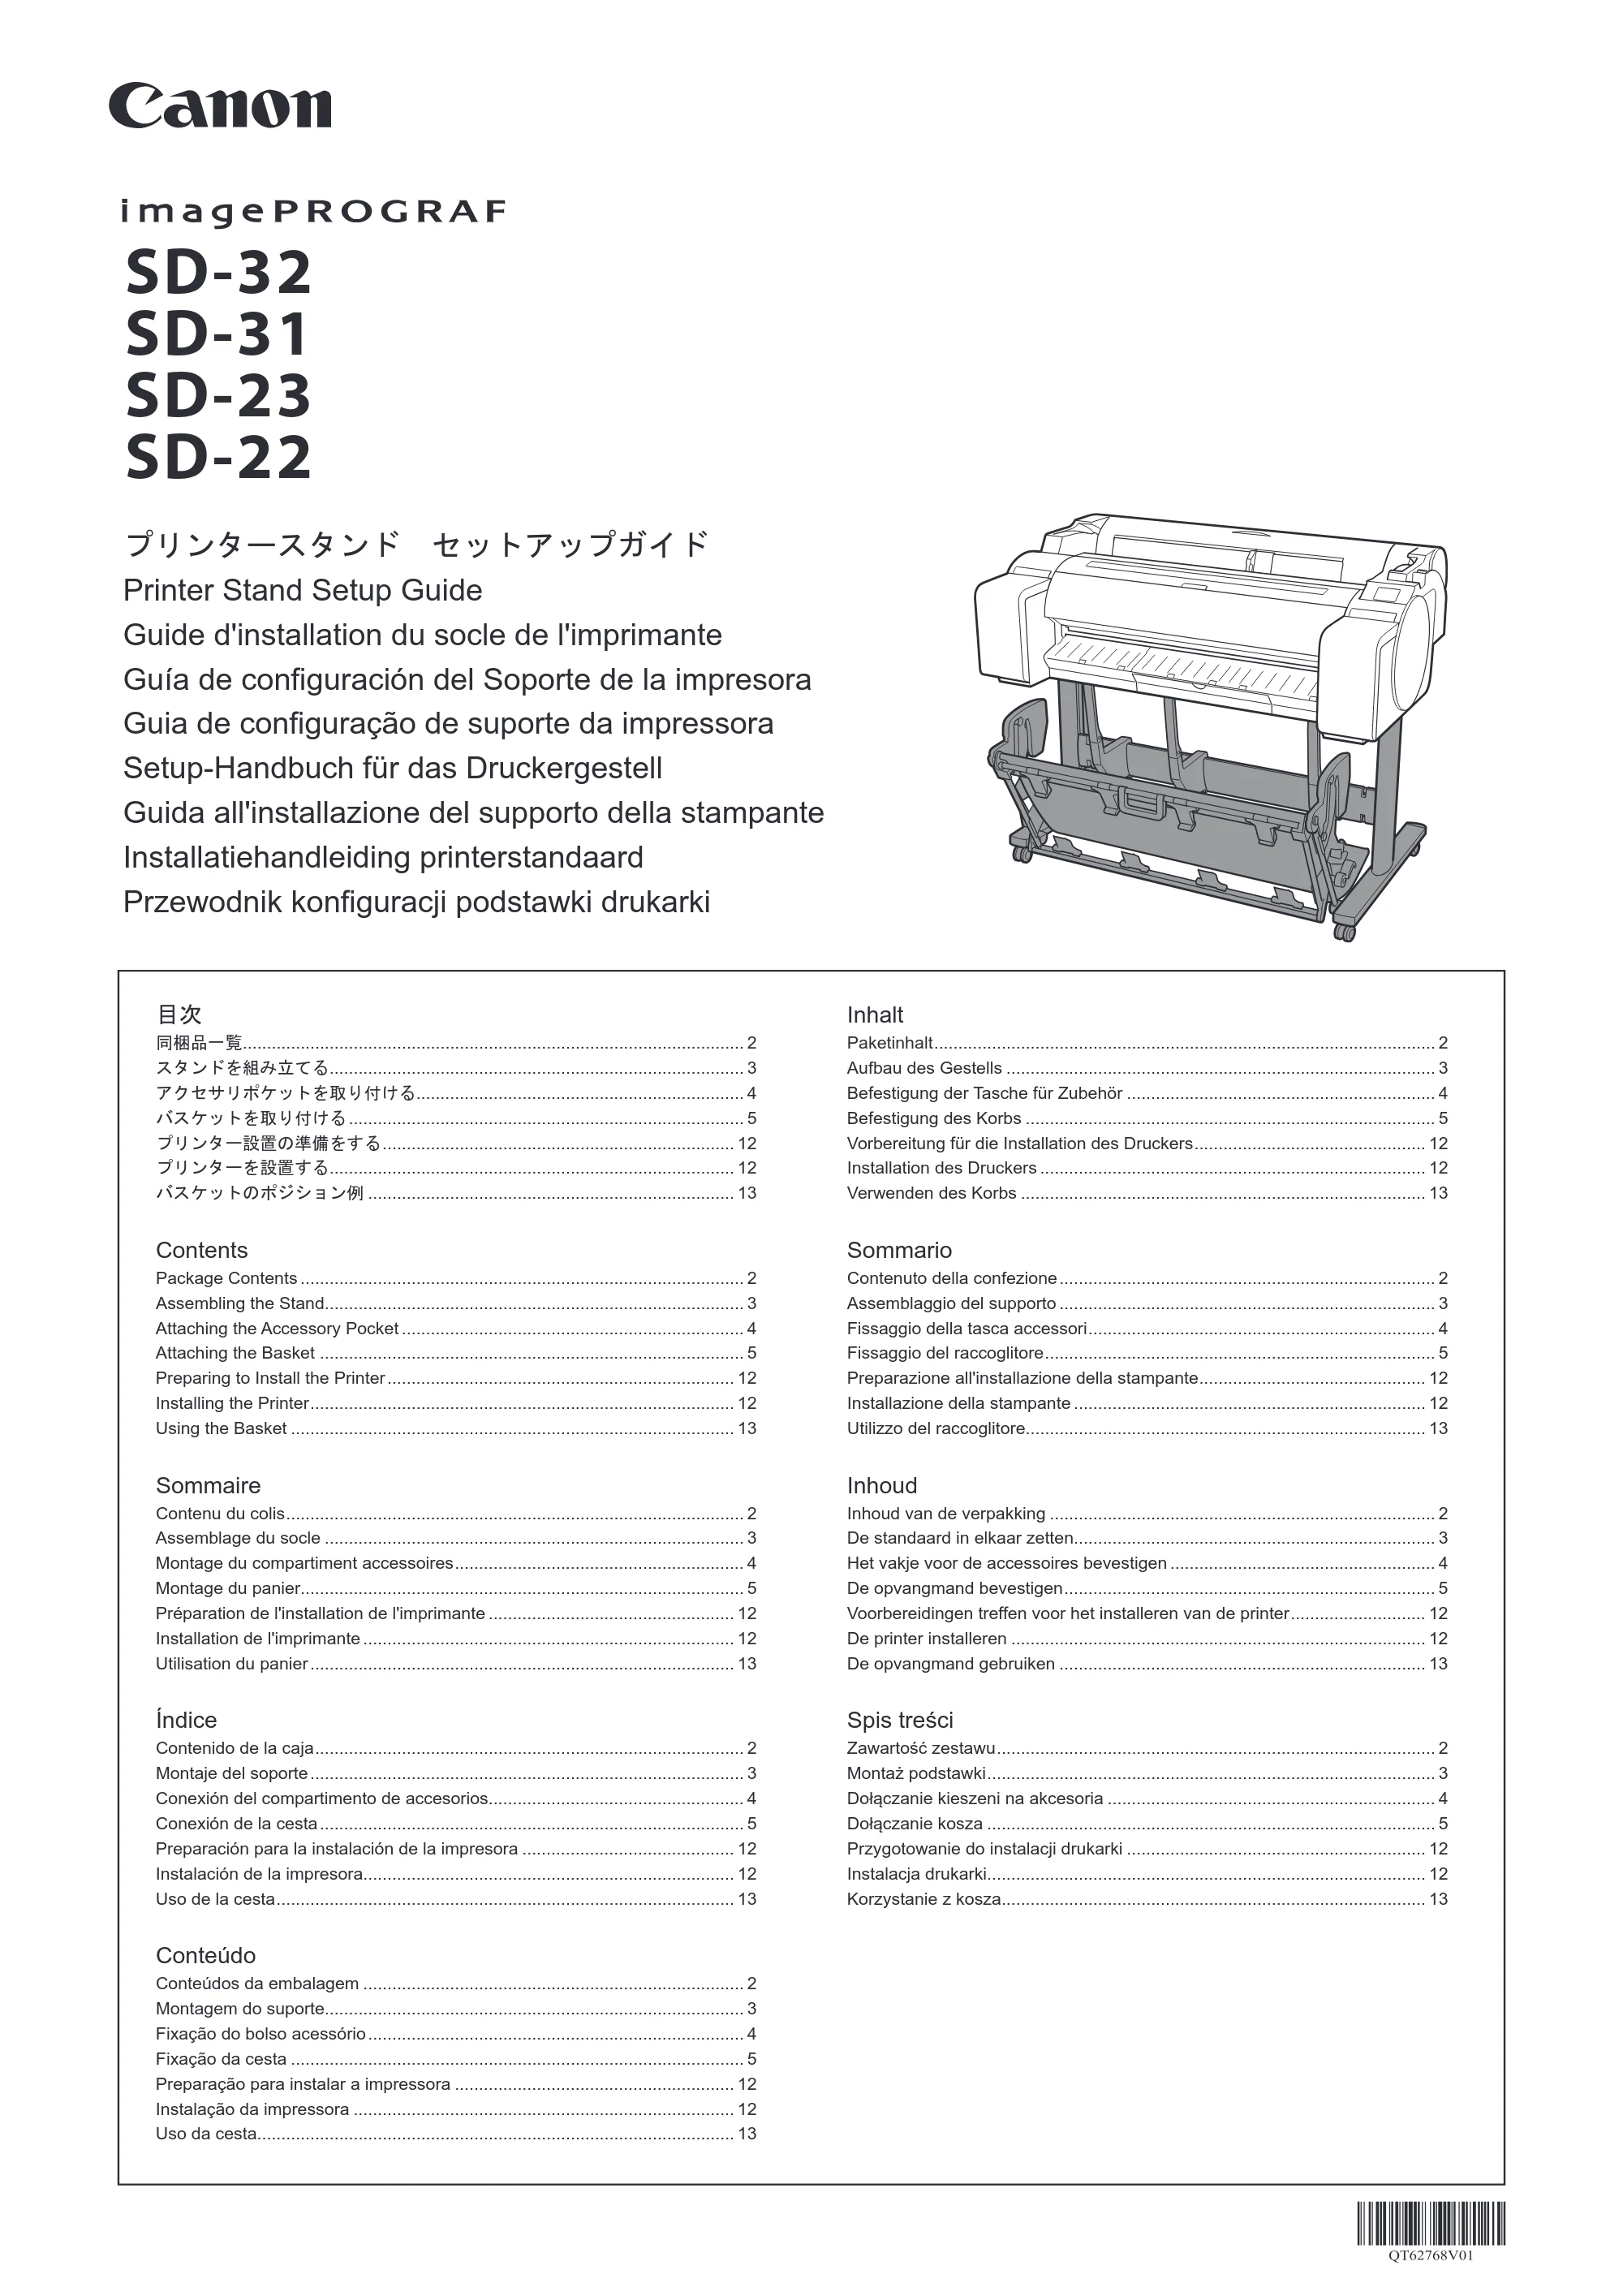
プリンタースタンド セットアップガイド
Printer Stand Setup Guide
Guide d'installation du socle de l'imprimante
Guía de configuración del Soporte de la impresora
Guia de configuração de suporte da impressora
Setup-Handbuch für das Druckergestell
Guida all'installazione del supporto della stampante
Installatiehandleiding printerstandaard
Przewodnik konfiguracji podstawki drukarki
SD-32
SD-31
SD-23
SD-22
QT62768V01
目次
同梱品一覧........................................................................................................ 2
スタンドを組み立てる...................................................................................... 3
アクセサリポケットを取り付ける.................................................................... 4
バスケットを取り付ける .................................................................................. 5
プリンター設置の準備をする ......................................................................... 12
プリンターを設置する.................................................................................... 12
バスケットのポジション例 ............................................................................ 13
Conteúdo
Conteúdos da embalagem ............................................................................... 2
Montagem do suporte....................................................................................... 3
Fixação do bolso acessório .............................................................................. 4
Fixação da cesta .............................................................................................. 5
Preparação para instalar a impressora .......................................................... 12
Instalação da impressora ............................................................................... 12
Uso da cesta................................................................................................... 13
Inhoud
Inhoud van de verpakking ................................................................................ 2
De standaard in elkaar zetten........................................................................... 3
Het vakje voor de accessoires bevestigen ....................................................... 4
De opvangmand bevestigen ............................................................................. 5
Voorbereidingen treffen voor het installeren van de printer ............................ 12
De printer installeren ...................................................................................... 12
De opvangmand gebruiken ............................................................................ 13
Contents
Package Contents ............................................................................................ 2
Assembling the Stand....................................................................................... 3
Attaching the Accessory Pocket ....................................................................... 4
Attaching the Basket ........................................................................................ 5
Preparing to Install the Printer ........................................................................ 12
Installing the Printer ........................................................................................ 12
Using the Basket ............................................................................................ 13
Inhalt
Paketinhalt ........................................................................................................ 2
Aufbau des Gestells ......................................................................................... 3
Befestigung der Tasche für Zubehör ................................................................ 4
Befestigung des Korbs ..................................................................................... 5
Vorbereitung für die Installation des Druckers ................................................ 12
Installation des Druckers ................................................................................ 12
Verwenden des Korbs .................................................................................... 13
Spis treści
Zawartość zestawu ........................................................................................... 2
Montaż podstawki ............................................................................................. 3
Dołączanie kieszeni na akcesoria .................................................................... 4
Dołączanie kosza ............................................................................................. 5
Przygotowanie do instalacji drukarki .............................................................. 12
Instalacja drukarki........................................................................................... 12
Korzystanie z kosza........................................................................................ 13
Sommaire
Contenu du colis ............................................................................................... 2
Assemblage du socle ....................................................................................... 3
Montage du compartiment accessoires ............................................................ 4
Montage du panier............................................................................................ 5
Préparation de l'installation de l'imprimante ................................................... 12
Installation de l'imprimante ............................................................................. 12
Utilisation du panier ........................................................................................ 13
Sommario
Contenuto della confezione .............................................................................. 2
Assemblaggio del supporto .............................................................................. 3
Fissaggio della tasca accessori ........................................................................ 4
Fissaggio del raccoglitore ................................................................................. 5
Preparazione all'installazione della stampante............................................... 12
Installazione della stampante ......................................................................... 12
Utilizzo del raccoglitore................................................................................... 13
Índice
Contenido de la caja ......................................................................................... 2
Montaje del soporte .......................................................................................... 3
Conexión del compartimento de accesorios..................................................... 4
Conexión de la cesta ........................................................................................ 5
Preparación para la instalación de la impresora ............................................ 12
Instalación de la impresora............................................................................. 12
Uso de la cesta ............................................................................................... 13
2ページ
1
注意
キヤノンプリンタースタンド SD-32/SD-31/SD-23/SD-22 は、キヤノンプリンター
TM-305/TM-300/TM-205/TM-200 専用のプリンタースタンドです。取扱説明書に従っ
て確実に固定してお使いください。また、必ず下記の組み合わせでお使いください。
- キヤノンプリンタースタンド SD-32/SD-31 → キヤノンプリンター TM-305/TM-300
に取り付けてお使いください。
- キヤノンプリンタースタンド SD-23/SD-22 → キヤノンプリンター TM-205/TM-200
に取り付けてお使いください。
「上記以外の組み合わせで使用する」、「指定以外のプリンタースタンドを使用する」、
「プリンター本体に固定しないままプリンタースタンドを使用する」といった使い方
をしますと、不安定になり、けがの原因になることがあります。
Caution
Canon Printer Stand SD-32/SD-31/SD-23/SD-22 is for use only with the Canon TM-
305/TM-300/TM-205/TM-200 printers. Follow the instructions in the manual to securely
attach the printer to the stand. Always use the following combinations of stand and
printer.
- Canon Printer Stand SD-32/SD-31: Use Canon TM-305/TM-300.
- Canon Printer Stand SD-23/SD-22: Use Canon TM-205/TM-200.
Using a different combination of printer and stand than shown above, using a stand
not listed above, or not attaching the printer securely to the stand may be unstable
and may result in injury.
Attention
Le socle d'imprimante Canon SD-32/SD-31/SD-23/SD-22 est uniquement destiné à
une utilisation avec les imprimantes Canon TM-305/TM-300/TM-205/TM-200. Suivez
les instructions de ce manuel pour fixer fermement l'imprimante sur le socle. Ayez
toujours recours aux combinaisons suivantes de socle et d'imprimante.
- Socle d'imprimante Canon SD-32/SD-31 : Utilisez Canon TM-305/TM-300.
- Socle d'imprimante Canon SD-23/SD-22 : Utilisez Canon TM-205/TM-200.
L'utilisation d'une autre combinaison d'imprimante et de socle que celle indiquée
ci-dessus, l'utilisation d'un socle non répertorié ci-dessus ou le fait de ne pas fixer
fermement l'imprimante sur le socle pourrait être à l'origine d'une instabilité et
provoquer des blessures.
Precaución
El soporte de la impresora Canon SD-32/SD-31/SD-23/SD-22 se utiliza únicamente
con impresoras Canon TM-305/TM-300/TM-205/TM-200. Siga las instrucciones del
manual para conectar la impresora al soporte de manera segura. Utilice siempre las
siguientes combinaciones de soporte e impresora.
- Soporte de la impresora Canon SD-32/SD-31: Utilice Canon TM-305/TM-300.
- Soporte de la impresora Canon SD-23/SD-22: Utilice Canon TM-205/TM-200.
Si utiliza una combinación diferente de impresora y soporte que la que se muestra
arriba, si utiliza un soporte que no se indica arriba o no conecta la impresora al
soporte de manera segura, es posible que el soporte no tenga estabilidad y que esto
dé lugar a lesiones.
Cuidado
O suporte da impressora Canon SD-32/SD-31/SD-23/SD-22 deve ser usado apenas
com impressoras Canon TM-305/TM-300/TM-205/TM-200. Siga as instruções do
manual para fixar a impressora ao suporte de forma segura. Sempre respeite as
seguintes combinações de suporte e impressora.
- Suporte da impressora Canon SD-32/SD-31: use Canon TM-305/TM-300.
- Suporte da impressora Canon SD-23/SD-22: use Canon TM-205/TM-200.
Usar uma combinação de impressora e suporte diferente da mencionada acima, usar
um suporte não mencionado acima ou não afixar a impressora ao suporte de forma
segura podem causar instabilidade e resultar em lesões.
Vorsicht
Das Canon Druckergestell SD-32/SD-31/SD-23/SD-22 darf nur mit den Canon
Druckern TM-305/TM-300/TM-205/TM-200 verwendet werden. Folgen Sie den
Anweisungen im Handbuch, um den Drucker sicher am Gestell zu befestigen.
Verwenden Sie immer die folgenden Kombinationen aus Gestell und Drucker.
- Canon Druckergestell SD-32/SD-31: Verwenden Sie Canon TM-305/TM-300.
- Canon Druckergestell SD-23/SD-22: Verwenden Sie Canon TM-205/TM-200.
Wenn Sie eine andere Kombination aus Drucker und Gestell als die oben aufgeführten
Kombinationen verwenden, ein oben nicht aufgeführtes Gestell verwenden oder den
Drucker nicht sicher am Gestell befestigen, ist die Konstruktion möglicherweise nicht
stabil, was zu Verletzungen führen kann.
Avvertenza
Canon Supporto della stampante SD-SD-32/SD-31/SD-23/SD-22 è utilizzabile solo
con le stampanti Canon TM-305/TM-300/TM-205/TM-200. Attenersi alle istruzioni
presenti nel manuale per installare la stampante sul supporto in modo sicuro.
Utilizzare sempre le combinazioni seguenti di supporto e stampante.
- Canon Supporto della stampante SD-32/SD-31: utilizzare Canon TM-305/TM-300.
- Canon Supporto della stampante SD-23/SD-22: utilizzare Canon TM-205/TM-200.
Se si utilizza una combinazione di stampante e supporto differente da quella
raccomandata sopra, utilizzando un supporto non elencato oppure non installando la
stampante sul supporto in modo sicuro, il risultato sarà un assemblaggio instabile e
insicuro che espone al rischio di infortunio.
Let op
Canon-printerstandaard SD-32/SD-31/SD-23/SD-22 is alleen bestemd voor gebruik
in combinatie met de Canon-printers TM-305/TM-300/TM-205/TM-200. Volg de
instructies in de handleiding om de printer stevig op de standaard te bevestigen.
Gebruik altijd de onderstaande combinaties van standaard en printer.
- Canon-printerstandaard SD-32/SD-31: gebruik Canon TM-305/TM-300.
- Canon-printerstandaard SD-23/SD-22: gebruik Canon TM-205/TM-200.
Het gebruik van een andere combinatie van printer en standaard, het gebruik van een
andere dan de hierboven genoemde standaard of een niet stevig op de standaard
bevestigende printer kan leiden tot instabiliteit en dit kan letsel tot gevolg hebben.
Przestroga
Podstawka drukarki Canon Printer Stand SD-32/SD-31/SD-23/SD-22 jest
przeznaczona wyłącznie dla drukarek Canon TM-305/TM-300/TM-205/TM-200. Aby
bezpiecznie zamocować drukarkę na podstawce, należy postępować zgodnie z
instrukcjami z niniejszego podręcznika. Należy zawsze korzystać z następujących
połączeń podstawki i drukarki.
- Canon Printer Stand SD-32/SD-31: użyj drukarki Canon TM-305/TM-300.
- Canon Printer Stand SD-23/SD-22: użyj drukarki Canon TM-205/TM-200.
Korzystanie z innych połączeń podstawki i drukarki niż przedstawione powyżej,
korzystanie z podstawki, która nie została wymieniona powyżej, jak również
nieprzestrzeganie zalecenia o bezpiecznym zamocowaniu drukarki na podstawce
może doprowadzić do kontuzji.
- スタンドの組み立ては本書をお読みください。ご使用の機種とイラストが異なる場
合がありますが、基本的な手順は同じです。ご使用前に必ず本書をお読みください。
将来いつでも使用できるように大切に保管してください。
- Read this manual for details on assembling the stand. Although the illustrations may
differ from the model you are using, the basic procedure is the same. Read this
manual before attempting to operate the stand. Keep this manual for future reference.
- Lisez ce manuel pour plus de détails sur le montage du socle. Bien que les
illustrations puissent être différentes du modèle que vous utilisez, la procédure de
base est identique. Lisez ce manuel avant d'essayer d'utiliser le socle. Conservez ce
manuel pour toute consultation ultérieure.
- Lea este manual donde encontrará detalles sobre el montaje del soporte. Aunque las
ilustraciones podrían diferir del modelo que está utilizando, el procedimiento básico
es el mismo. Antes de intentar utilizar el soporte, lea este manual. Conserve este
manual para consultas posteriores.
- Consulte este manual para obter informações sobre a montagem do suporte.
As ilustrações podem ser diferentes do modelo que você estiver usando, mas o
processo básico é o mesmo. Leia este manual antes de tentar operar o suporte.
Guarde este manual referência futura.
- Lesen Sie dieses Handbuch, um Details zum Aufbau des Gestells zu erhalten. Auch
wenn sich die Abbildungen von dem von Ihnen verwendeten Modell möglicherweise
unterscheiden, ist die grundlegende Vorgehensweise identisch. Lesen Sie dieses
Handbuch, bevor Sie versuchen, das Gestell zu bedienen. Bewahren Sie diese
Anleitung zum späteren Nachschlagen auf.
- Leggere questo manuale per conoscere i dettagli relativi al montaggio del supporto.
Sebbene le illustrazioni possano differire dal modello in possesso, la procedura
di base è la stessa. Leggere questo manuale prima di utilizzare in alcun modo il
supporto. Conservare questo manuale per riferimento futuro.
- Lees deze handleiding voor nadere bijzonderheden over het in elkaar zetten van de
standaard. De illustraties zullen misschien niet het model dat u gebruikt, weergeven
maar de basisprocedure is hetzelfde. Lees deze handleiding voordat u probeert de
standaard te bedienen. Bewaar deze handleiding zodat u de handleiding later kunt
raadplegen.
- Przed zmontowaniem podstawki należy zapoznać się z niniejszym podręcznikiem.
Zamieszczone w nim ilustracje mogą różnić się od rzeczywistego wyglądu używanego
modelu urządzenia, procedura jednak pozostaje taka sama. Przed rozpoczęciem
korzystania z podstawki należy zapoznać się z niniejszym podręcznikiem. Niniejszy
podręcznik należy zachować, aby można było z niego skorzystać w przyszłości.
- プリンター本体にスタンドが同梱されている場合はそちらをお使いください。プリンタースタンドをオプションでご購入された場合は、下記の注意にしたがってください。
- If a stand is included with the printer, please use that stand. If you are purchasing an optional printer stand, please observe the following caution.
- Si un socle est inclus avec l'imprimante, veuillez l'utiliser. Si vous achetez un socle d'imprimante en option, respectez les précautions suivantes.
- Si se incluye un soporte con la impresora, utilice ese soporte. Si ha comprado un soporte de la impresora distinto, tenga en cuenta las siguientes precauciones.
- Se um suporte acompanhar a impressora, use-o. Se você estiver adquirindo o suporte opcional da impressora, tome as seguintes precauções.
- Wenn im Lieferumfang des Druckers ein Gestell enthalten ist, verwenden Sie dieses Gestell. Wenn Sie ein optionales Druckergestell erwerben, beachten Sie die folgenden
Vorsichtsmaßnahmen.
- Se a corredo della stampante è stato fornito un supporto, utilizzare quel supporto. Se si sta acquistando un supporto della stampante opzionale, attenersi alla seguente
avvertenza.
- Als de printerstandaard bij de printer wordt geleverd, gebruik deze dan. Als u de printerstandaard als een optie hebt aangeschaft, volgt u de onderstaande instructies.
- Jeśli do drukarki została dołączona podstawka, należy korzystać z dołączonej podstawki. Przy zakupie opcjonalnej podstawki drukarki należy przestrzegać następujących
zaleceń.
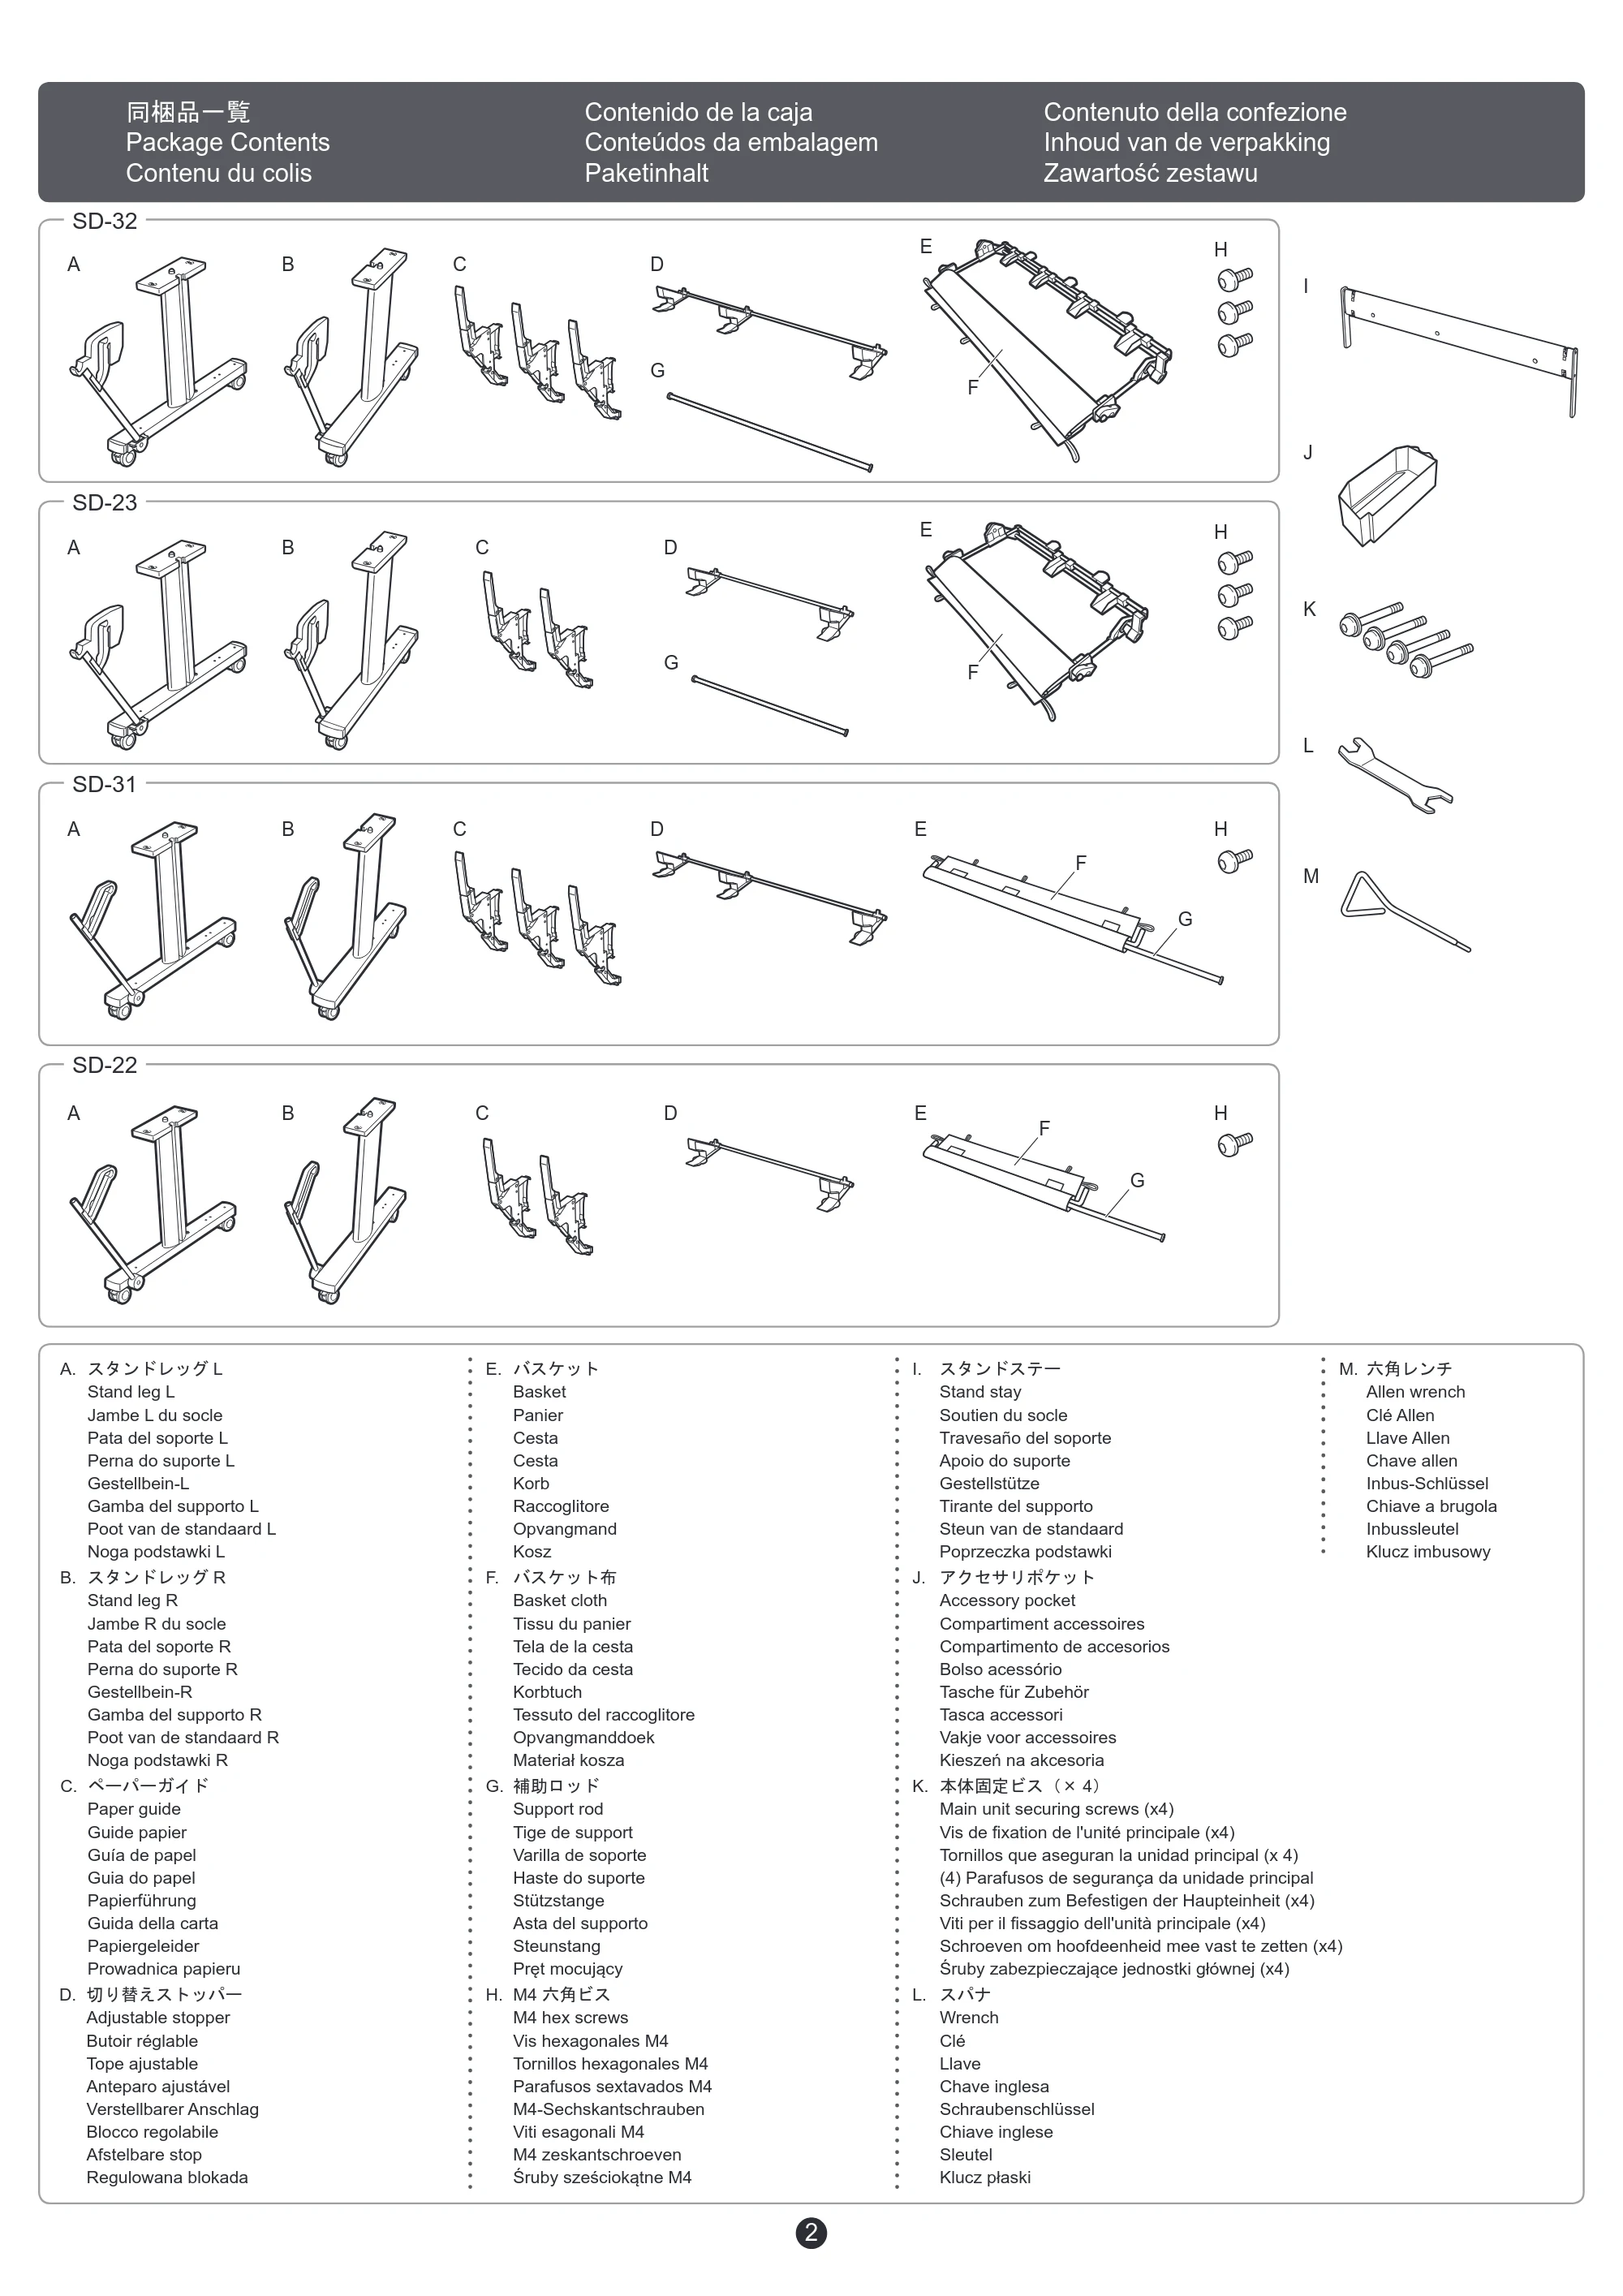
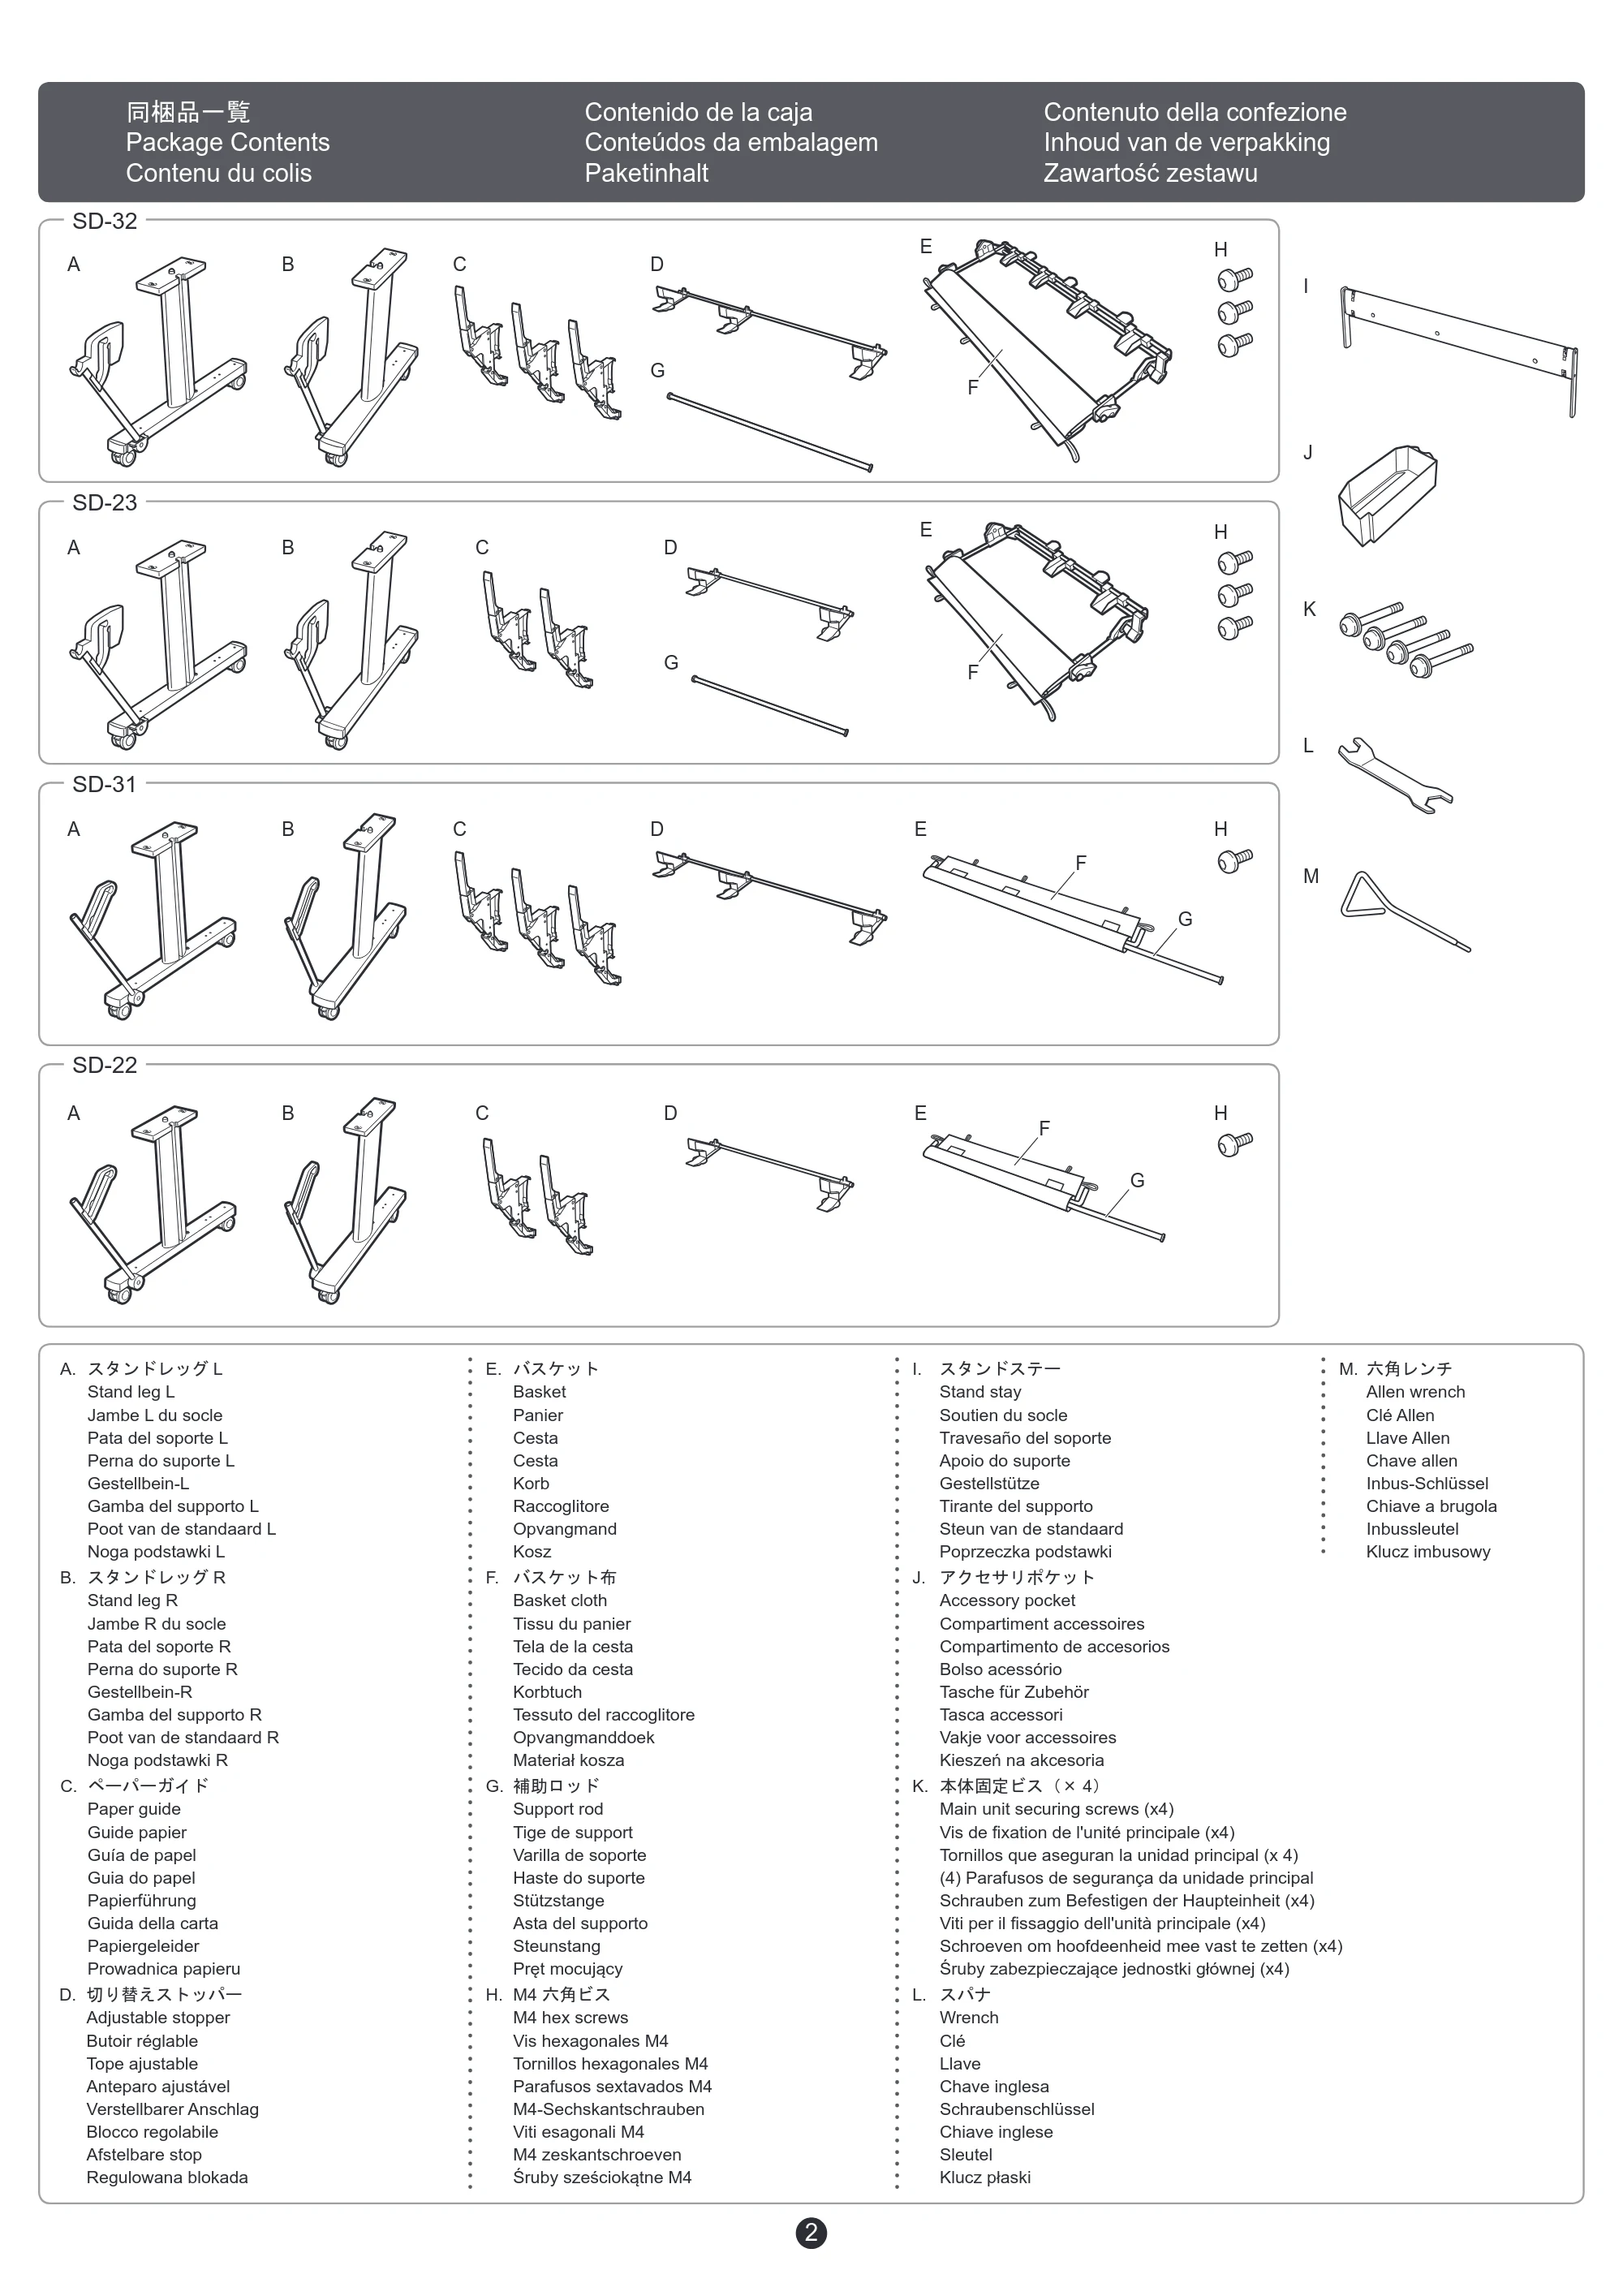
同梱品一覧
2
F. バスケット布
Basket cloth
Tissu du panier
Tela de la cesta
Tecido da cesta
Korbtuch
Tessuto del raccoglitore
Opvangmanddoek
Materiał kosza
B. スタンドレッグ R
Stand leg R
Jambe R du socle
Pata del soporte R
Perna do suporte R
Gestellbein-R
Gamba del supporto R
Poot van de standaard R
Noga podstawki R
I. スタンドステー
Stand stay
Soutien du socle
Travesaño del soporte
Apoio do suporte
Gestellstütze
Tirante del supporto
Steun van de standaard
Poprzeczka podstawki
A. スタンドレッグ L
Stand leg L
Jambe L du socle
Pata del soporte L
Perna do suporte L
Gestellbein-L
Gamba del supporto L
Poot van de standaard L
Noga podstawki L
J. アクセサリポケット
Accessory pocket
Compartiment accessoires
Compartimento de accesorios
Bolso acessório
Tasche für Zubehör
Tasca accessori
Vakje voor accessoires
Kieszeń na akcesoria
C. ペーパーガイド
Paper guide
Guide papier
Guía de papel
Guia do papel
Papierführung
Guida della carta
Papiergeleider
Prowadnica papieru
D. 切り替えストッパー
Adjustable stopper
Butoir réglable
Tope ajustable
Anteparo ajustável
Verstellbarer Anschlag
Blocco regolabile
Afstelbare stop
Regulowana blokada
E. バスケット
Basket
Panier
Cesta
Cesta
Korb
Raccoglitore
Opvangmand
Kosz
G. 補助ロッド
Support rod
Tige de support
Varilla de soporte
Haste do suporte
Stützstange
Asta del supporto
Steunstang
Pręt mocujący
L. スパナ
Wrench
Clé
Llave
Chave inglesa
Schraubenschlüssel
Chiave inglese
Sleutel
Klucz płaski
M. 六角レンチ
Allen wrench
Clé Allen
Llave Allen
Chave allen
Inbus-Schlüssel
Chiave a brugola
Inbussleutel
Klucz imbusowy
H. M4 六角ビス
M4 hex screws
Vis hexagonales M4
Tornillos hexagonales M4
Parafusos sextavados M4
M4-Sechskantschrauben
Viti esagonali M4
M4 zeskantschroeven
Śruby sześciokątne M4
K. 本体固定ビス(× 4)
Main unit securing screws (x4)
Vis de fixation de l'unité principale (x4)
Tornillos que aseguran la unidad principal (x 4)
(4) Parafusos de segurança da unidade principal
Schrauben zum Befestigen der Haupteinheit (x4)
Viti per il fissaggio dell'unità principale (x4)
Schroeven om hoofdeenheid mee vast te zetten (x4)
Śruby zabezpieczające jednostki głównej (x4)
同梱品一覧 Contenido de la caja Contenuto della confezione
Package Contents Conteúdos da embalagem Inhoud van de verpakking
Contenu du colis Paketinhalt Zawartość zestawu
A
A
A
A
B
B
B
B
C
C
C
C
D
D
D
D
E
I
J
K
L
M
E
E
E
H
H
H
H
G
F
F
F
F
G
G
G
SD-32
SD-31
SD-22
SD-23
スタンドを組み立てる
3
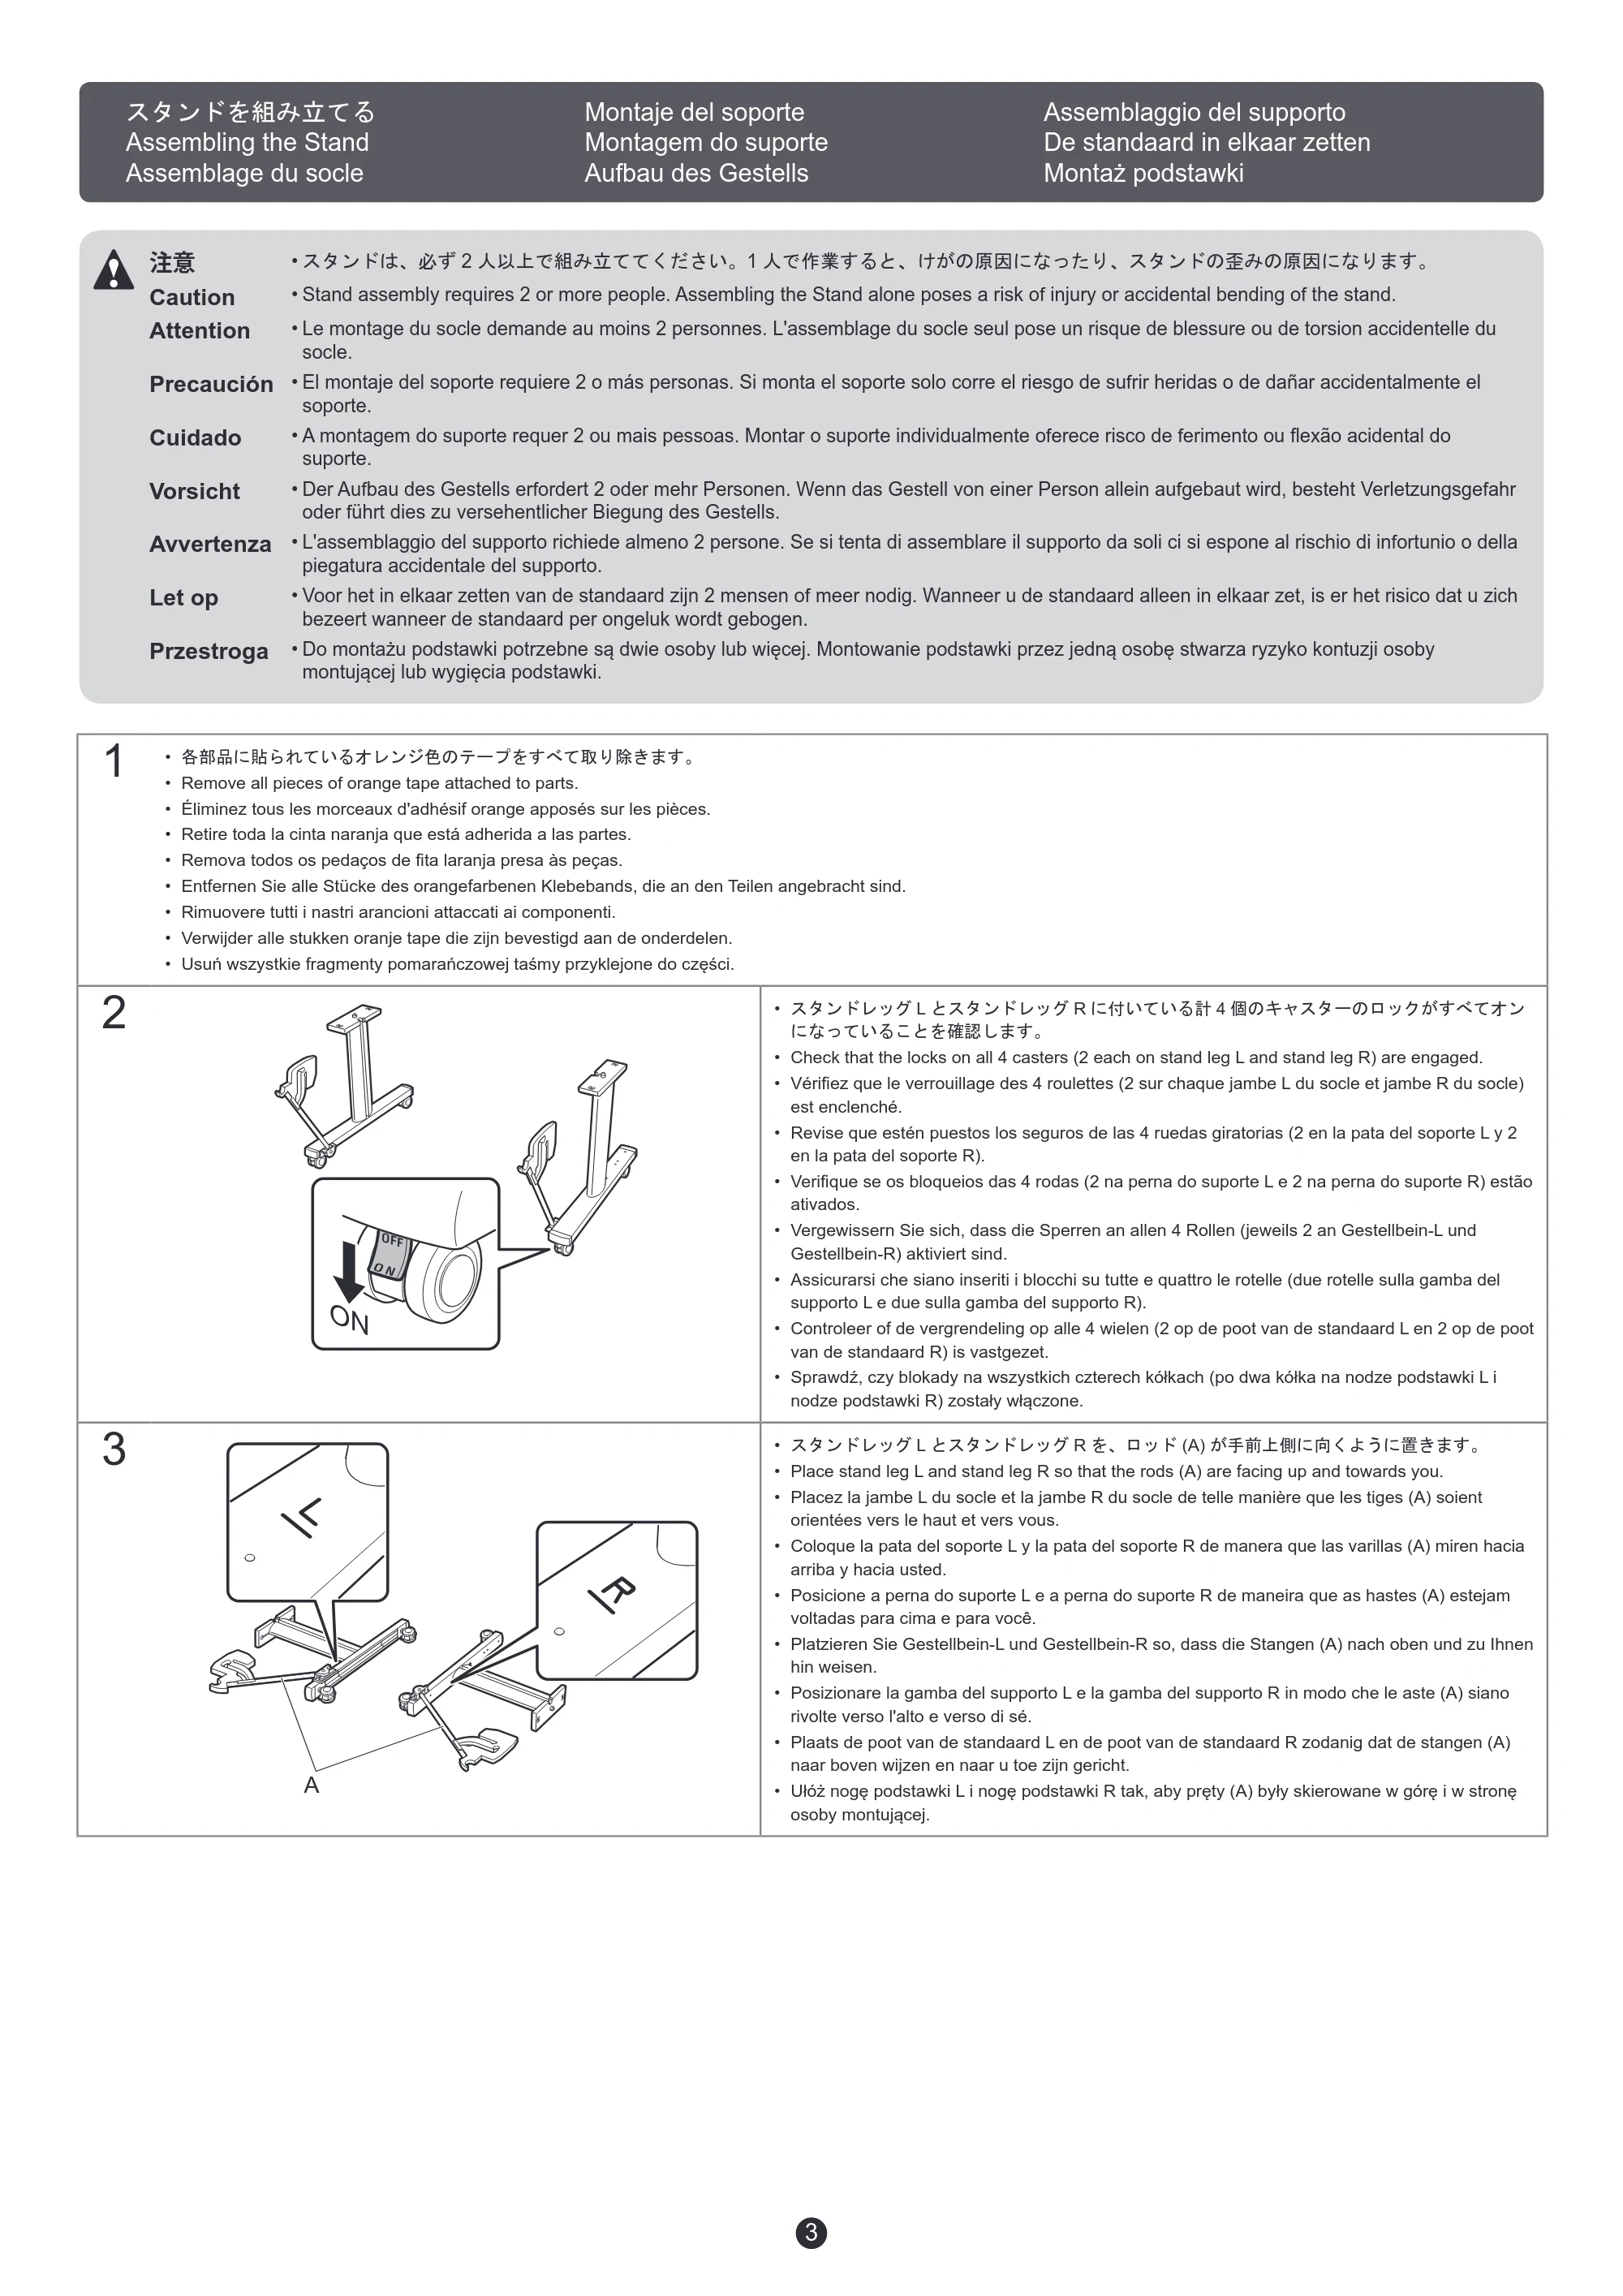
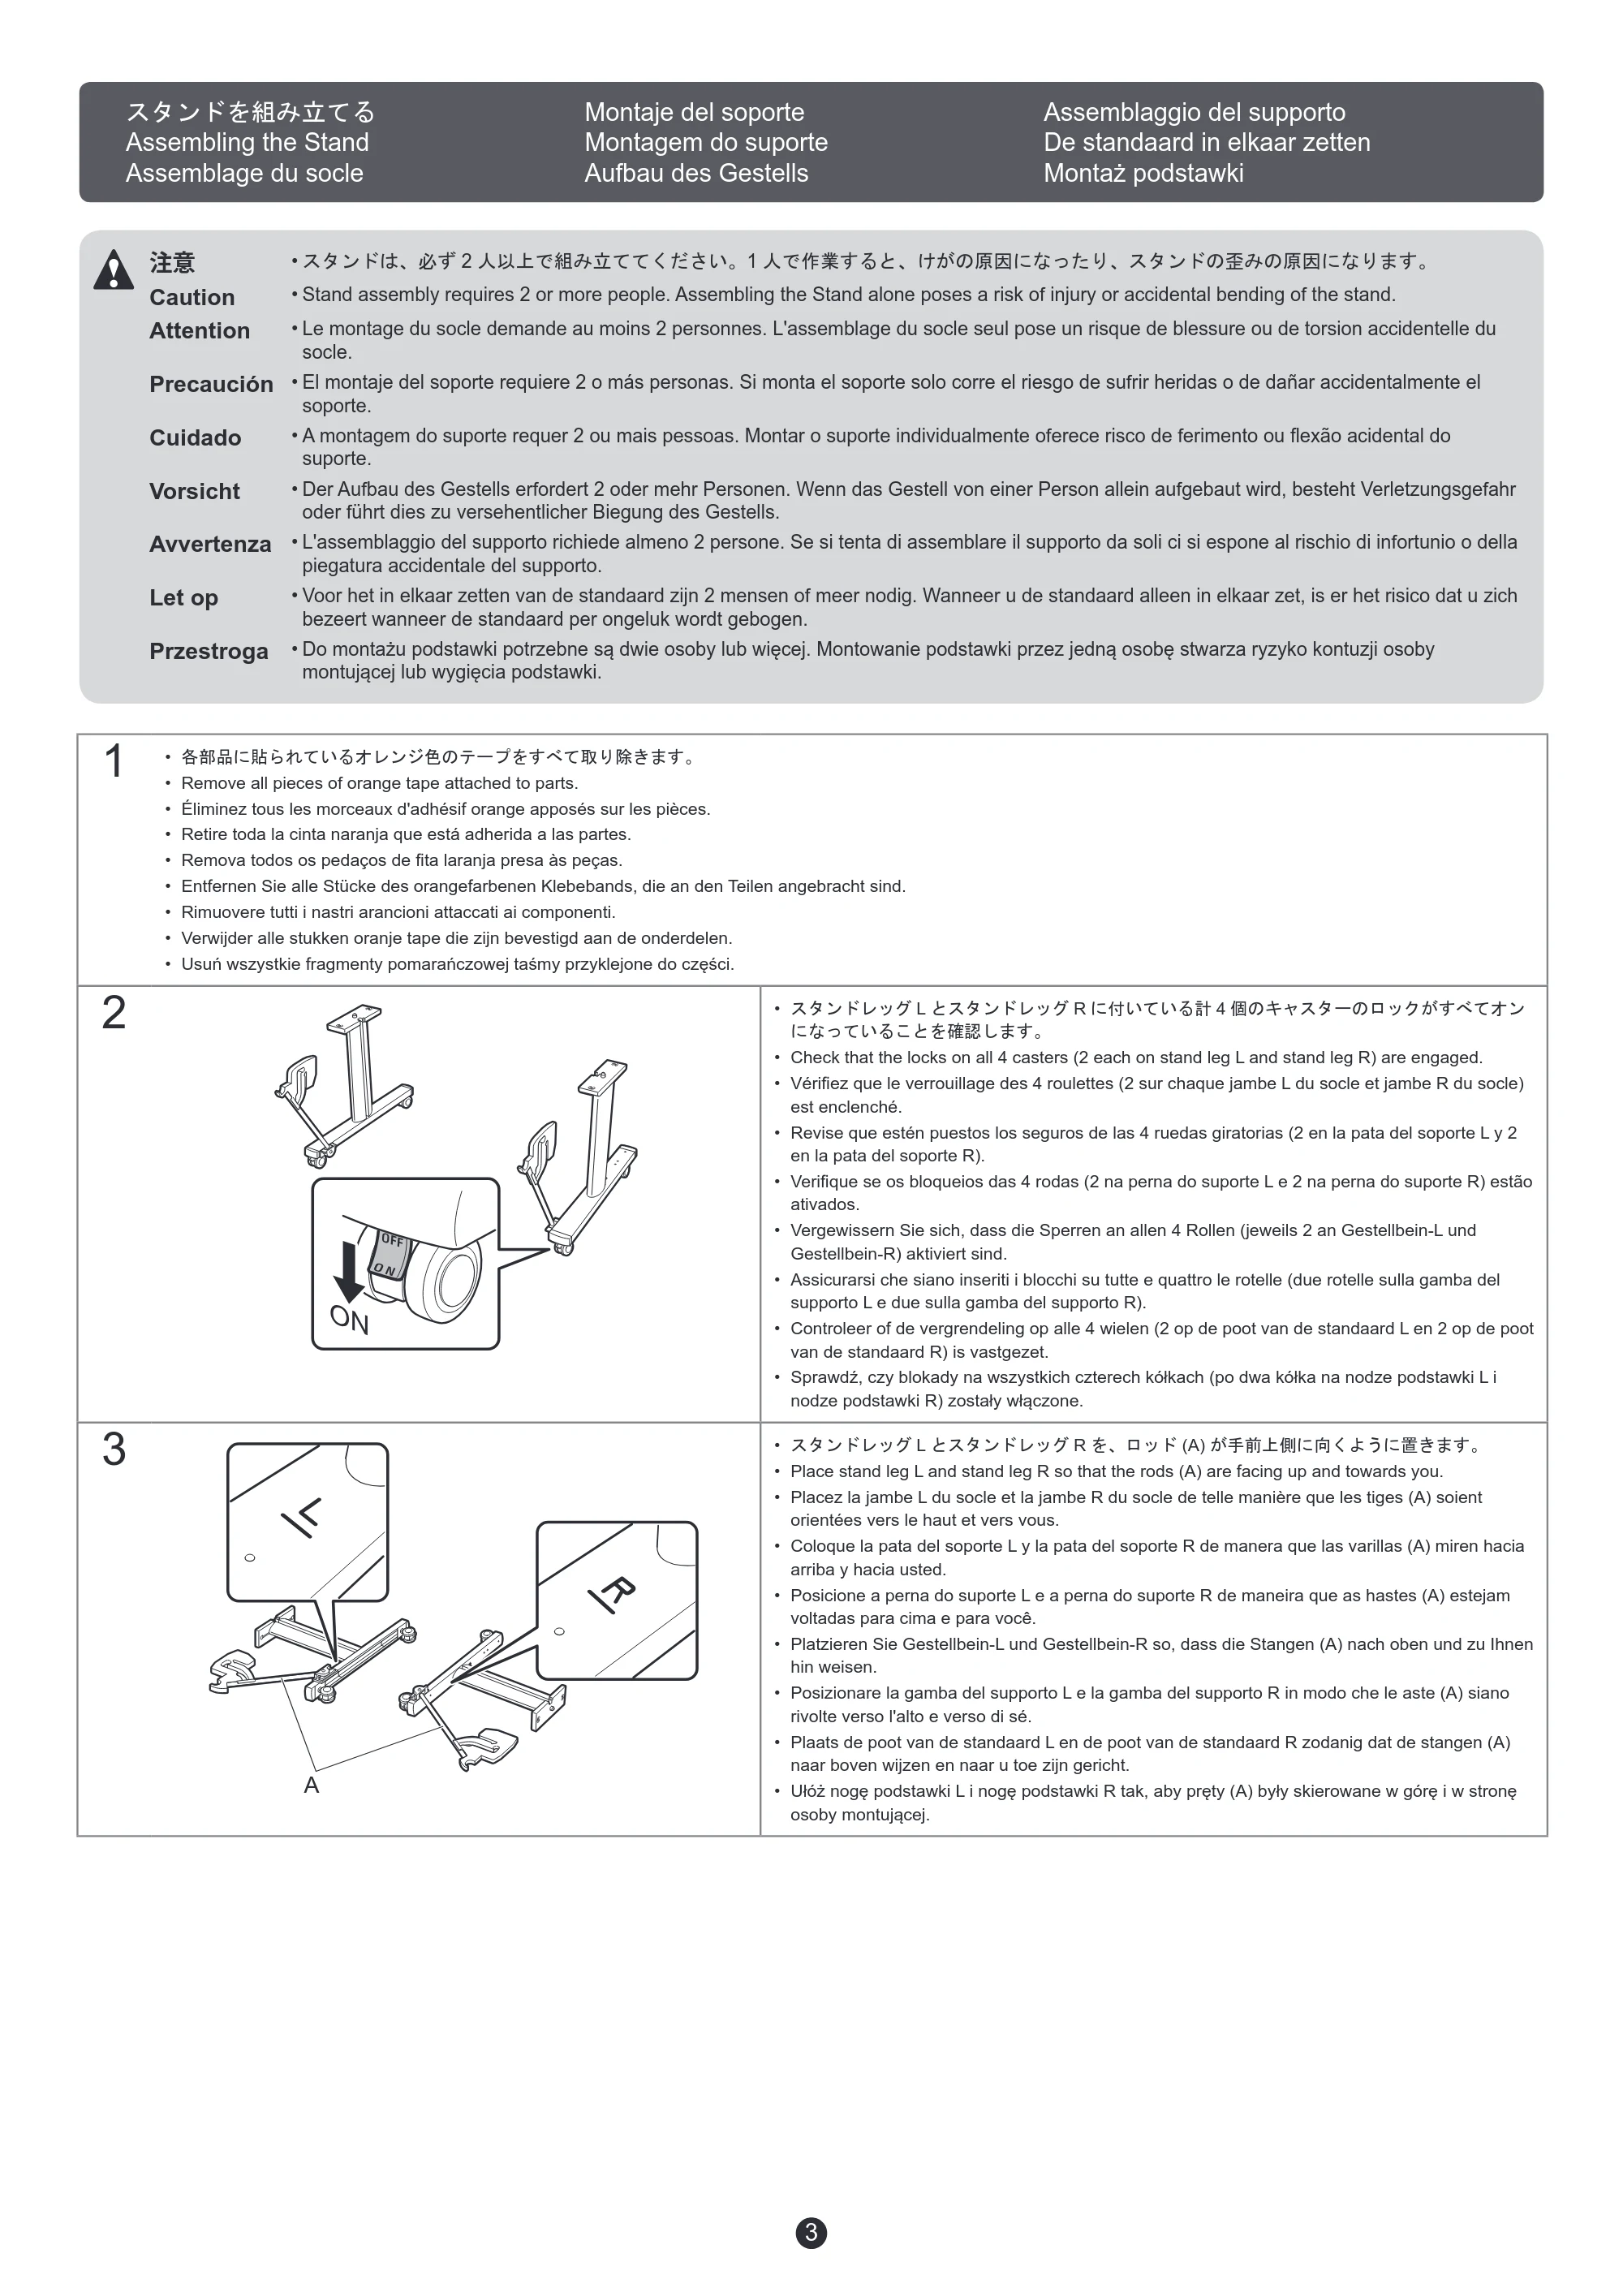
1
- 各部品に貼られているオレンジ色のテープをすべて取り除きます。
- Remove all pieces of orange tape attached to parts.
- Éliminez tous les morceaux d'adhésif orange apposés sur les pièces.
- Retire toda la cinta naranja que está adherida a las partes.
- Remova todos os pedaços de fita laranja presa às peças.
- Entfernen Sie alle Stücke des orangefarbenen Klebebands, die an den Teilen angebracht sind.
- Rimuovere tutti i nastri arancioni attaccati ai componenti.
- Verwijder alle stukken oranje tape die zijn bevestigd aan de onderdelen.
- Usuń wszystkie fragmenty pomarańczowej taśmy przyklejone do części.
2
- スタンドレッグ L とスタンドレッグ R に付いている計 4 個のキャスターのロックがすべてオン
になっていることを確認します。
- Check that the locks on all 4 casters (2 each on stand leg L and stand leg R) are engaged.
- Vérifiez que le verrouillage des 4 roulettes (2 sur chaque jambe L du socle et jambe R du socle)
est enclenché.
- Revise que estén puestos los seguros de las 4 ruedas giratorias (2 en la pata del soporte L y 2
en la pata del soporte R).
- Verifique se os bloqueios das 4 rodas (2 na perna do suporte L e 2 na perna do suporte R) estão
ativados.
- Vergewissern Sie sich, dass die Sperren an allen 4 Rollen (jeweils 2 an Gestellbein-L und
Gestellbein-R) aktiviert sind.
- Assicurarsi che siano inseriti i blocchi su tutte e quattro le rotelle (due rotelle sulla gamba del
supporto L e due sulla gamba del supporto R).
- Controleer of de vergrendeling op alle 4 wielen (2 op de poot van de standaard L en 2 op de poot
van de standaard R) is vastgezet.
- Sprawdź, czy blokady na wszystkich czterech kółkach (po dwa kółka na nodze podstawki L i
nodze podstawki R) zostały włączone.
3
A
- スタンドレッグ L とスタンドレッグ R を、ロッド (A) が手前上側に向くように置きます。
- Place stand leg L and stand leg R so that the rods (A) are facing up and towards you.
- Placez la jambe L du socle et la jambe R du socle de telle manière que les tiges (A) soient
orientées vers le haut et vers vous.
- Coloque la pata del soporte L y la pata del soporte R de manera que las varillas (A) miren hacia
arriba y hacia usted.
- Posicione a perna do suporte L e a perna do suporte R de maneira que as hastes (A) estejam
voltadas para cima e para você.
- Platzieren Sie Gestellbein-L und Gestellbein-R so, dass die Stangen (A) nach oben und zu Ihnen
hin weisen.
- Posizionare la gamba del supporto L e la gamba del supporto R in modo che le aste (A) siano
rivolte verso l'alto e verso di sé.
- Plaats de poot van de standaard L en de poot van de standaard R zodanig dat de stangen (A)
naar boven wijzen en naar u toe zijn gericht.
- Ułóż nogę podstawki L i nogę podstawki R tak, aby pręty (A) były skierowane w górę i w stronę
osoby montującej.
注意 • スタンドは、必ず 2 人以上で組み立ててください。1 人で作業すると、けがの原因になったり、スタンドの歪みの原因になります。
Caution • Stand assembly requires 2 or more people. Assembling the Stand alone poses a risk of injury or accidental bending of the stand.
Attention • Le montage du socle demande au moins 2 personnes. L'assemblage du socle seul pose un risque de blessure ou de torsion accidentelle du
socle.
Precaución • El montaje del soporte requiere 2 o más personas. Si monta el soporte solo corre el riesgo de sufrir heridas o de dañar accidentalmente el
soporte.
Cuidado • A montagem do suporte requer 2 ou mais pessoas. Montar o suporte individualmente oferece risco de ferimento ou flexão acidental do
suporte.
Vorsicht • Der Aufbau des Gestells erfordert 2 oder mehr Personen. Wenn das Gestell von einer Person allein aufgebaut wird, besteht Verletzungsgefahr
oder führt dies zu versehentlicher Biegung des Gestells.
Avvertenza • L'assemblaggio del supporto richiede almeno 2 persone. Se si tenta di assemblare il supporto da soli ci si espone al rischio di infortunio o della
piegatura accidentale del supporto.
Let op • Voor het in elkaar zetten van de standaard zijn 2 mensen of meer nodig. Wanneer u de standaard alleen in elkaar zet, is er het risico dat u zich
bezeert wanneer de standaard per ongeluk wordt gebogen.
Przestroga • Do montażu podstawki potrzebne są dwie osoby lub więcej. Montowanie podstawki przez jedną osobę stwarza ryzyko kontuzji osoby
montującej lub wygięcia podstawki.
スタンドを組み立てる Montaje del soporte Assemblaggio del supporto
Assembling the Stand Montagem do suporte De standaard in elkaar zetten
Assemblage du socle Aufbau des Gestells Montaż podstawki
アクセサリポケットを取り付ける
4
4
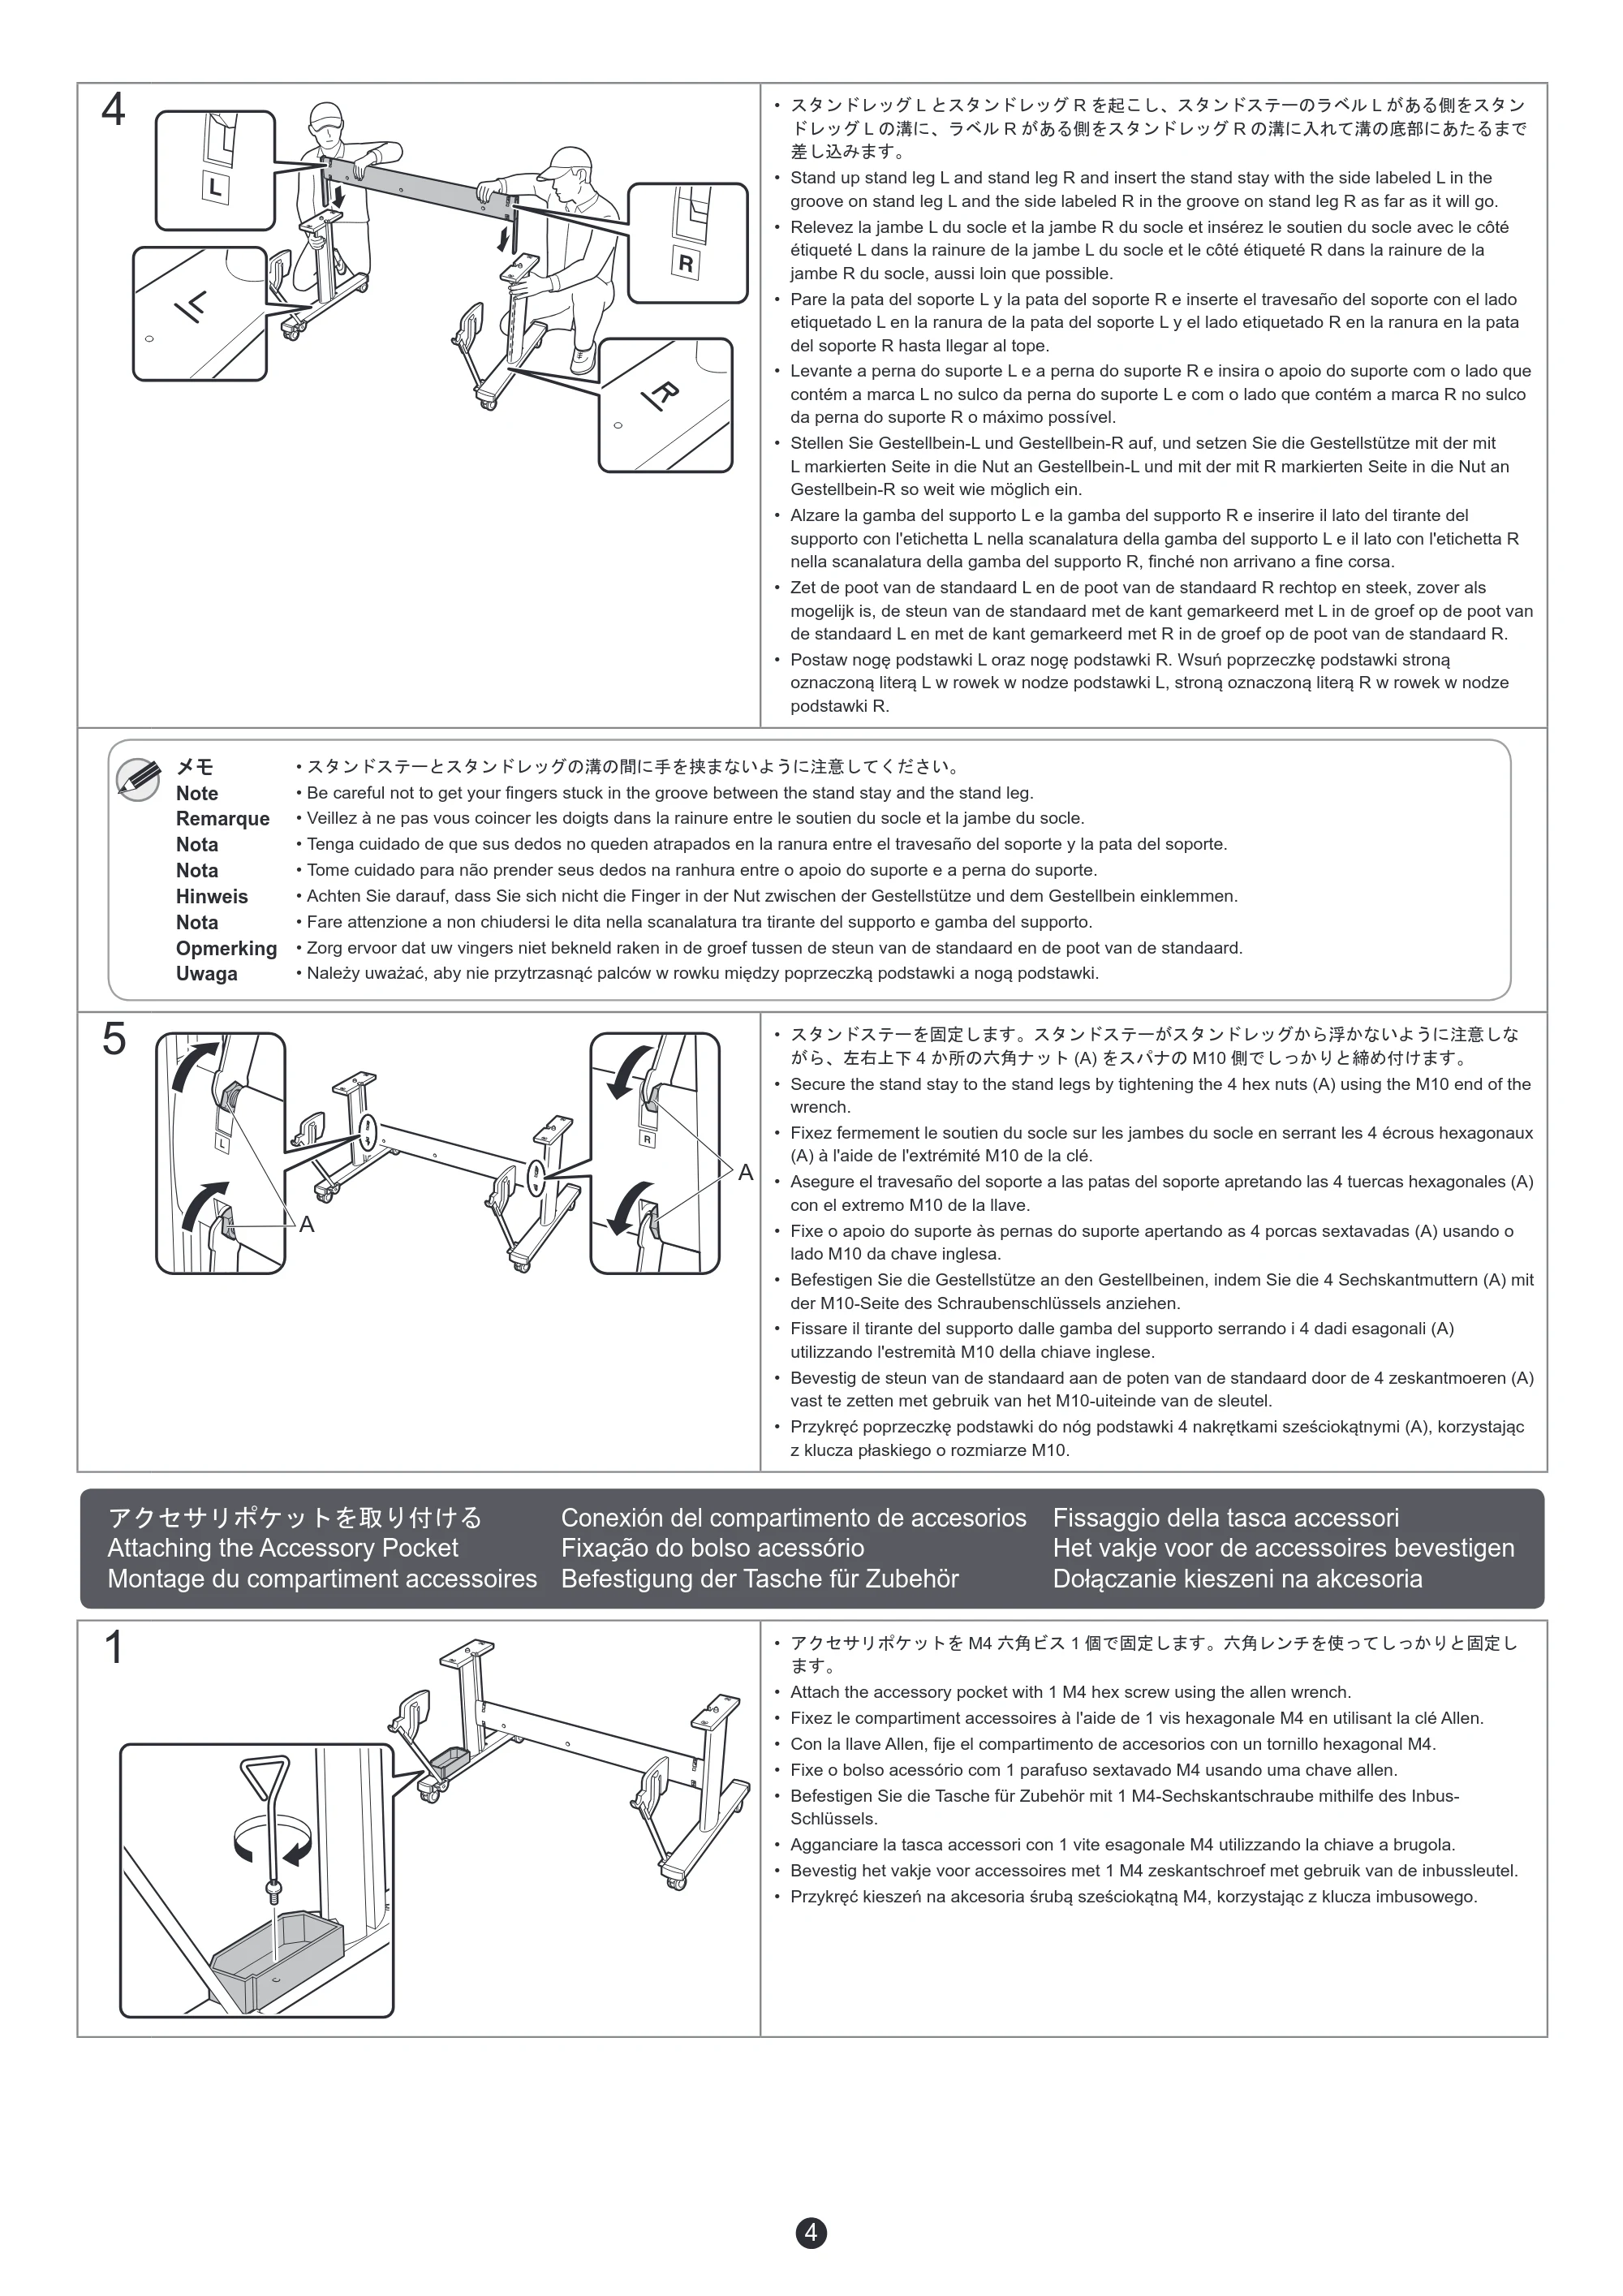
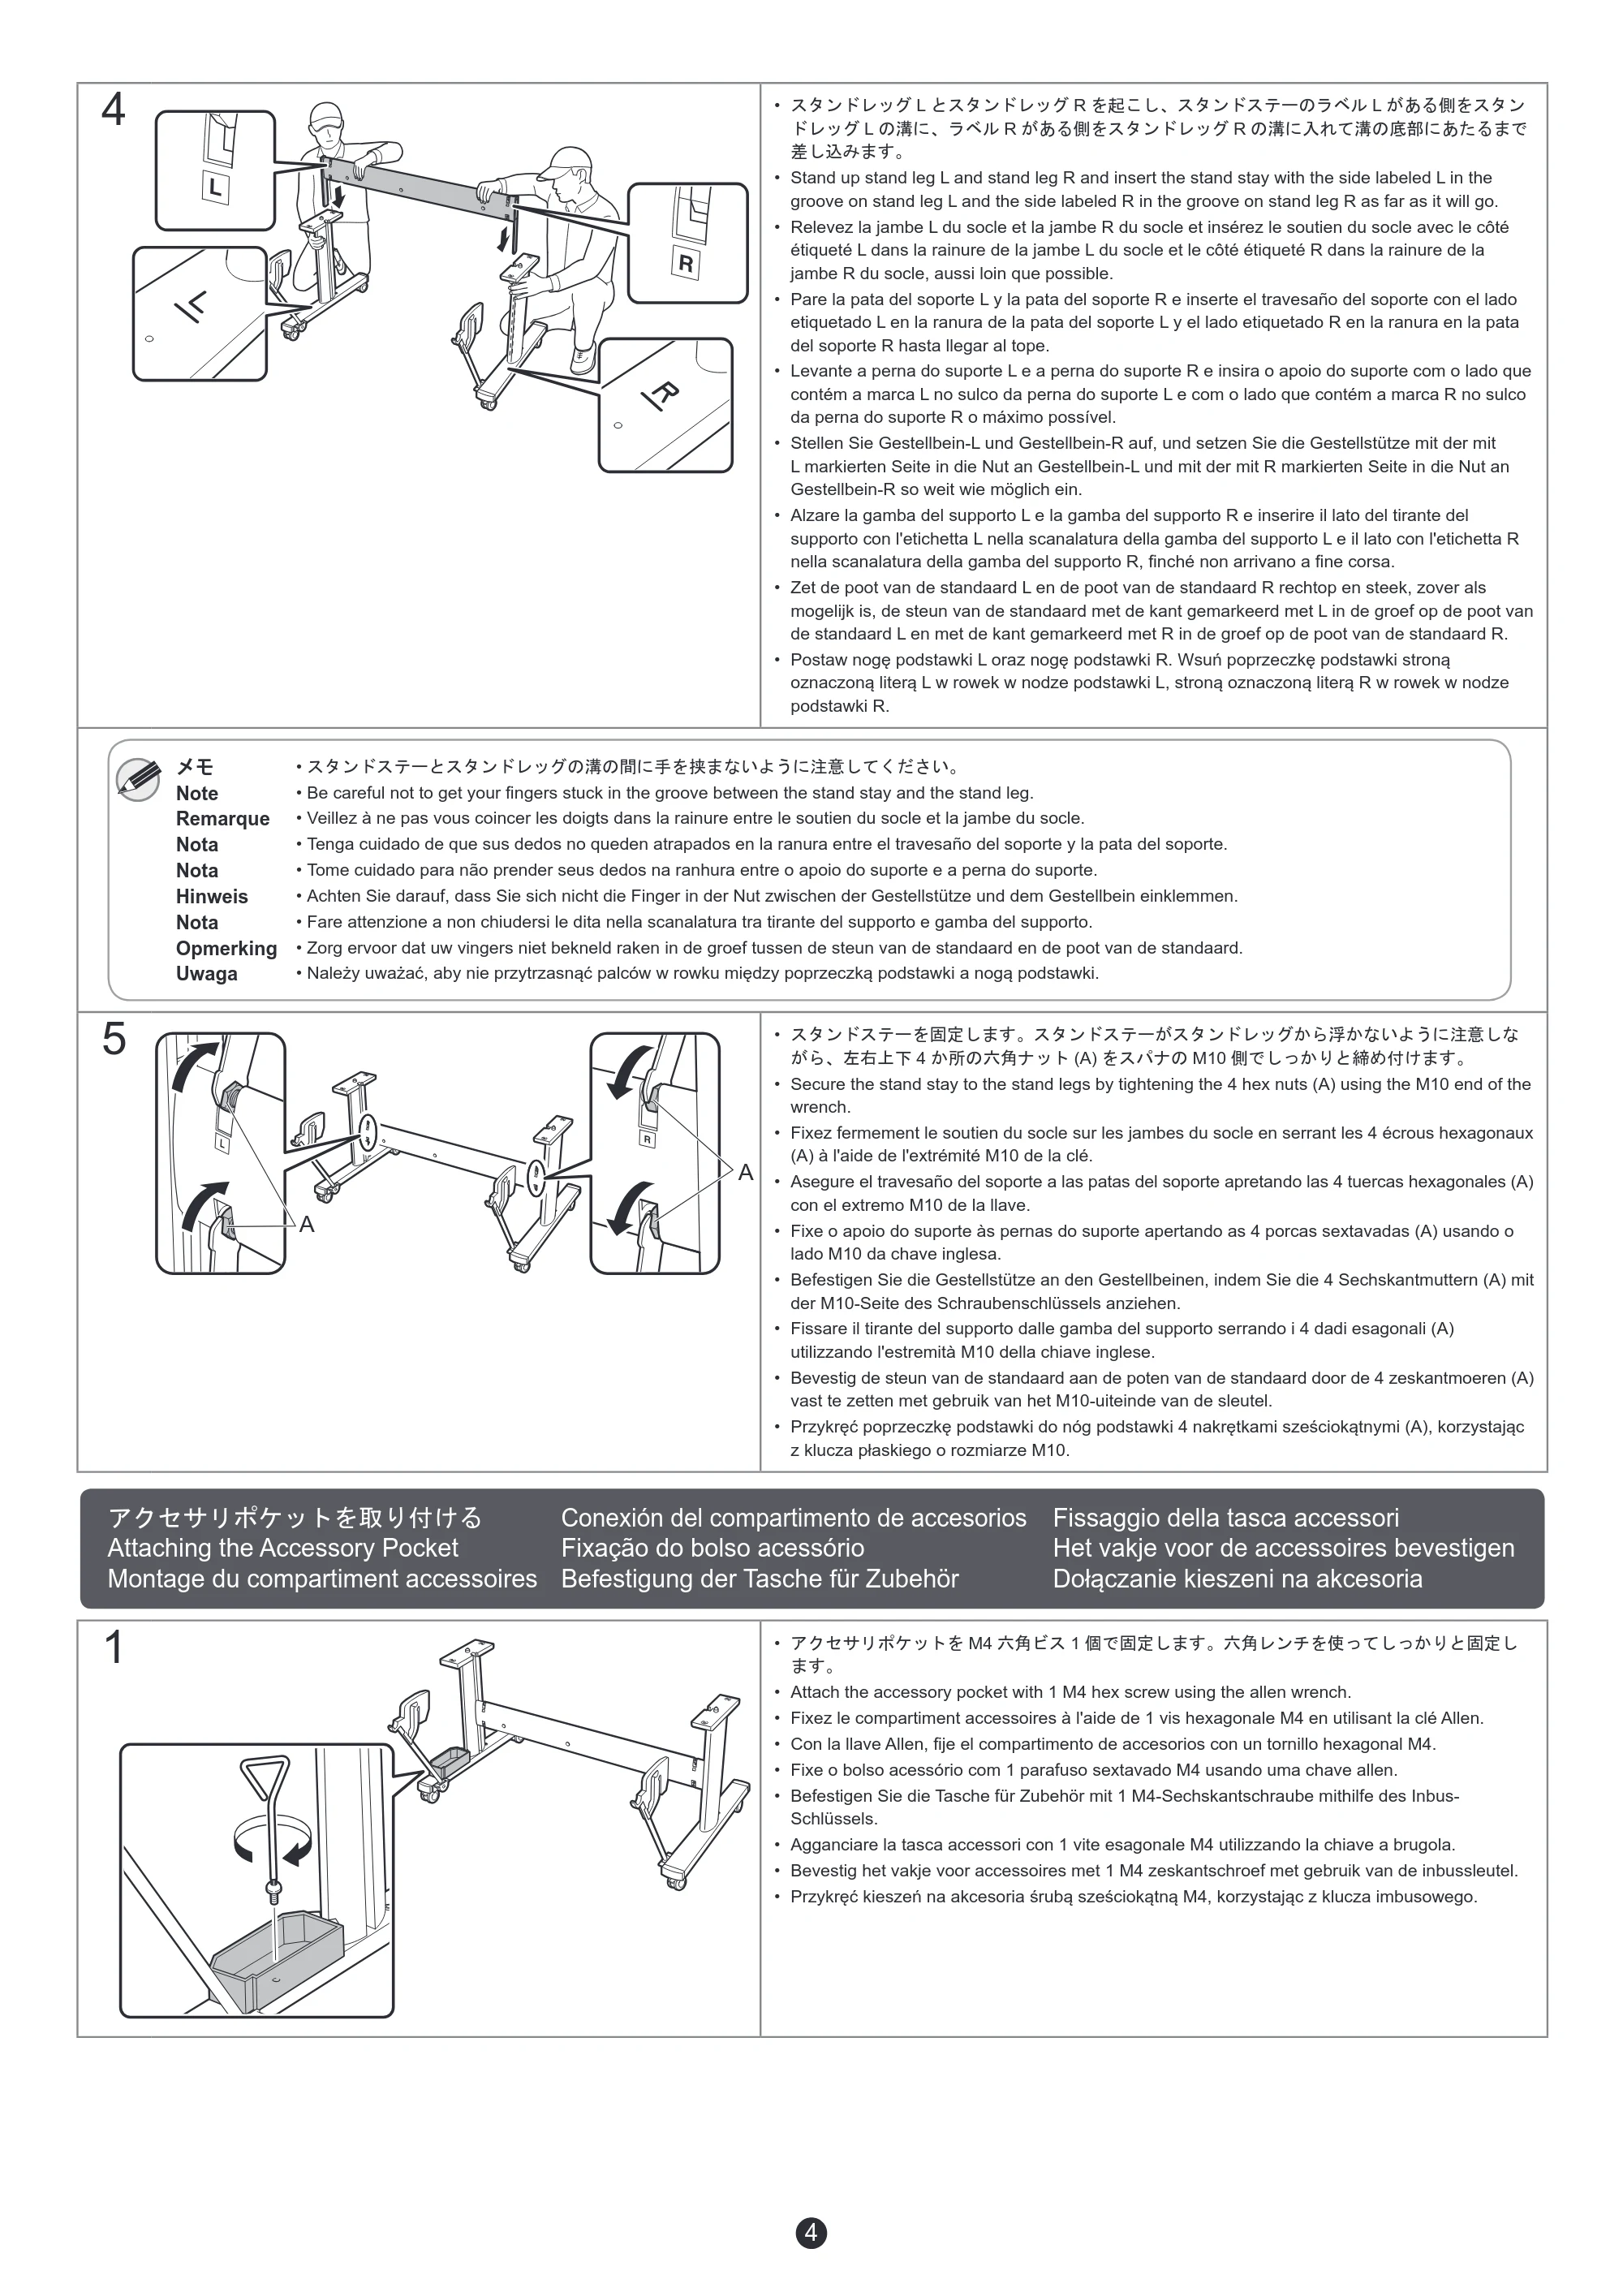
- スタンドレッグ L とスタンドレッグ R を起こし、スタンドステーのラベル L がある側をスタン
ドレッグ L の溝に、ラベル R がある側をスタンドレッグ R の溝に入れて溝の底部にあたるまで
差し込みます。
- Stand up stand leg L and stand leg R and insert the stand stay with the side labeled L in the
groove on stand leg L and the side labeled R in the groove on stand leg R as far as it will go.
- Relevez la jambe L du socle et la jambe R du socle et insérez le soutien du socle avec le côté
étiqueté L dans la rainure de la jambe L du socle et le côté étiqueté R dans la rainure de la
jambe R du socle, aussi loin que possible.
- Pare la pata del soporte L y la pata del soporte R e inserte el travesaño del soporte con el lado
etiquetado L en la ranura de la pata del soporte L y el lado etiquetado R en la ranura en la pata
del soporte R hasta llegar al tope.
- Levante a perna do suporte L e a perna do suporte R e insira o apoio do suporte com o lado que
contém a marca L no sulco da perna do suporte L e com o lado que contém a marca R no sulco
da perna do suporte R o máximo possível.
- Stellen Sie Gestellbein-L und Gestellbein-R auf, und setzen Sie die Gestellstütze mit der mit
L markierten Seite in die Nut an Gestellbein-L und mit der mit R markierten Seite in die Nut an
Gestellbein-R so weit wie möglich ein.
- Alzare la gamba del supporto L e la gamba del supporto R e inserire il lato del tirante del
supporto con l'etichetta L nella scanalatura della gamba del supporto L e il lato con l'etichetta R
nella scanalatura della gamba del supporto R, finché non arrivano a fine corsa.
- Zet de poot van de standaard L en de poot van de standaard R rechtop en steek, zover als
mogelijk is, de steun van de standaard met de kant gemarkeerd met L in de groef op de poot van
de standaard L en met de kant gemarkeerd met R in de groef op de poot van de standaard R.
- Postaw nogę podstawki L oraz nogę podstawki R. Wsuń poprzeczkę podstawki stroną
oznaczoną literą L w rowek w nodze podstawki L, stroną oznaczoną literą R w rowek w nodze
podstawki R.
メモ • スタンドステーとスタンドレッグの溝の間に手を挟まないように注意してください。
Note • Be careful not to get your fingers stuck in the groove between the stand stay and the stand leg.
Remarque • Veillez à ne pas vous coincer les doigts dans la rainure entre le soutien du socle et la jambe du socle.
Nota • Tenga cuidado de que sus dedos no queden atrapados en la ranura entre el travesaño del soporte y la pata del soporte.
Nota • Tome cuidado para não prender seus dedos na ranhura entre o apoio do suporte e a perna do suporte.
Hinweis • Achten Sie darauf, dass Sie sich nicht die Finger in der Nut zwischen der Gestellstütze und dem Gestellbein einklemmen.
Nota • Fare attenzione a non chiudersi le dita nella scanalatura tra tirante del supporto e gamba del supporto.
Opmerking • Zorg ervoor dat uw vingers niet bekneld raken in de groef tussen de steun van de standaard en de poot van de standaard.
Uwaga • Należy uważać, aby nie przytrzasnąć palców w rowku między poprzeczką podstawki a nogą podstawki.
5
A
A
- スタンドステーを固定します。スタンドステーがスタンドレッグから浮かないように注意しな
がら、左右上下 4 か所の六角ナット (A) をスパナの M10 側でしっかりと締め付けます。
- Secure the stand stay to the stand legs by tightening the 4 hex nuts (A) using the M10 end of the
wrench.
- Fixez fermement le soutien du socle sur les jambes du socle en serrant les 4 écrous hexagonaux
(A) à l'aide de l'extrémité M10 de la clé.
- Asegure el travesaño del soporte a las patas del soporte apretando las 4 tuercas hexagonales (A)
con el extremo M10 de la llave.
- Fixe o apoio do suporte às pernas do suporte apertando as 4 porcas sextavadas (A) usando o
lado M10 da chave inglesa.
- Befestigen Sie die Gestellstütze an den Gestellbeinen, indem Sie die 4 Sechskantmuttern (A) mit
der M10-Seite des Schraubenschlüssels anziehen.
- Fissare il tirante del supporto dalle gamba del supporto serrando i 4 dadi esagonali (A)
utilizzando l'estremità M10 della chiave inglese.
- Bevestig de steun van de standaard aan de poten van de standaard door de 4 zeskantmoeren (A)
vast te zetten met gebruik van het M10-uiteinde van de sleutel.
- Przykręć poprzeczkę podstawki do nóg podstawki 4 nakrętkami sześciokątnymi (A), korzystając
z klucza płaskiego o rozmiarze M10.
アクセサリポケットを取り付ける Conexión del compartimento de accesorios Fissaggio della tasca accessori
Attaching the Accessory Pocket Fixação do bolso acessório Het vakje voor de accessoires bevestigen
Montage du compartiment accessoires Befestigung der Tasche für Zubehör Dołączanie kieszeni na akcesoria
1
- アクセサリポケットを M4 六角ビス 1 個で固定します。六角レンチを使ってしっかりと固定し
ます。
- Attach the accessory pocket with 1 M4 hex screw using the allen wrench.
- Fixez le compartiment accessoires à l'aide de 1 vis hexagonale M4 en utilisant la clé Allen.
- Con la llave Allen, fije el compartimento de accesorios con un tornillo hexagonal M4.
- Fixe o bolso acessório com 1 parafuso sextavado M4 usando uma chave allen.
- Befestigen Sie die Tasche für Zubehör mit 1 M4-Sechskantschraube mithilfe des Inbus-
Schlüssels.
- Agganciare la tasca accessori con 1 vite esagonale M4 utilizzando la chiave a brugola.
- Bevestig het vakje voor accessoires met 1 M4 zeskantschroef met gebruik van de inbussleutel.
- Przykręć kieszeń na akcesoria śrubą sześciokątną M4, korzystając z klucza imbusowego.
バスケットを取り付ける
5
バスケットを取り付ける Conexión de la cesta Fissaggio del raccoglitore
Attaching the Basket Fixação da cesta De opvangmand bevestigen
Montage du panier Befestigung des Korbs Dołączanie kosza
- スタンドレッグの形状を見て、それぞれのページに進みます
- Check which type of stand leg is used with the product.
- Vérifiez le type de jambe de socle utilisé avec le produit.
- Verifique qué tipo de pata del soporte se utiliza con el producto.
- Verifique que tipo de perna do suporte é usado com o produto.
- Überprüfen Sie, welcher Gestellbeintyp mit dem Produkt verwendet wird.
- Controllare il tipo di gamba del supporto utilizzata con il prodotto.
- Controleer welk type poot van de standaard wordt gebruikt in combinatie met
het product.
- Sprawdź, jakiego rodzaju noga podstawki jest używana.
SD-32 / SD-23 ► P.5 SD-31 / SD-22 ► P.9
■ SD-32 / SD-23
1
B C
A
D
E
F
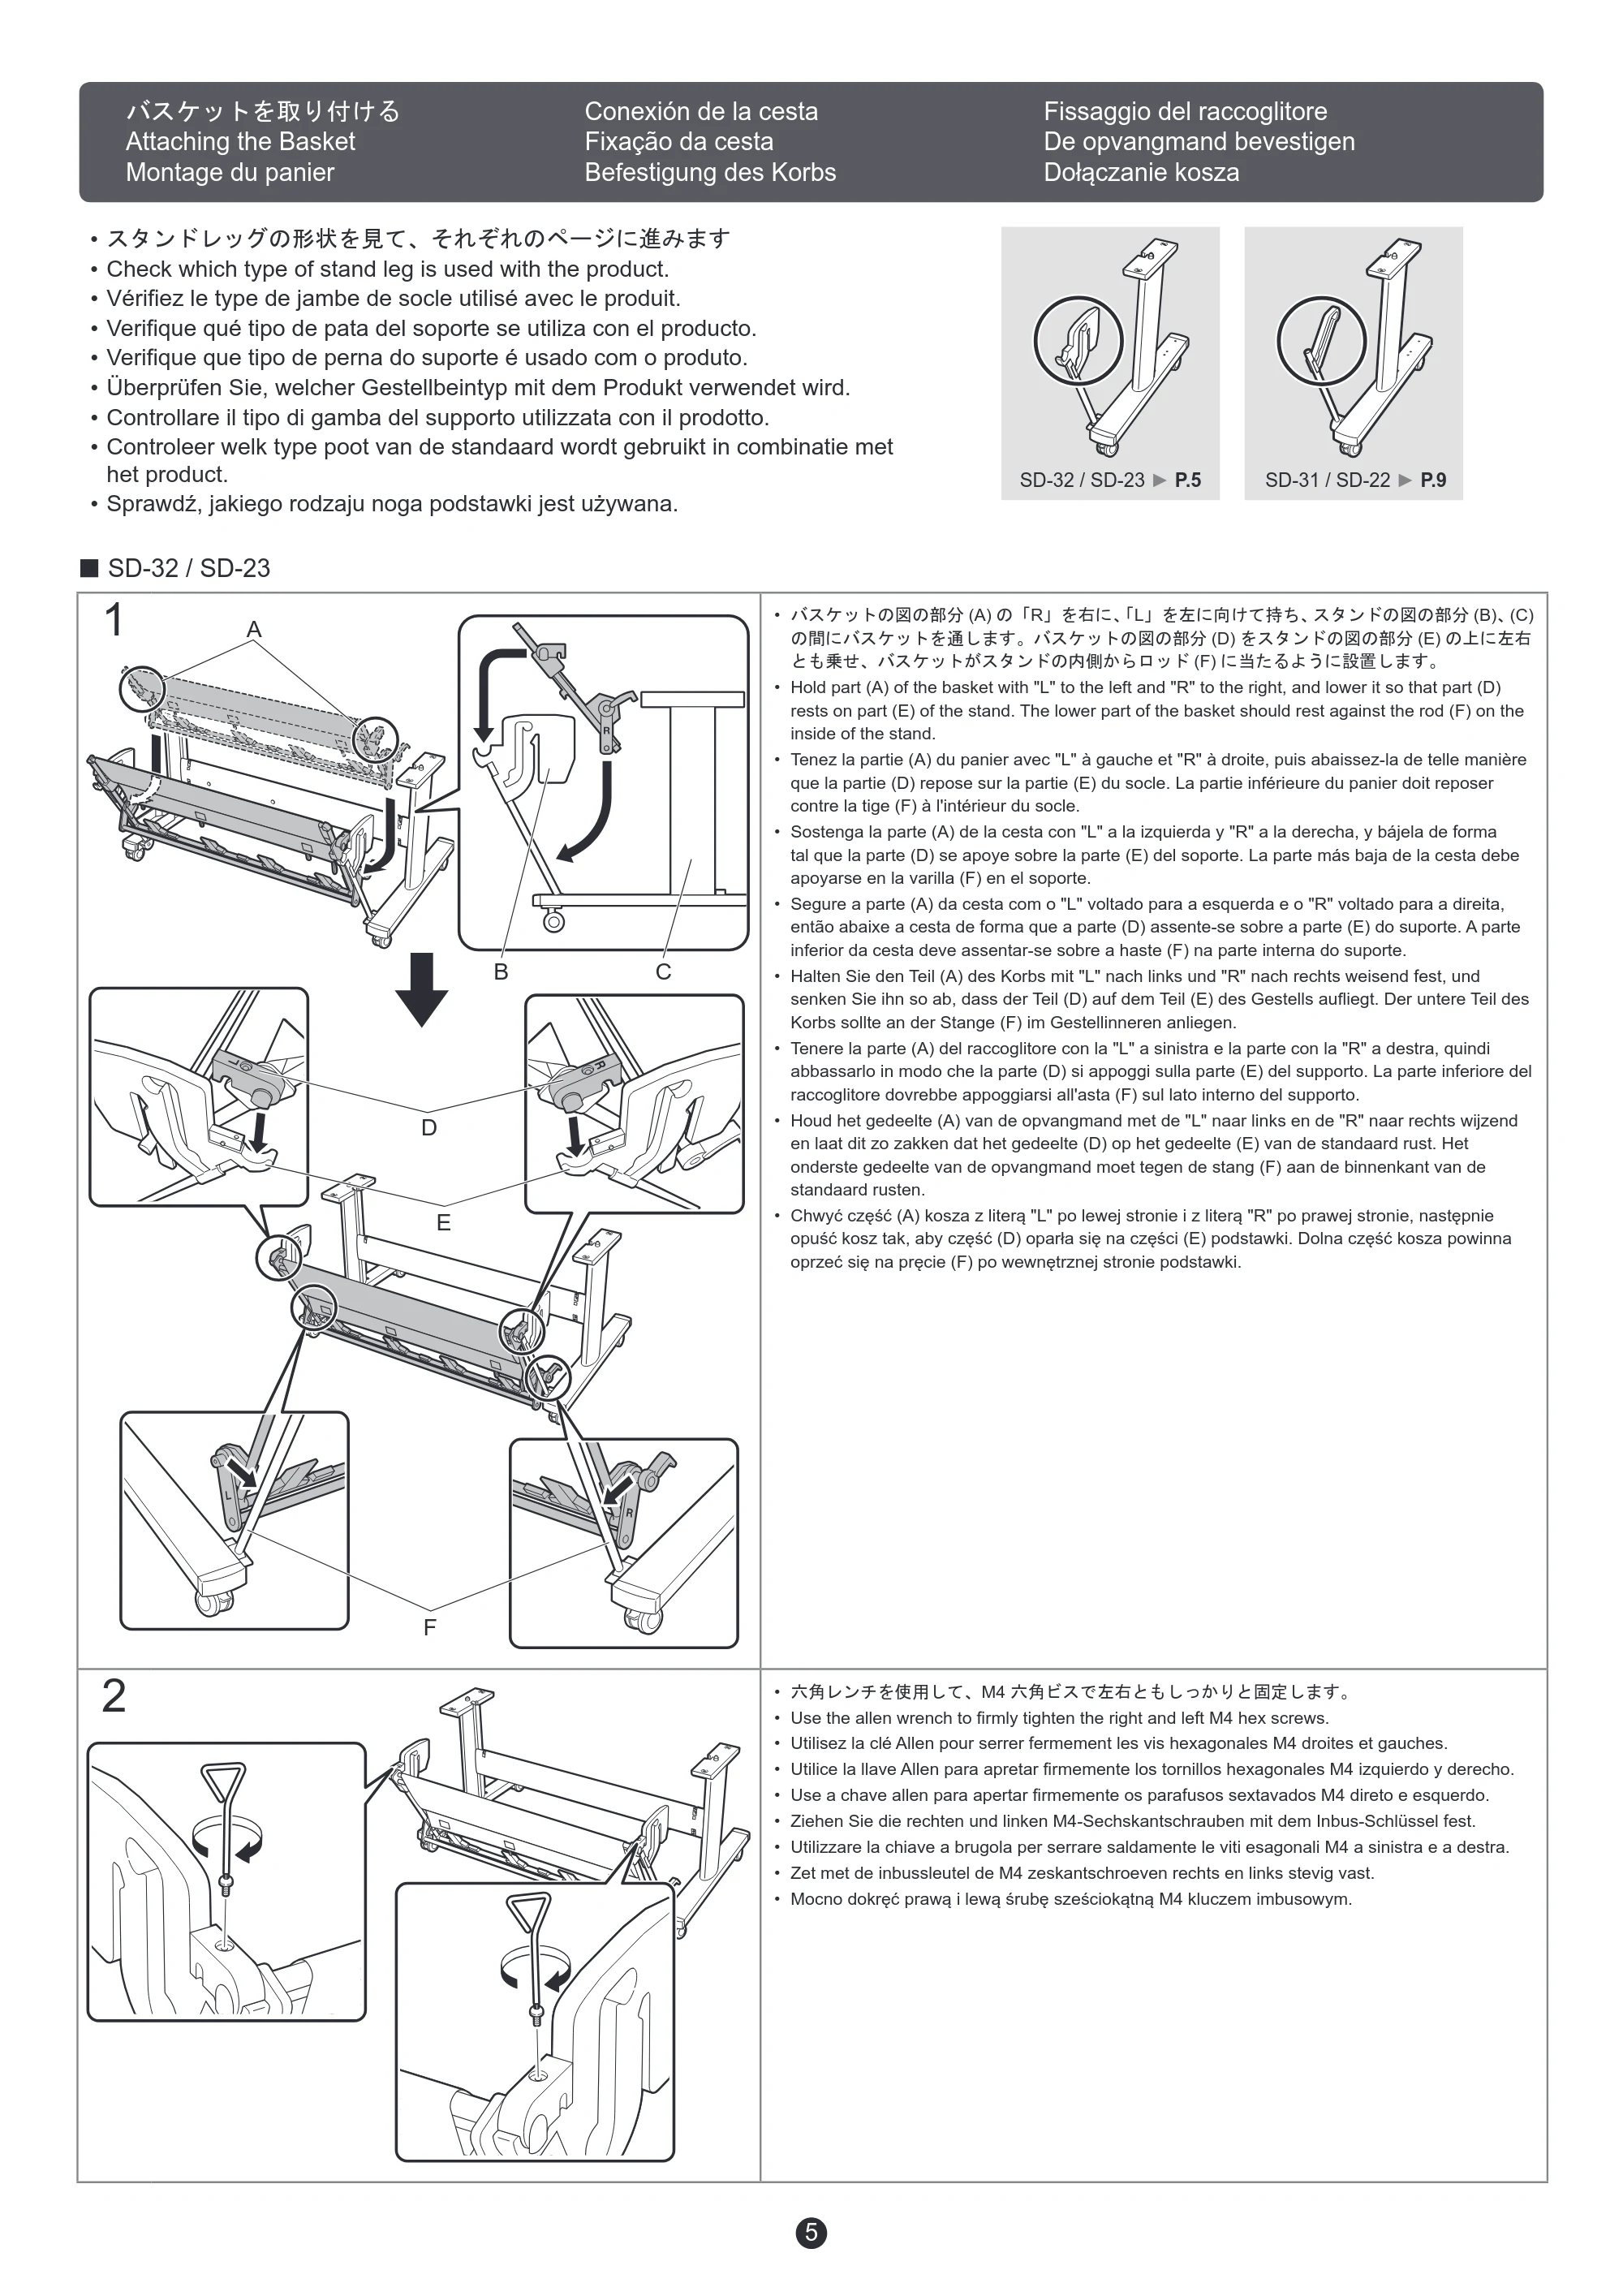
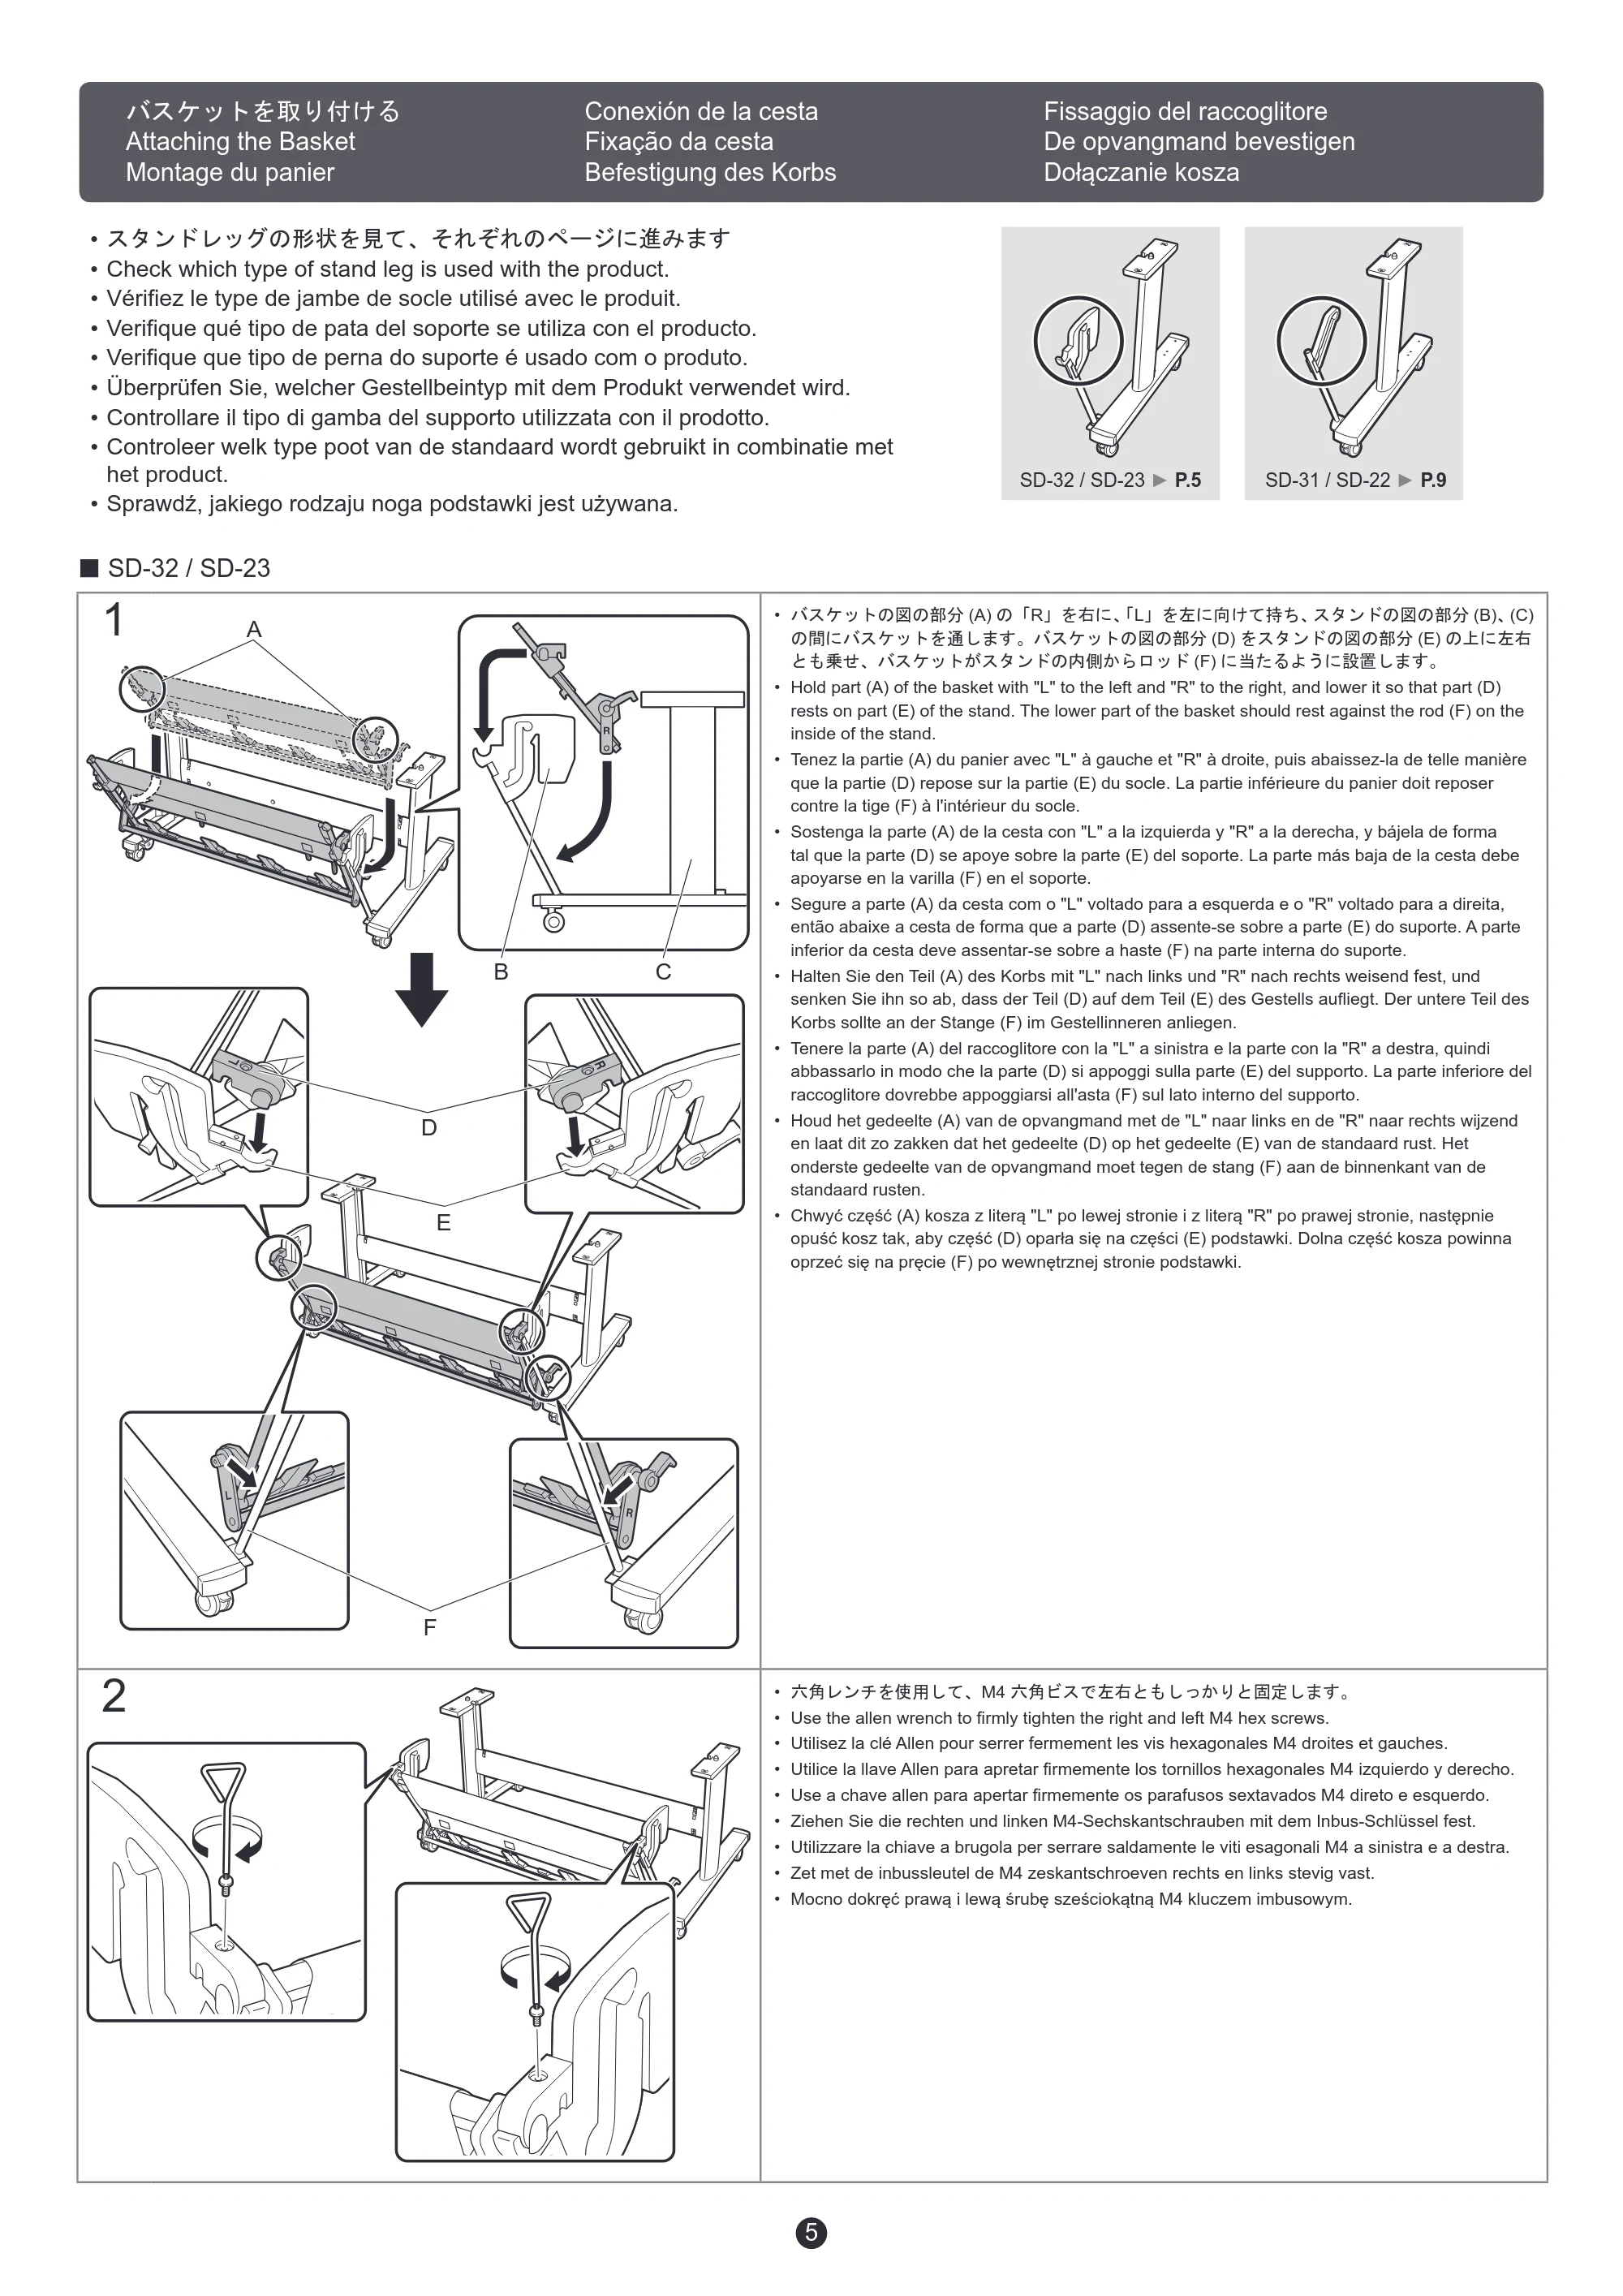
- バスケットの図の部分 (A) の「R」を右に、「L」を左に向けて持ち、スタンドの図の部分 (B)、(C)
の間にバスケットを通します。バスケットの図の部分 (D) をスタンドの図の部分 (E) の上に左右
とも乗せ、バスケットがスタンドの内側からロッド (F) に当たるように設置します。
- Hold part (A) of the basket with "L" to the left and "R" to the right, and lower it so that part (D)
rests on part (E) of the stand. The lower part of the basket should rest against the rod (F) on the
inside of the stand.
- Tenez la partie (A) du panier avec "L" à gauche et "R" à droite, puis abaissez-la de telle manière
que la partie (D) repose sur la partie (E) du socle. La partie inférieure du panier doit reposer
contre la tige (F) à l'intérieur du socle.
- Sostenga la parte (A) de la cesta con "L" a la izquierda y "R" a la derecha, y bájela de forma
tal que la parte (D) se apoye sobre la parte (E) del soporte. La parte más baja de la cesta debe
apoyarse en la varilla (F) en el soporte.
- Segure a parte (A) da cesta com o "L" voltado para a esquerda e o "R" voltado para a direita,
então abaixe a cesta de forma que a parte (D) assente-se sobre a parte (E) do suporte. A parte
inferior da cesta deve assentar-se sobre a haste (F) na parte interna do suporte.
- Halten Sie den Teil (A) des Korbs mit "L" nach links und "R" nach rechts weisend fest, und
senken Sie ihn so ab, dass der Teil (D) auf dem Teil (E) des Gestells aufliegt. Der untere Teil des
Korbs sollte an der Stange (F) im Gestellinneren anliegen.
- Tenere la parte (A) del raccoglitore con la "L" a sinistra e la parte con la "R" a destra, quindi
abbassarlo in modo che la parte (D) si appoggi sulla parte (E) del supporto. La parte inferiore del
raccoglitore dovrebbe appoggiarsi all'asta (F) sul lato interno del supporto.
- Houd het gedeelte (A) van de opvangmand met de "L" naar links en de "R" naar rechts wijzend
en laat dit zo zakken dat het gedeelte (D) op het gedeelte (E) van de standaard rust. Het
onderste gedeelte van de opvangmand moet tegen de stang (F) aan de binnenkant van de
standaard rusten.
- Chwyć część (A) kosza z literą "L" po lewej stronie i z literą "R" po prawej stronie, następnie
opuść kosz tak, aby część (D) oparła się na części (E) podstawki. Dolna część kosza powinna
oprzeć się na pręcie (F) po wewnętrznej stronie podstawki.
2
- 六角レンチを使用して、M4 六角ビスで左右ともしっかりと固定します。
- Use the allen wrench to firmly tighten the right and left M4 hex screws.
- Utilisez la clé Allen pour serrer fermement les vis hexagonales M4 droites et gauches.
- Utilice la llave Allen para apretar firmemente los tornillos hexagonales M4 izquierdo y derecho.
- Use a chave allen para apertar firmemente os parafusos sextavados M4 direto e esquerdo.
- Ziehen Sie die rechten und linken M4-Sechskantschrauben mit dem Inbus-Schlüssel fest.
- Utilizzare la chiave a brugola per serrare saldamente le viti esagonali M4 a sinistra e a destra.
- Zet met de inbussleutel de M4 zeskantschroeven rechts en links stevig vast.
- Mocno dokręć prawą i lewą śrubę sześciokątną M4 kluczem imbusowym.
7ページ
6
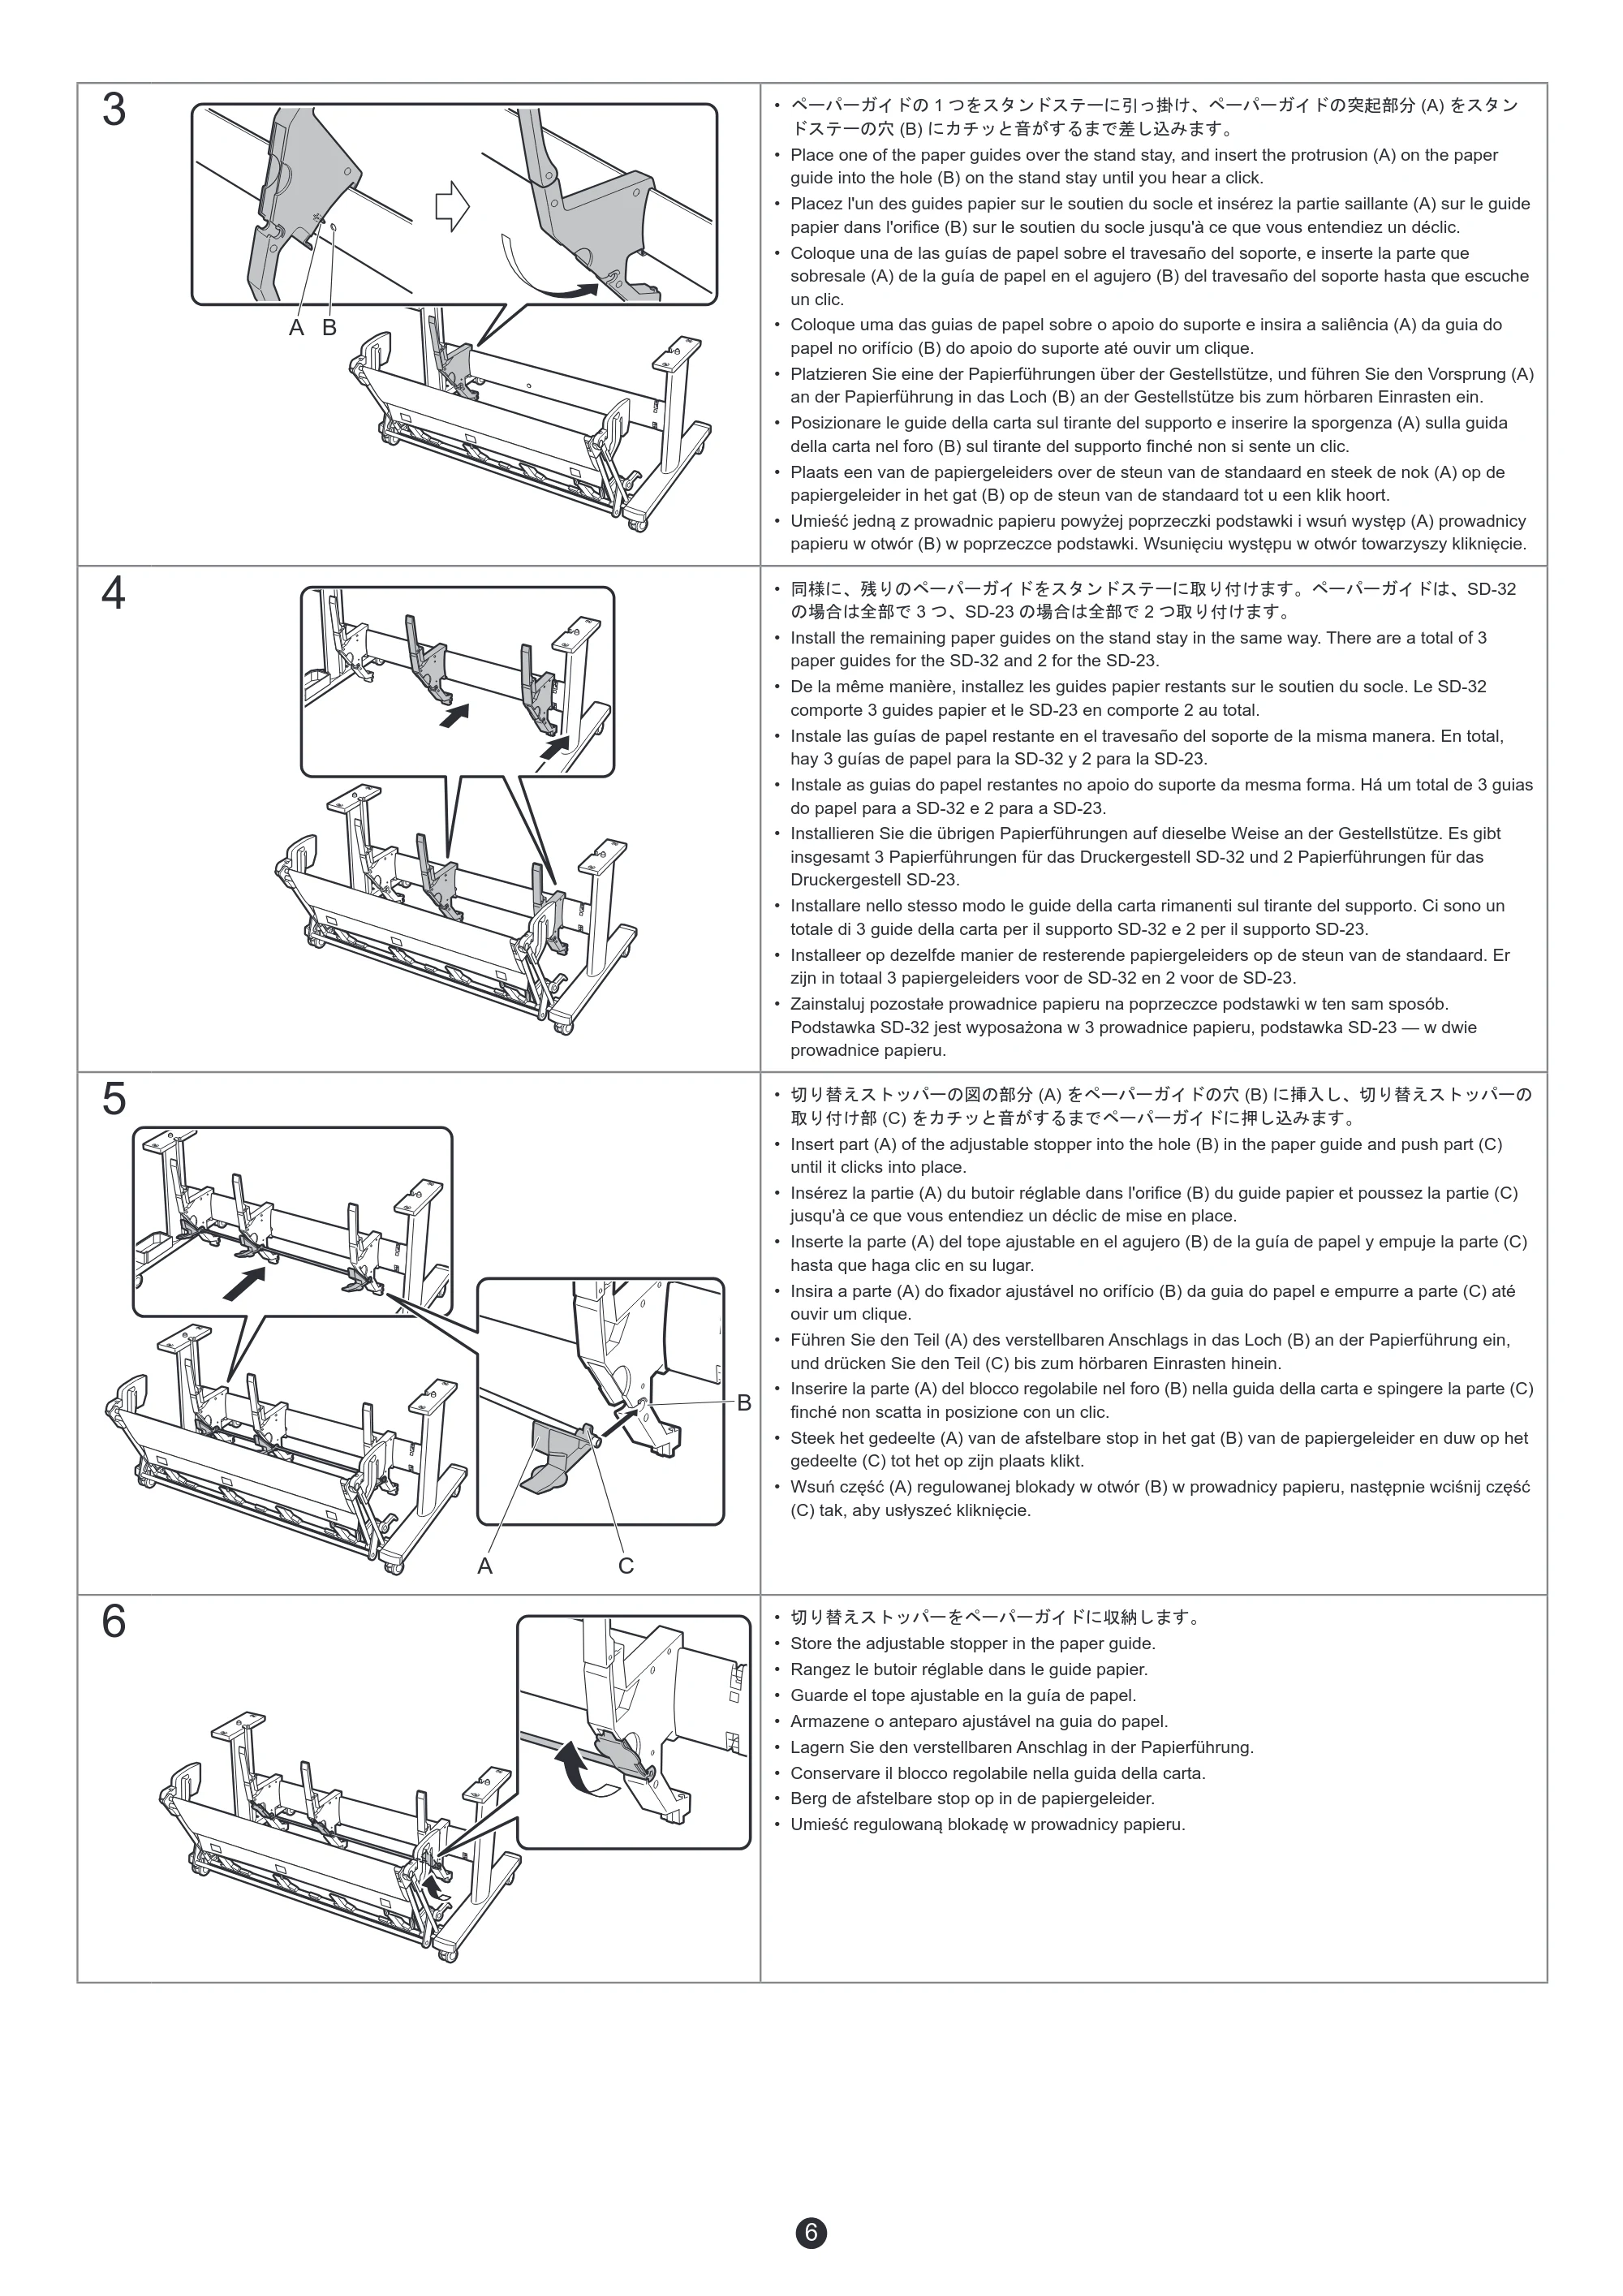
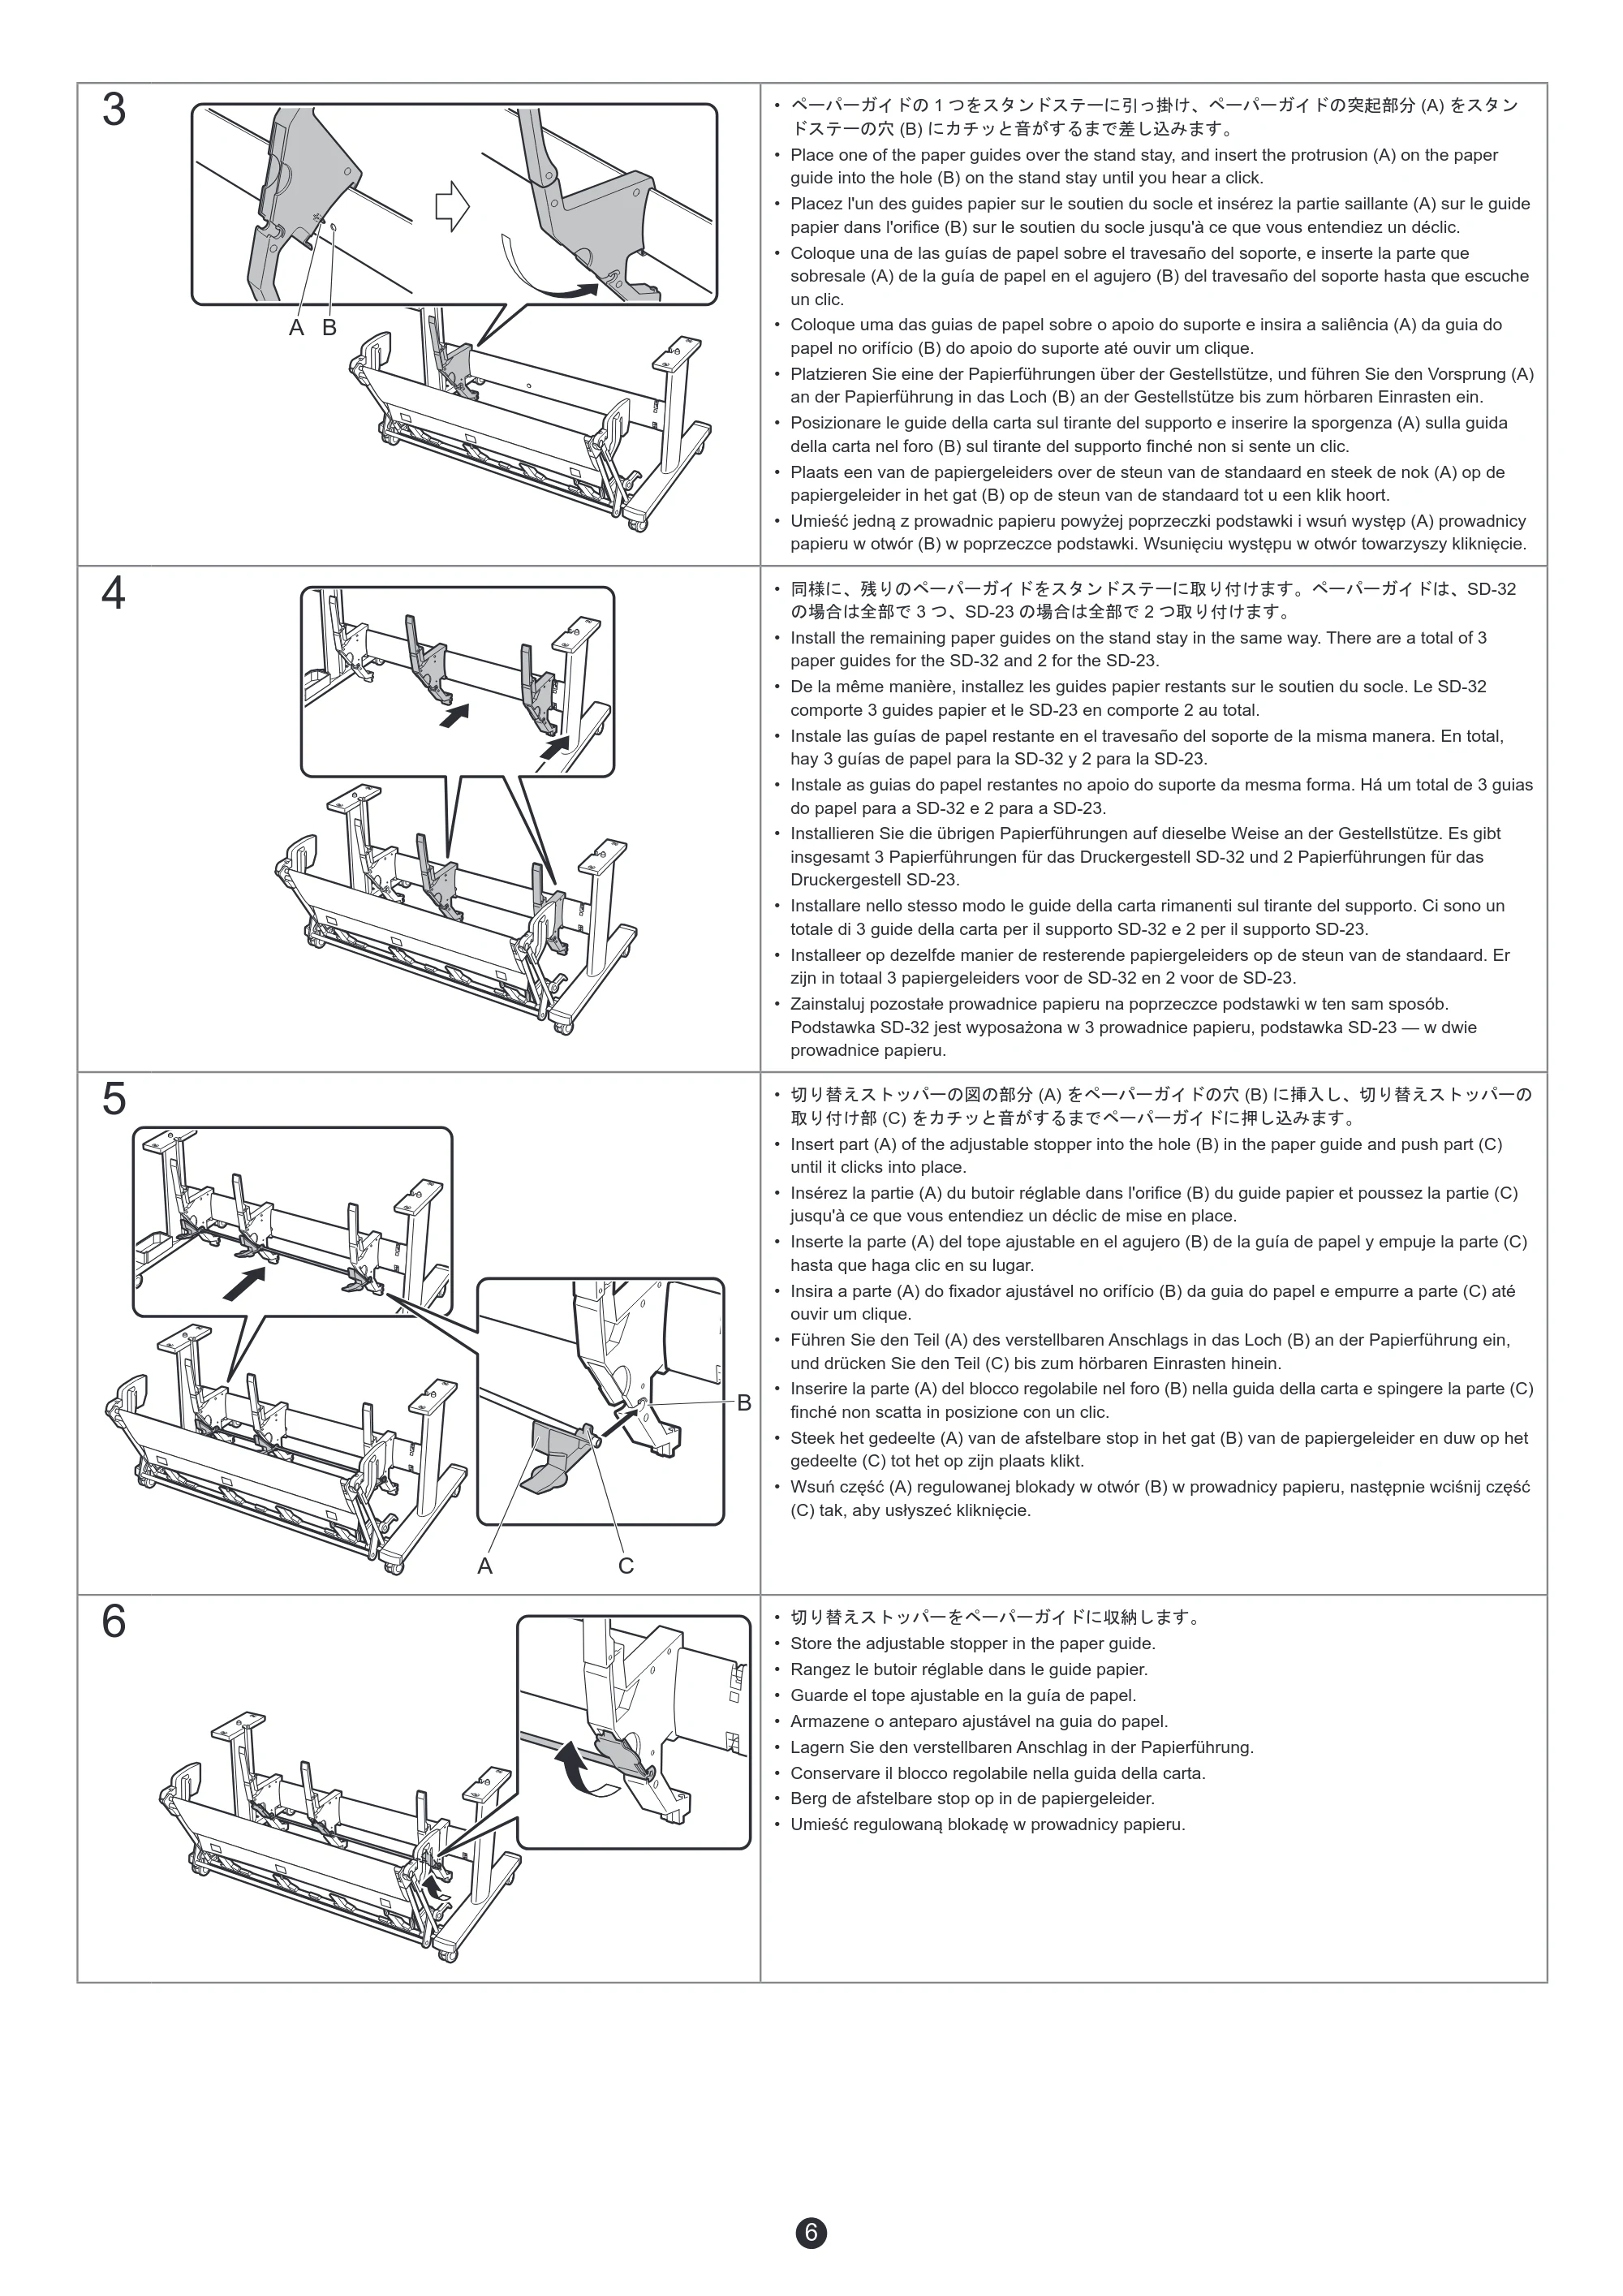
3
A B
- ペーパーガイドの 1 つをスタンドステーに引っ掛け、ペーパーガイドの突起部分 (A) をスタン
ドステーの穴 (B) にカチッと音がするまで差し込みます。
- Place one of the paper guides over the stand stay, and insert the protrusion (A) on the paper
guide into the hole (B) on the stand stay until you hear a click.
- Placez l'un des guides papier sur le soutien du socle et insérez la partie saillante (A) sur le guide
papier dans l'orifice (B) sur le soutien du socle jusqu'à ce que vous entendiez un déclic.
- Coloque una de las guías de papel sobre el travesaño del soporte, e inserte la parte que
sobresale (A) de la guía de papel en el agujero (B) del travesaño del soporte hasta que escuche
un clic.
- Coloque uma das guias de papel sobre o apoio do suporte e insira a saliência (A) da guia do
papel no orifício (B) do apoio do suporte até ouvir um clique.
- Platzieren Sie eine der Papierführungen über der Gestellstütze, und führen Sie den Vorsprung (A)
an der Papierführung in das Loch (B) an der Gestellstütze bis zum hörbaren Einrasten ein.
- Posizionare le guide della carta sul tirante del supporto e inserire la sporgenza (A) sulla guida
della carta nel foro (B) sul tirante del supporto finché non si sente un clic.
- Plaats een van de papiergeleiders over de steun van de standaard en steek de nok (A) op de
papiergeleider in het gat (B) op de steun van de standaard tot u een klik hoort.
- Umieść jedną z prowadnic papieru powyżej poprzeczki podstawki i wsuń występ (A) prowadnicy
papieru w otwór (B) w poprzeczce podstawki. Wsunięciu występu w otwór towarzyszy kliknięcie.
4
- 同様に、残りのペーパーガイドをスタンドステーに取り付けます。ペーパーガイドは、SD-32
の場合は全部で 3 つ、SD-23 の場合は全部で 2 つ取り付けます。
- Install the remaining paper guides on the stand stay in the same way. There are a total of 3
paper guides for the SD-32 and 2 for the SD-23.
- De la même manière, installez les guides papier restants sur le soutien du socle. Le SD-32
comporte 3 guides papier et le SD-23 en comporte 2 au total.
- Instale las guías de papel restante en el travesaño del soporte de la misma manera. En total,
hay 3 guías de papel para la SD-32 y 2 para la SD-23.
- Instale as guias do papel restantes no apoio do suporte da mesma forma. Há um total de 3 guias
do papel para a SD-32 e 2 para a SD-23.
- Installieren Sie die übrigen Papierführungen auf dieselbe Weise an der Gestellstütze. Es gibt
insgesamt 3 Papierführungen für das Druckergestell SD-32 und 2 Papierführungen für das
Druckergestell SD-23.
- Installare nello stesso modo le guide della carta rimanenti sul tirante del supporto. Ci sono un
totale di 3 guide della carta per il supporto SD-32 e 2 per il supporto SD-23.
- Installeer op dezelfde manier de resterende papiergeleiders op de steun van de standaard. Er
zijn in totaal 3 papiergeleiders voor de SD-32 en 2 voor de SD-23.
- Zainstaluj pozostałe prowadnice papieru na poprzeczce podstawki w ten sam sposób.
Podstawka SD-32 jest wyposażona w 3 prowadnice papieru, podstawka SD-23 — w dwie
prowadnice papieru.
5
B
A C
- 切り替えストッパーの図の部分 (A) をペーパーガイドの穴 (B) に挿入し、切り替えストッパーの
取り付け部 (C) をカチッと音がするまでペーパーガイドに押し込みます。
- Insert part (A) of the adjustable stopper into the hole (B) in the paper guide and push part (C)
until it clicks into place.
- Insérez la partie (A) du butoir réglable dans l'orifice (B) du guide papier et poussez la partie (C)
jusqu'à ce que vous entendiez un déclic de mise en place.
- Inserte la parte (A) del tope ajustable en el agujero (B) de la guía de papel y empuje la parte (C)
hasta que haga clic en su lugar.
- Insira a parte (A) do fixador ajustável no orifício (B) da guia do papel e empurre a parte (C) até
ouvir um clique.
- Führen Sie den Teil (A) des verstellbaren Anschlags in das Loch (B) an der Papierführung ein,
und drücken Sie den Teil (C) bis zum hörbaren Einrasten hinein.
- Inserire la parte (A) del blocco regolabile nel foro (B) nella guida della carta e spingere la parte (C)
finché non scatta in posizione con un clic.
- Steek het gedeelte (A) van de afstelbare stop in het gat (B) van de papiergeleider en duw op het
gedeelte (C) tot het op zijn plaats klikt.
- Wsuń część (A) regulowanej blokady w otwór (B) w prowadnicy papieru, następnie wciśnij część
(C) tak, aby usłyszeć kliknięcie.
6
- 切り替えストッパーをペーパーガイドに収納します。
- Store the adjustable stopper in the paper guide.
- Rangez le butoir réglable dans le guide papier.
- Guarde el tope ajustable en la guía de papel.
- Armazene o anteparo ajustável na guia do papel.
- Lagern Sie den verstellbaren Anschlag in der Papierführung.
- Conservare il blocco regolabile nella guida della carta.
- Berg de afstelbare stop op in de papiergeleider.
- Umieść regulowaną blokadę w prowadnicy papieru.
8ページ
7
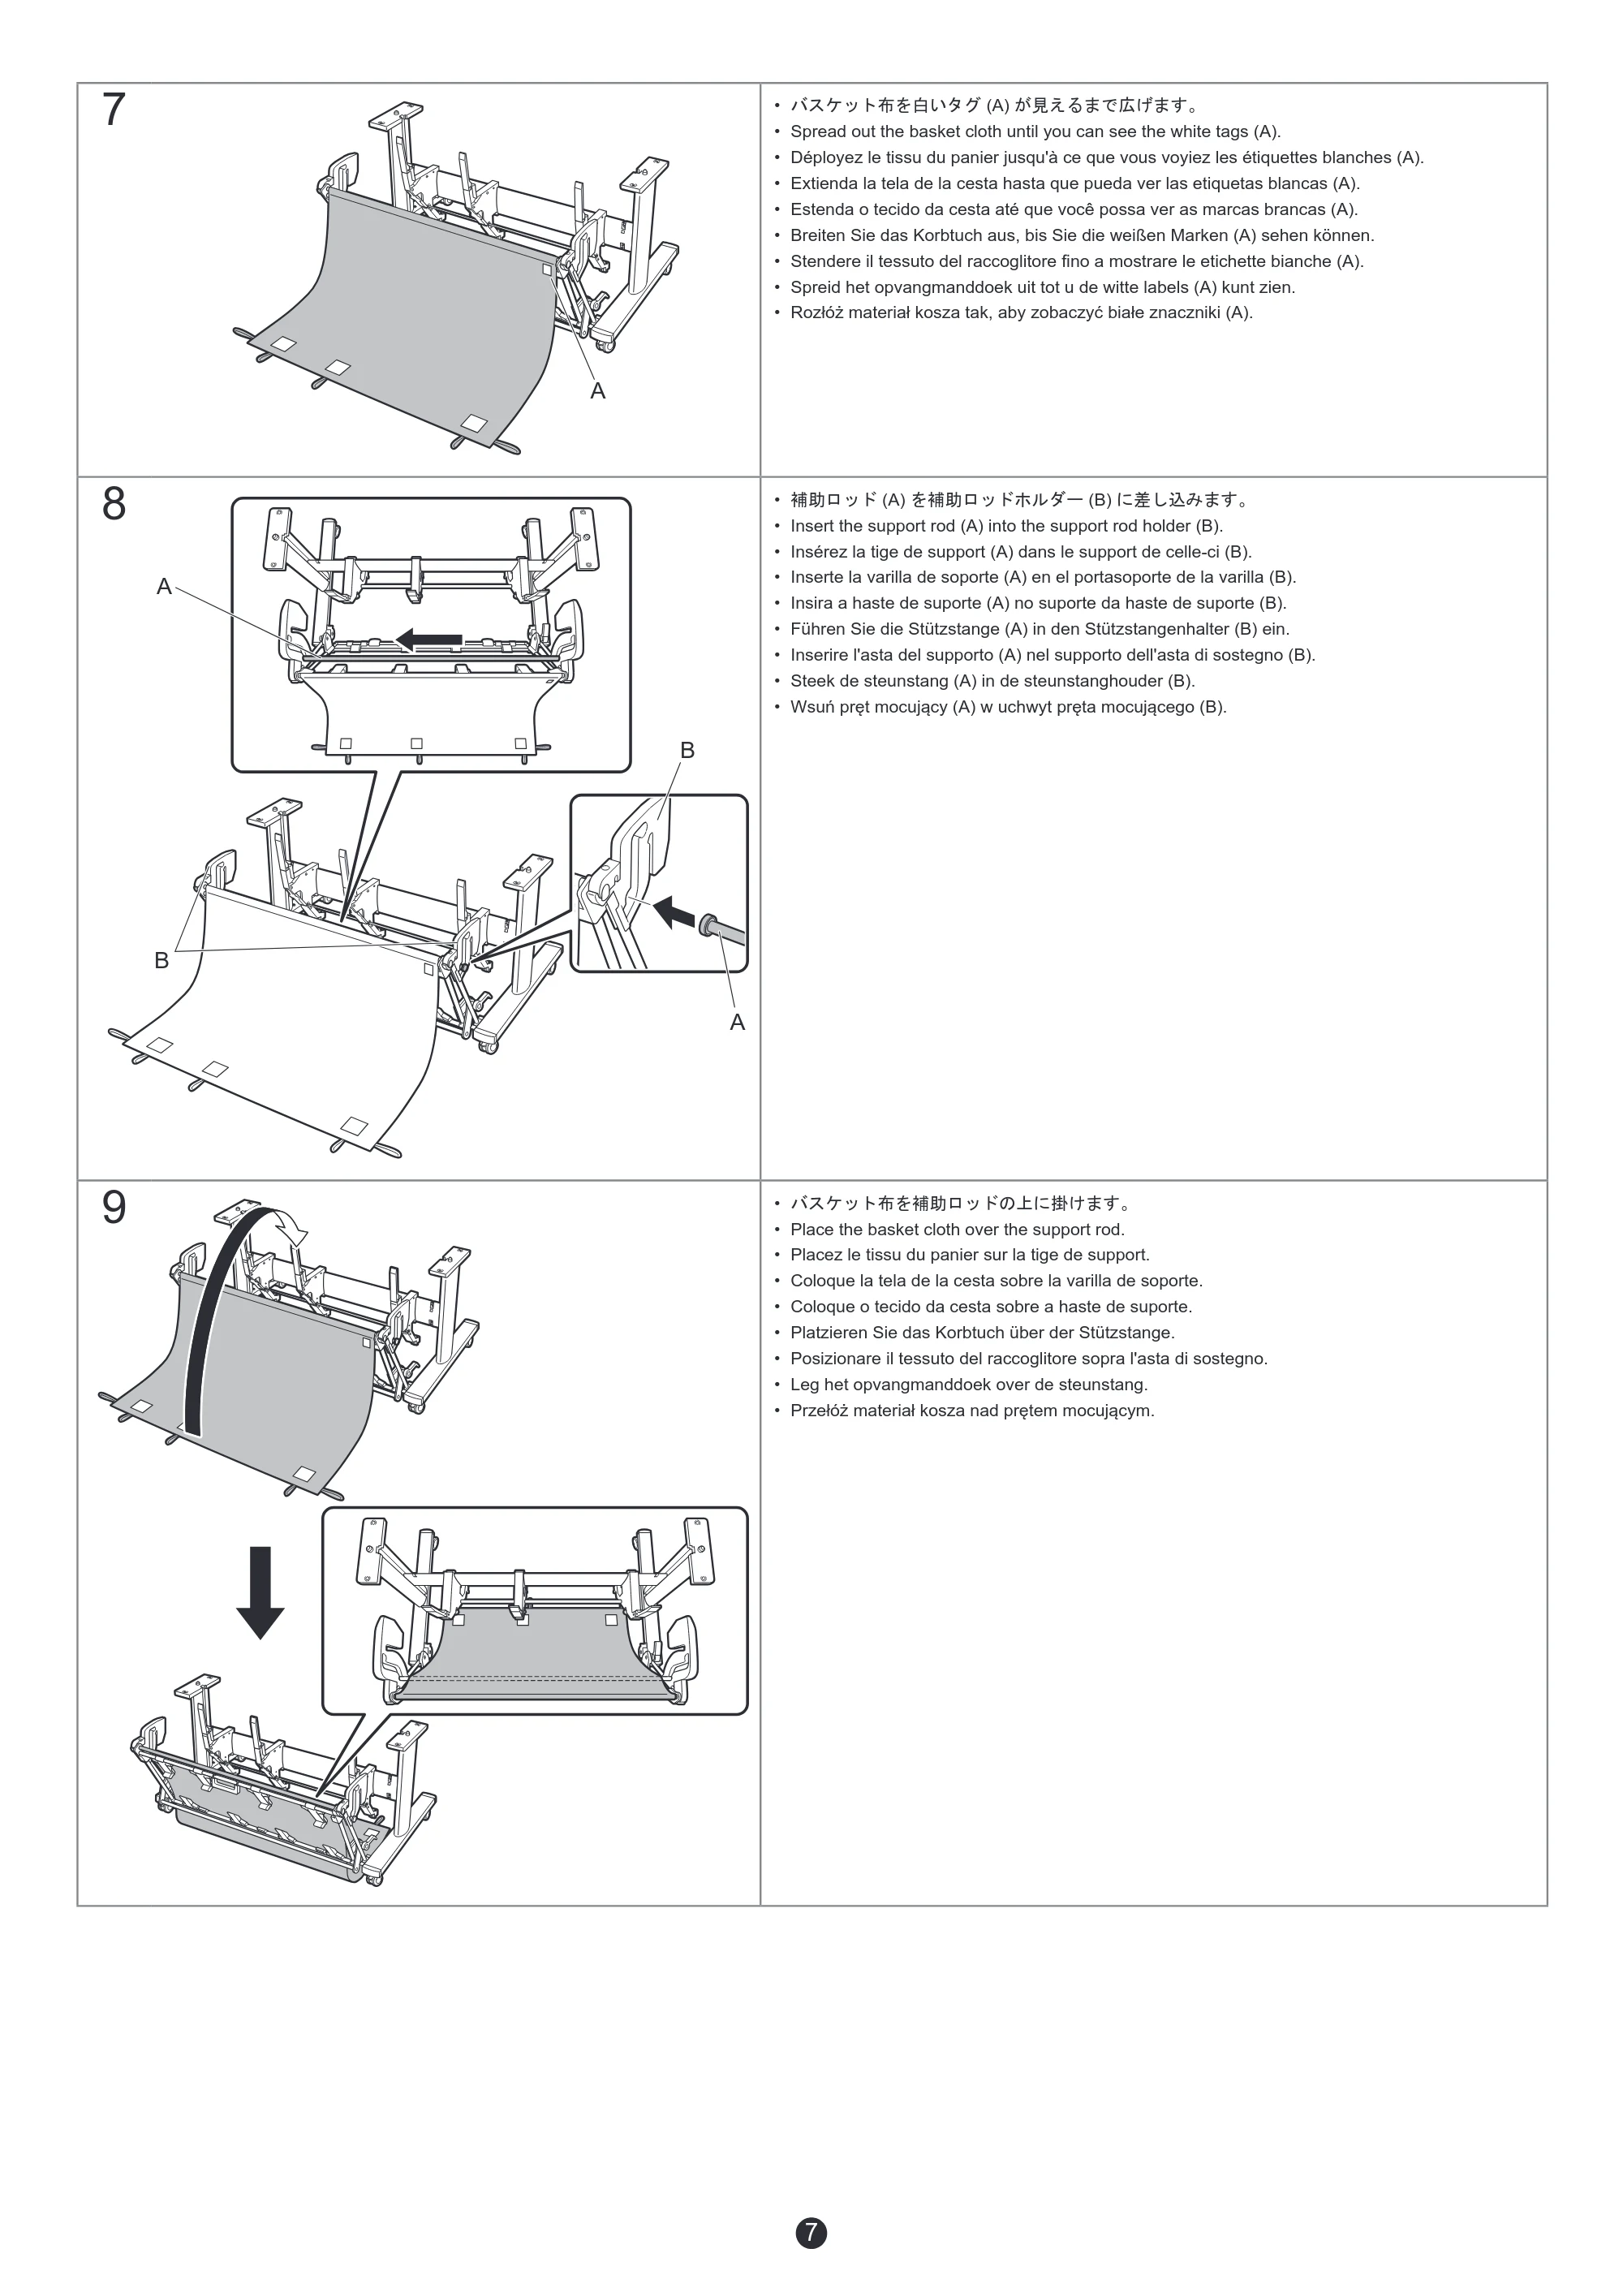
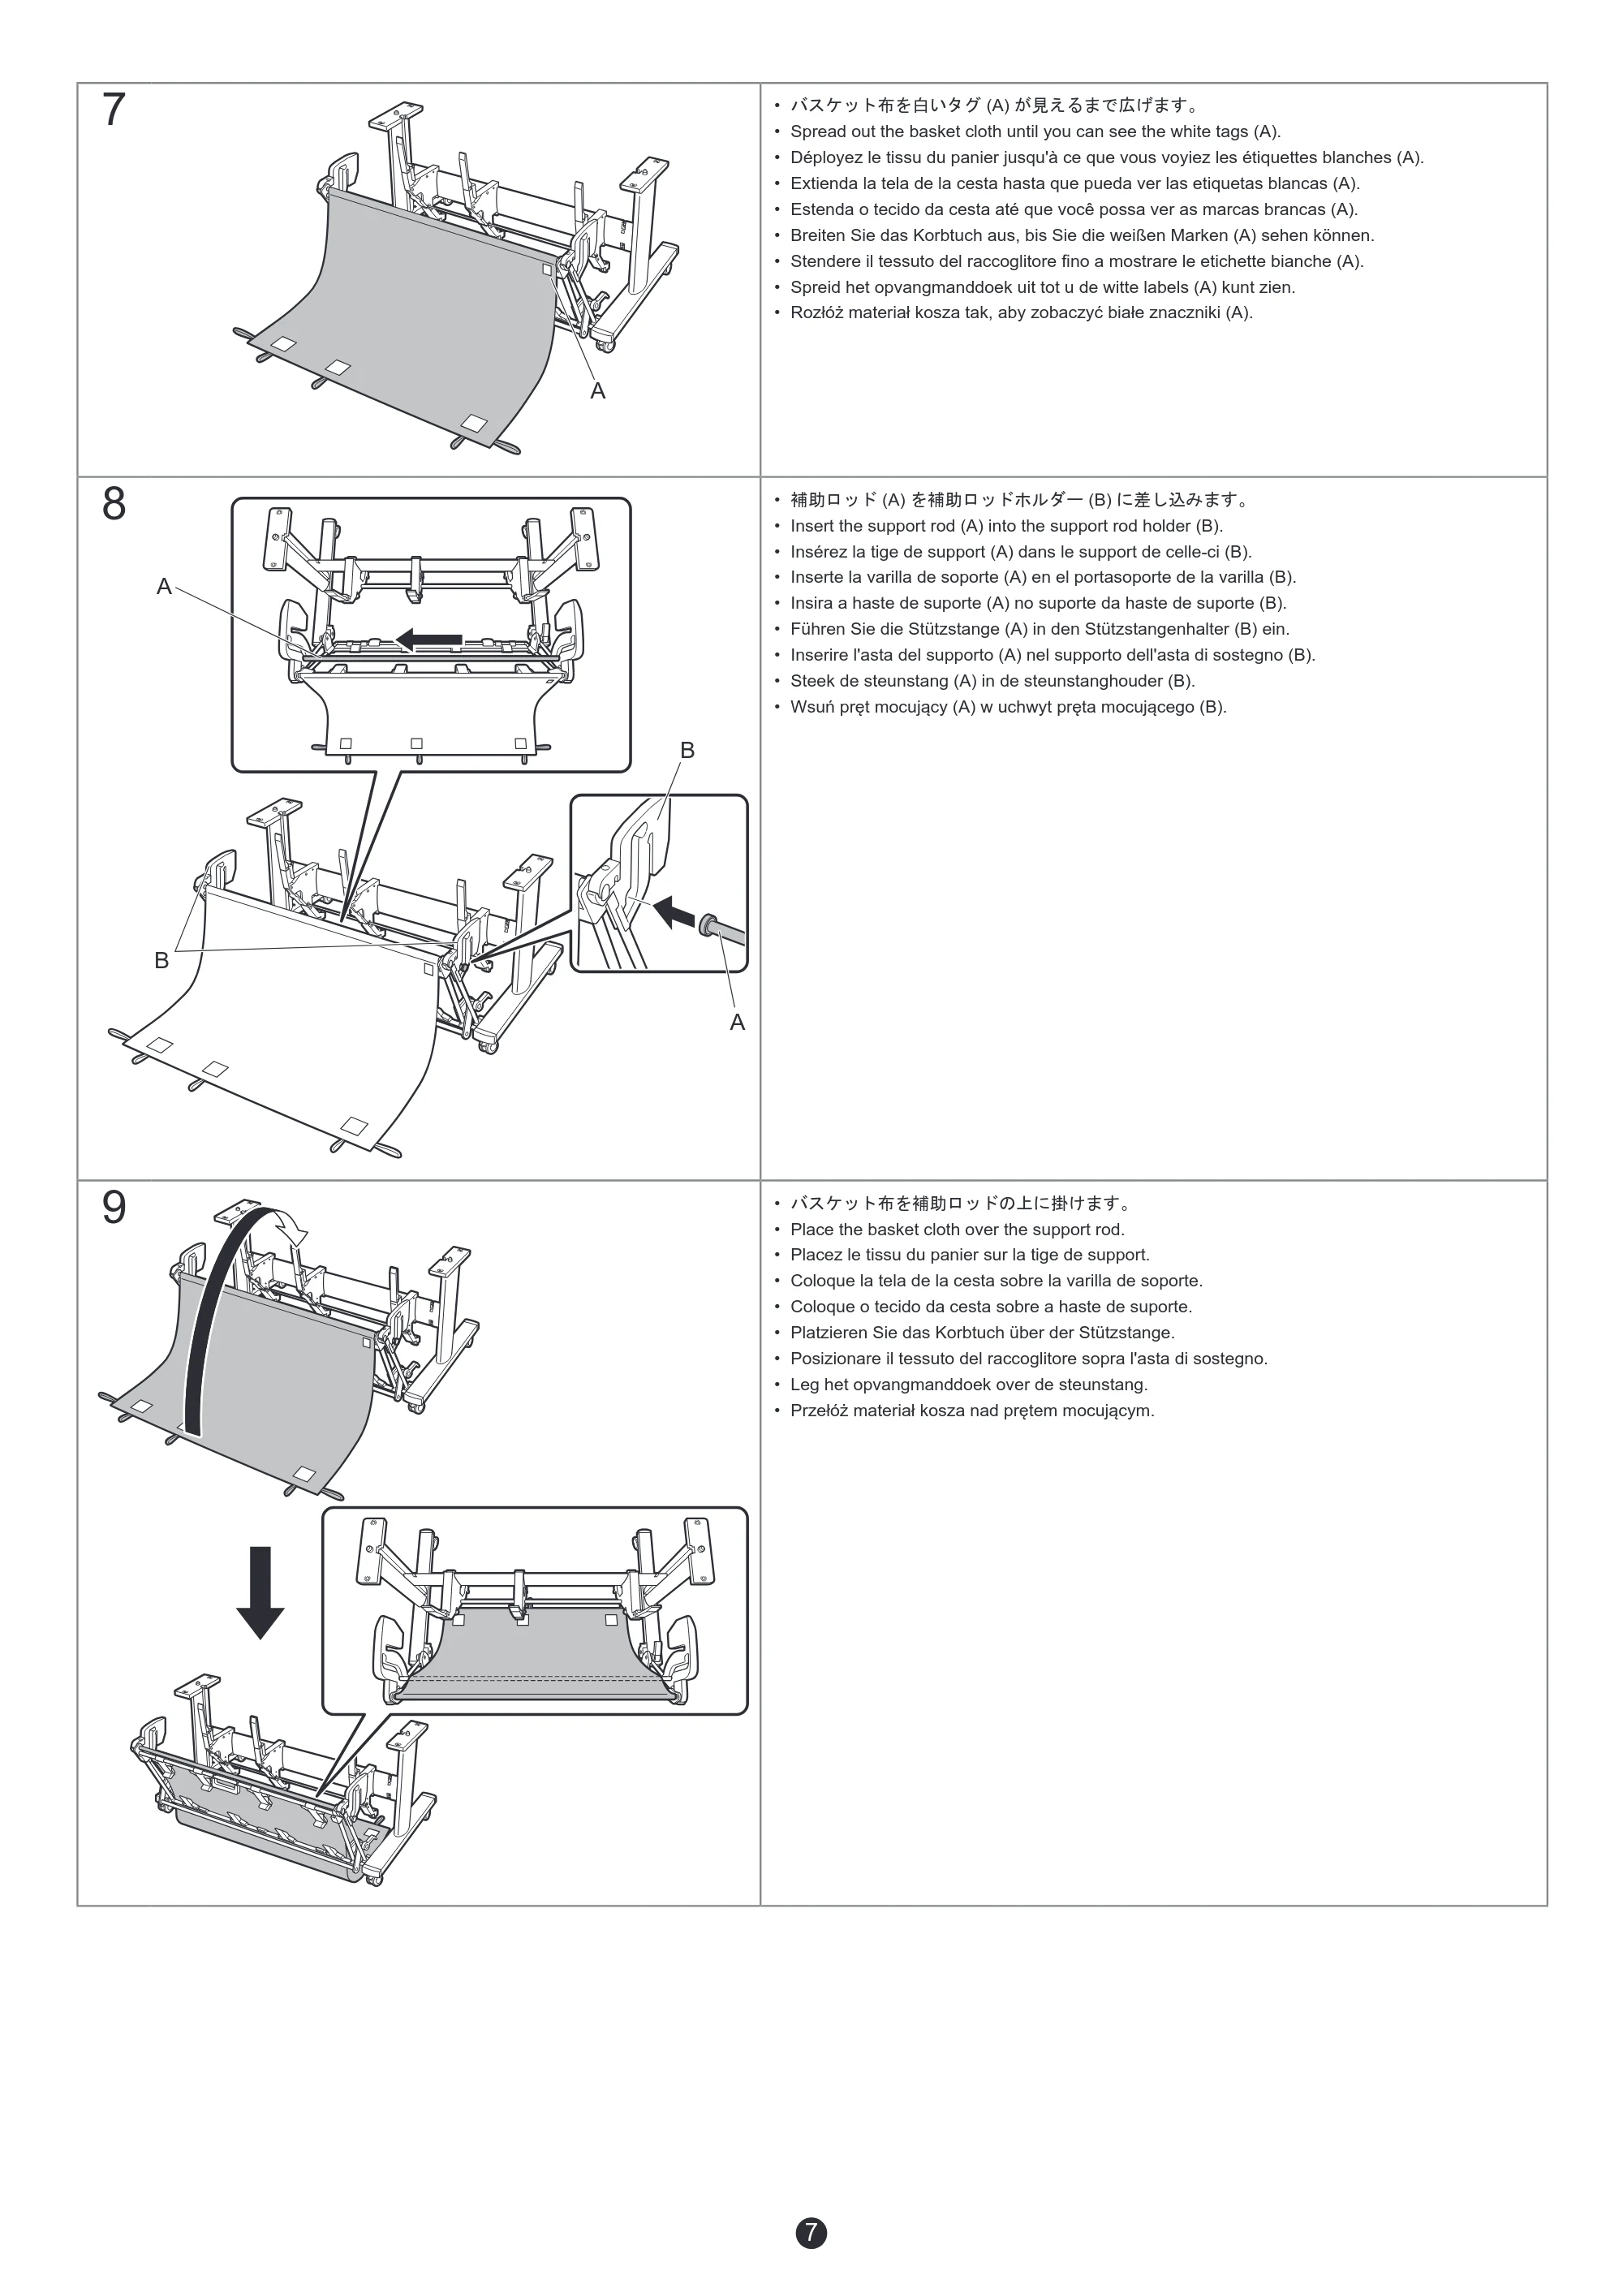
7
A
- バスケット布を白いタグ (A) が見えるまで広げます。
- Spread out the basket cloth until you can see the white tags (A).
- Déployez le tissu du panier jusqu'à ce que vous voyiez les étiquettes blanches (A).
- Extienda la tela de la cesta hasta que pueda ver las etiquetas blancas (A).
- Estenda o tecido da cesta até que você possa ver as marcas brancas (A).
- Breiten Sie das Korbtuch aus, bis Sie die weißen Marken (A) sehen können.
- Stendere il tessuto del raccoglitore fino a mostrare le etichette bianche (A).
- Spreid het opvangmanddoek uit tot u de witte labels (A) kunt zien.
- Rozłóż materiał kosza tak, aby zobaczyć białe znaczniki (A).
8
B
A
A
B
- 補助ロッド (A) を補助ロッドホルダー (B) に差し込みます。
- Insert the support rod (A) into the support rod holder (B).
- Insérez la tige de support (A) dans le support de celle-ci (B).
- Inserte la varilla de soporte (A) en el portasoporte de la varilla (B).
- Insira a haste de suporte (A) no suporte da haste de suporte (B).
- Führen Sie die Stützstange (A) in den Stützstangenhalter (B) ein.
- Inserire l'asta del supporto (A) nel supporto dell'asta di sostegno (B).
- Steek de steunstang (A) in de steunstanghouder (B).
- Wsuń pręt mocujący (A) w uchwyt pręta mocującego (B).
9
- バスケット布を補助ロッドの上に掛けます。
- Place the basket cloth over the support rod.
- Placez le tissu du panier sur la tige de support.
- Coloque la tela de la cesta sobre la varilla de soporte.
- Coloque o tecido da cesta sobre a haste de suporte.
- Platzieren Sie das Korbtuch über der Stützstange.
- Posizionare il tessuto del raccoglitore sopra l'asta di sostegno.
- Leg het opvangmanddoek over de steunstang.
- Przełóż materiał kosza nad prętem mocującym.
9ページ
8
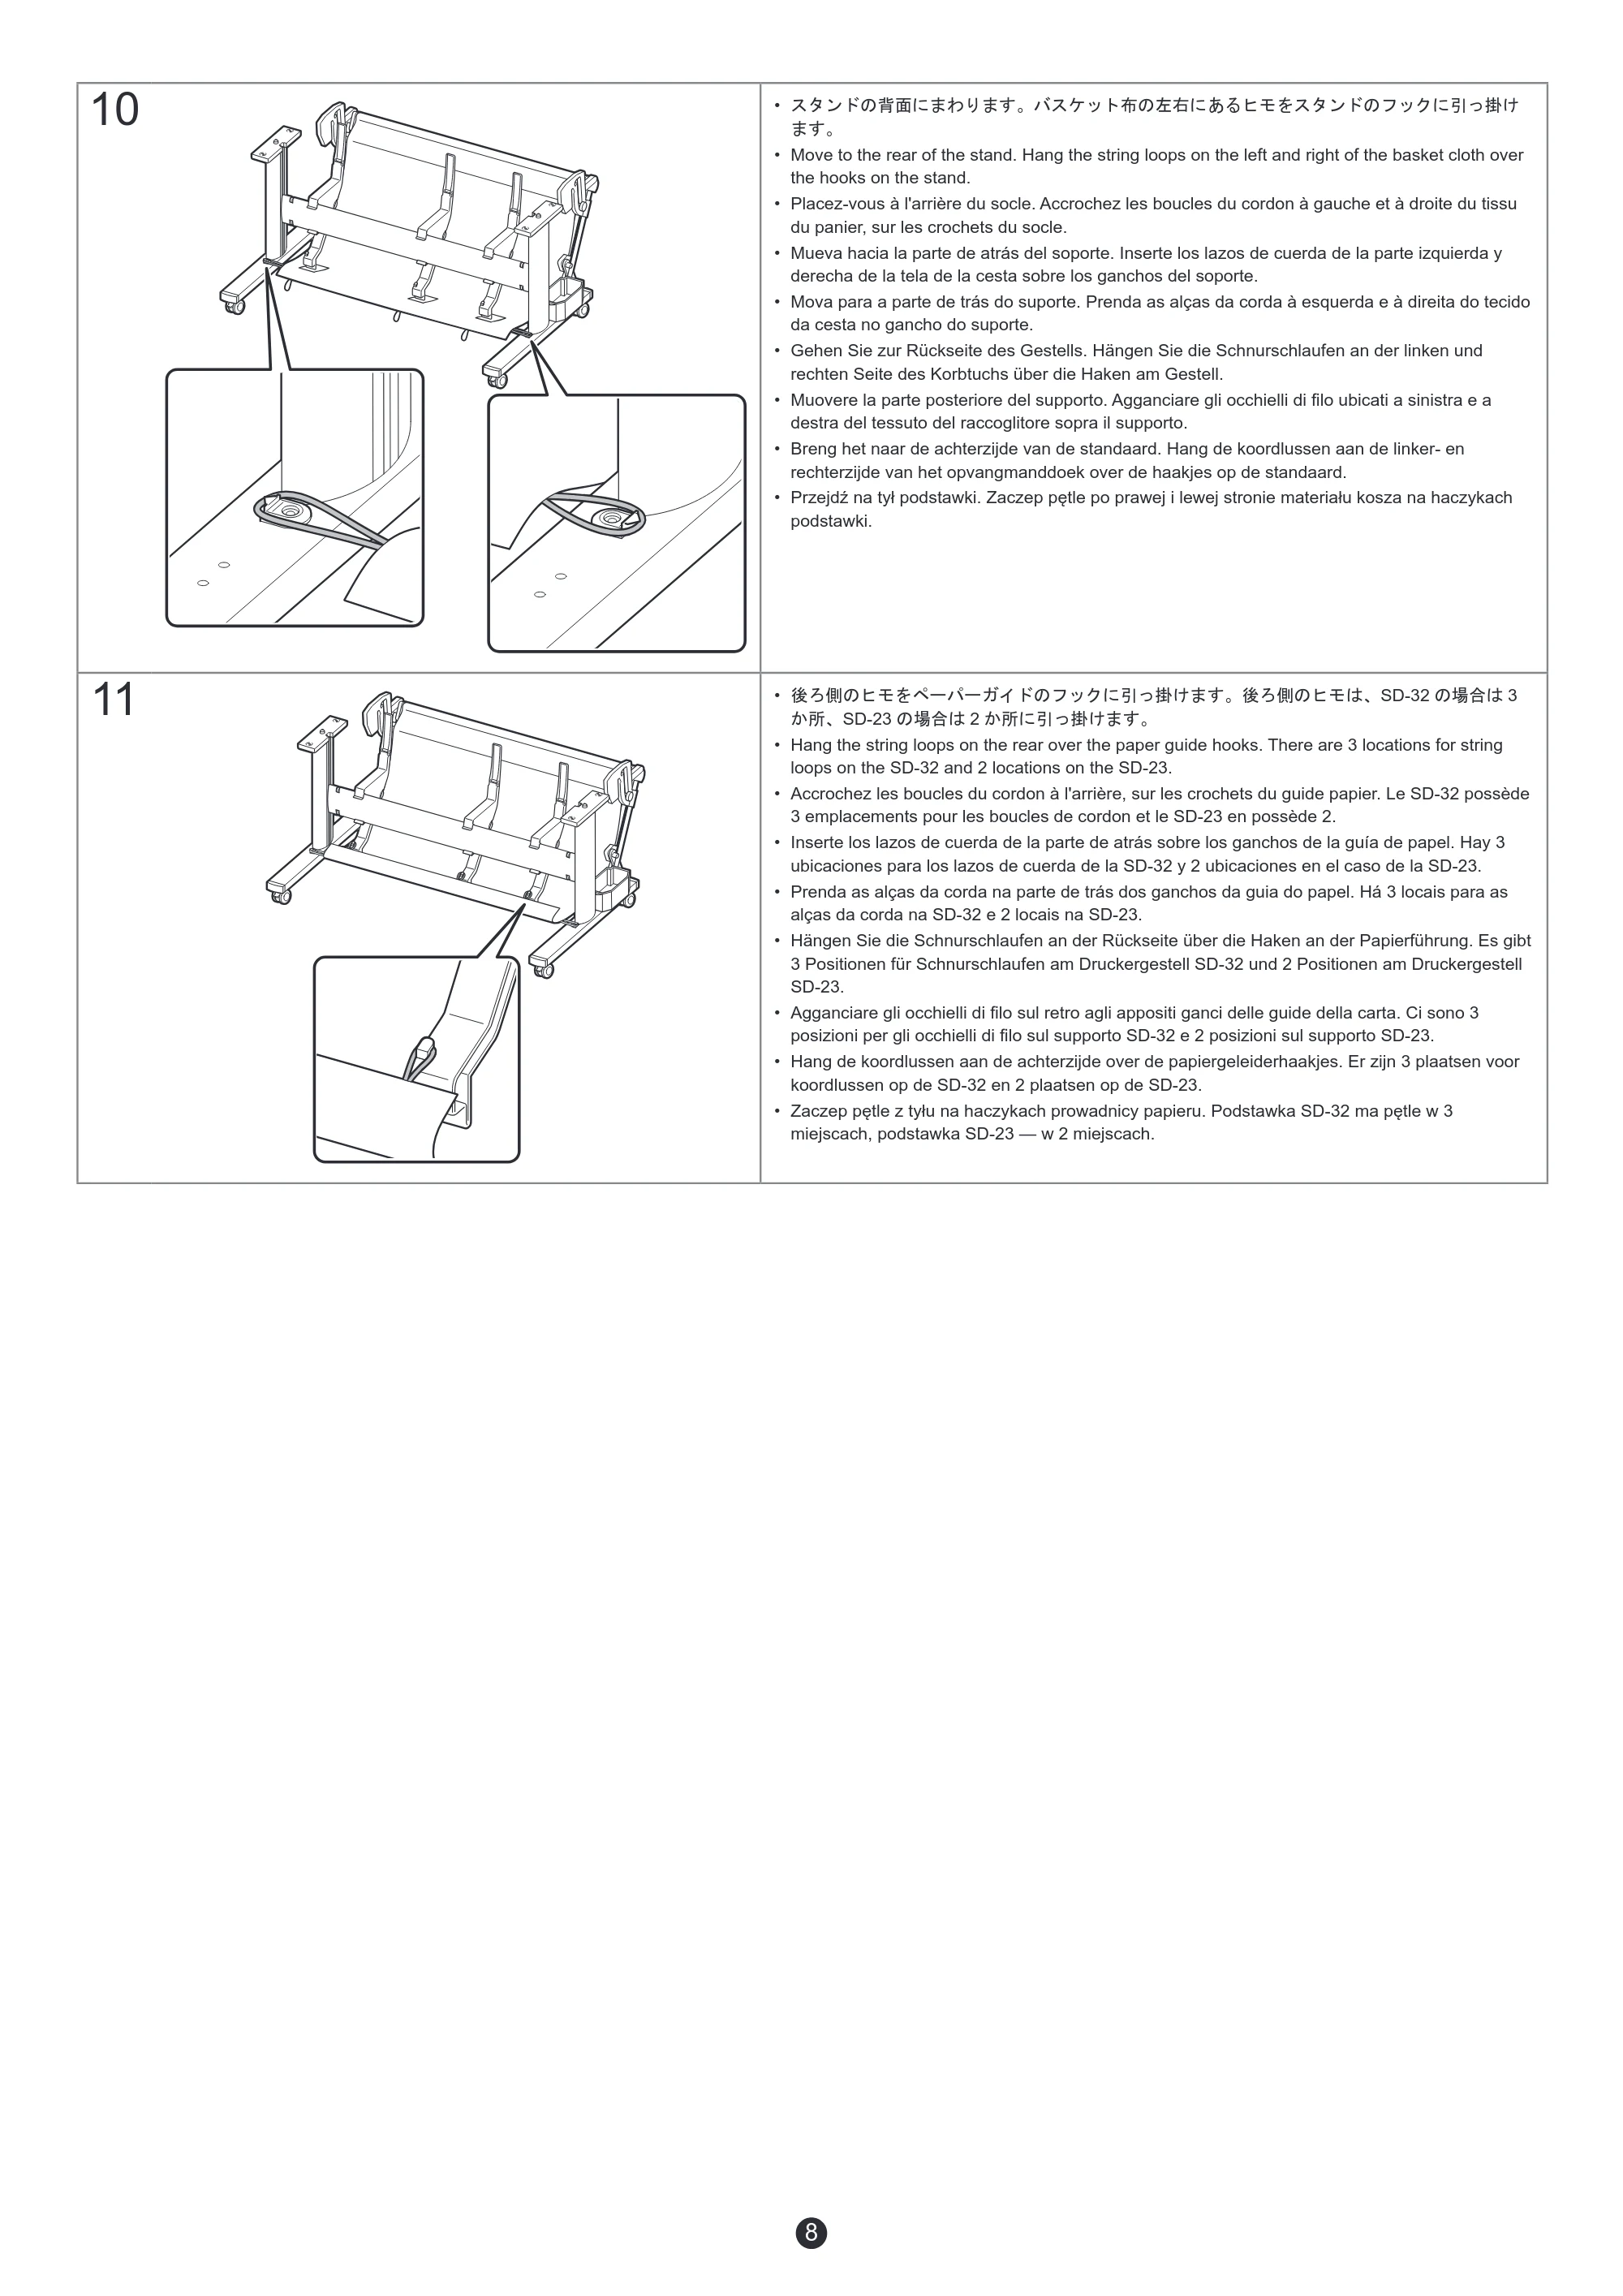
10
- スタンドの背面にまわります。バスケット布の左右にあるヒモをスタンドのフックに引っ掛け
ます。
- Move to the rear of the stand. Hang the string loops on the left and right of the basket cloth over
the hooks on the stand.
- Placez-vous à l'arrière du socle. Accrochez les boucles du cordon à gauche et à droite du tissu
du panier, sur les crochets du socle.
- Mueva hacia la parte de atrás del soporte. Inserte los lazos de cuerda de la parte izquierda y
derecha de la tela de la cesta sobre los ganchos del soporte.
- Mova para a parte de trás do suporte. Prenda as alças da corda à esquerda e à direita do tecido
da cesta no gancho do suporte.
- Gehen Sie zur Rückseite des Gestells. Hängen Sie die Schnurschlaufen an der linken und
rechten Seite des Korbtuchs über die Haken am Gestell.
- Muovere la parte posteriore del supporto. Agganciare gli occhielli di filo ubicati a sinistra e a
destra del tessuto del raccoglitore sopra il supporto.
- Breng het naar de achterzijde van de standaard. Hang de koordlussen aan de linker- en
rechterzijde van het opvangmanddoek over de haakjes op de standaard.
- Przejdź na tył podstawki. Zaczep pętle po prawej i lewej stronie materiału kosza na haczykach
podstawki.
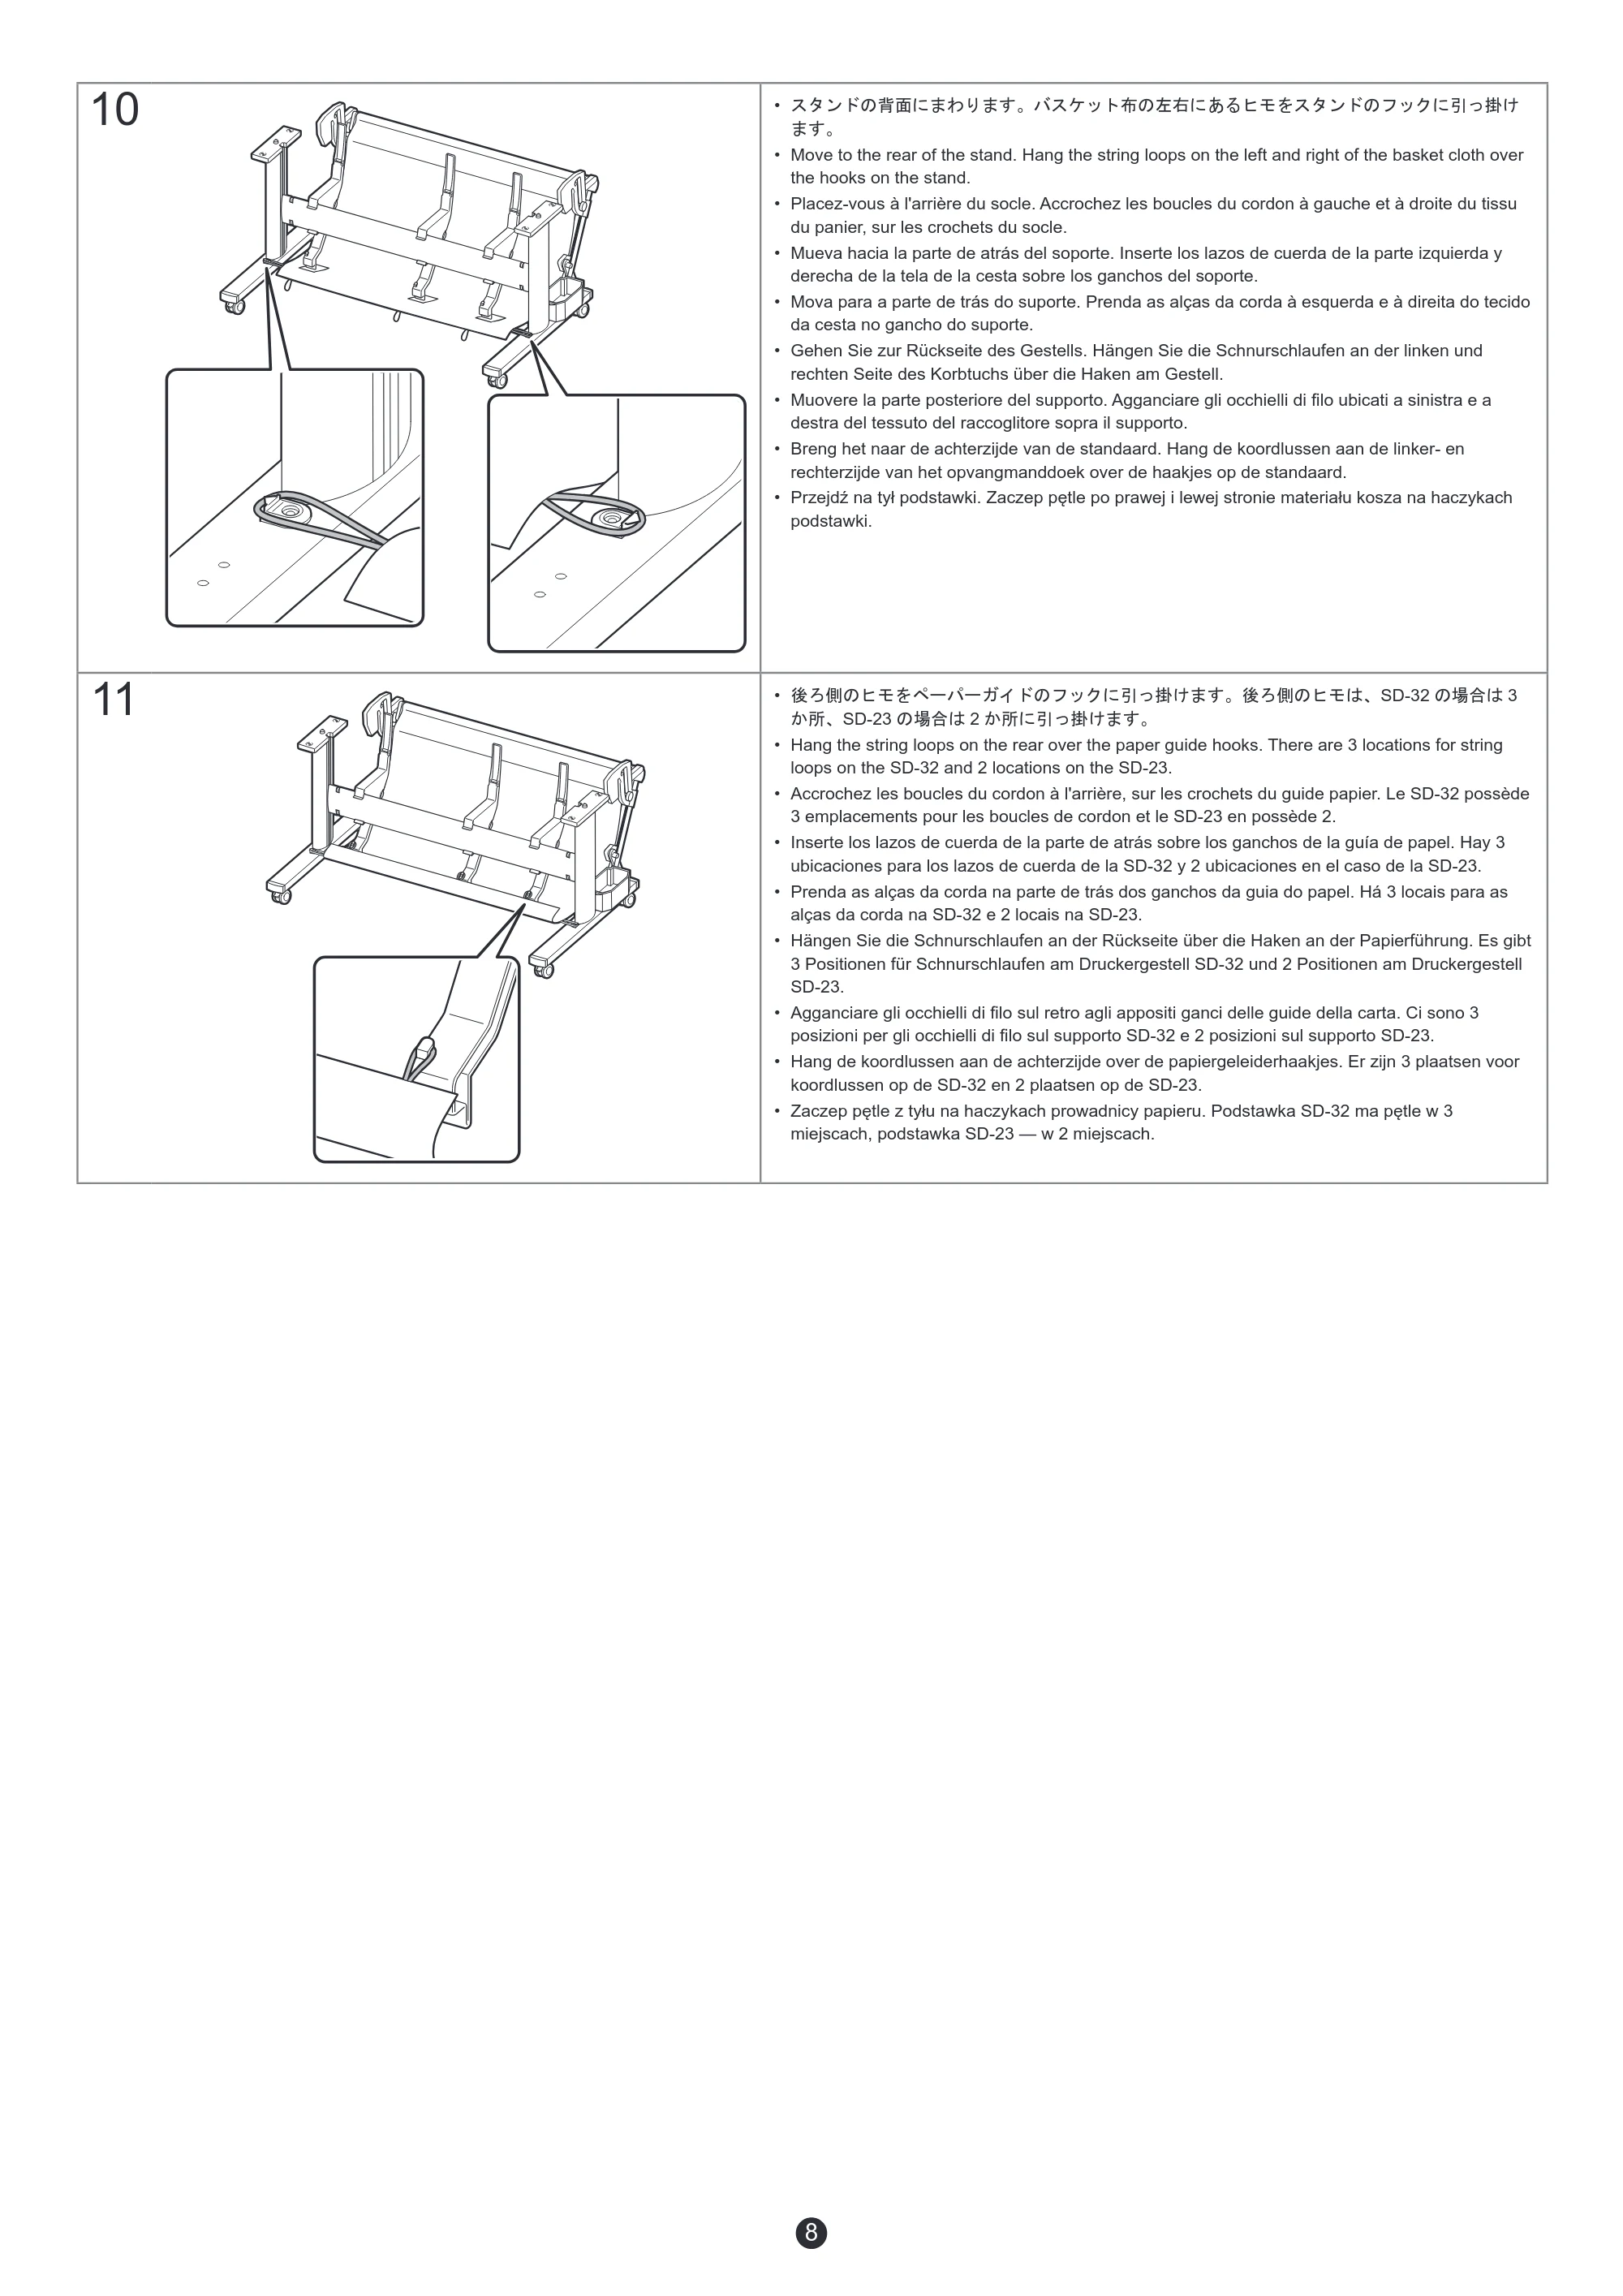
11
- 後ろ側のヒモをペーパーガイドのフックに引っ掛けます。後ろ側のヒモは、SD-32 の場合は 3
か所、SD-23 の場合は 2 か所に引っ掛けます。
- Hang the string loops on the rear over the paper guide hooks. There are 3 locations for string
loops on the SD-32 and 2 locations on the SD-23.
- Accrochez les boucles du cordon à l'arrière, sur les crochets du guide papier. Le SD-32 possède
3 emplacements pour les boucles de cordon et le SD-23 en possède 2.
- Inserte los lazos de cuerda de la parte de atrás sobre los ganchos de la guía de papel. Hay 3
ubicaciones para los lazos de cuerda de la SD-32 y 2 ubicaciones en el caso de la SD-23.
- Prenda as alças da corda na parte de trás dos ganchos da guia do papel. Há 3 locais para as
alças da corda na SD-32 e 2 locais na SD-23.
- Hängen Sie die Schnurschlaufen an der Rückseite über die Haken an der Papierführung. Es gibt
3 Positionen für Schnurschlaufen am Druckergestell SD-32 und 2 Positionen am Druckergestell
SD-23.
- Agganciare gli occhielli di filo sul retro agli appositi ganci delle guide della carta. Ci sono 3
posizioni per gli occhielli di filo sul supporto SD-32 e 2 posizioni sul supporto SD-23.
- Hang de koordlussen aan de achterzijde over de papiergeleiderhaakjes. Er zijn 3 plaatsen voor
koordlussen op de SD-32 en 2 plaatsen op de SD-23.
- Zaczep pętle z tyłu na haczykach prowadnicy papieru. Podstawka SD-32 ma pętle w 3
miejscach, podstawka SD-23 — w 2 miejscach.
10ページ
9
■ SD-31 / SD-22
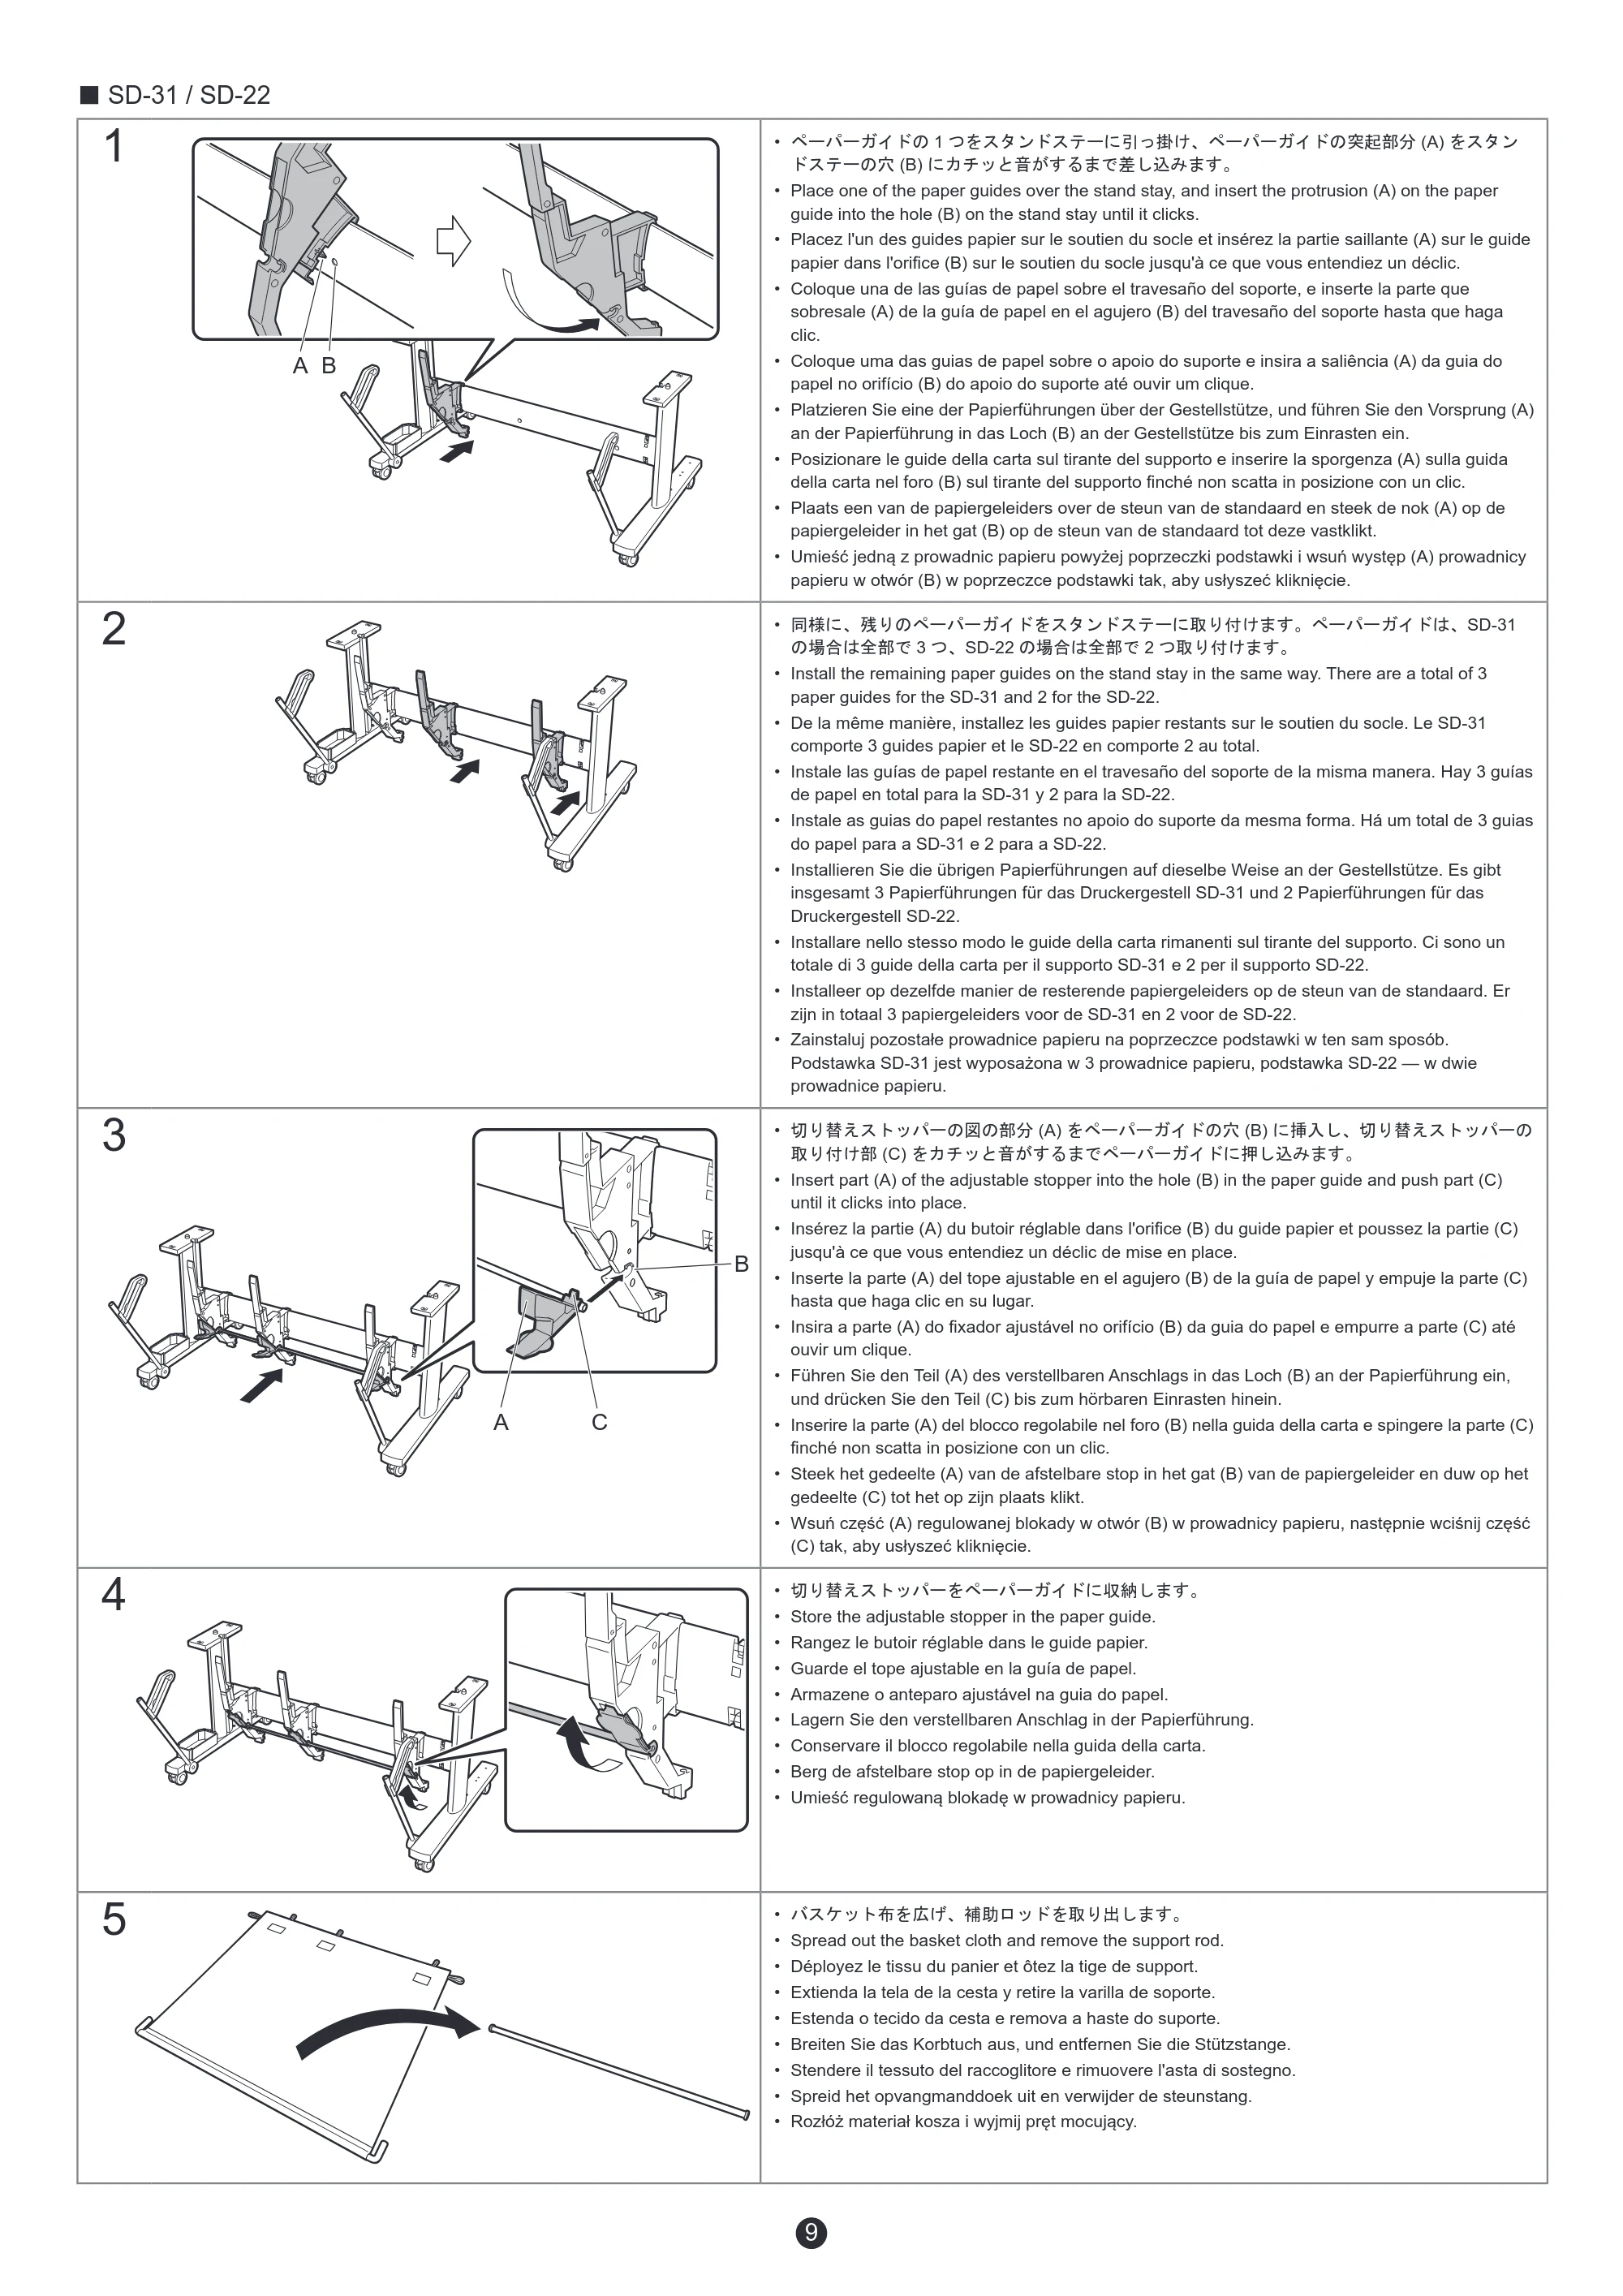
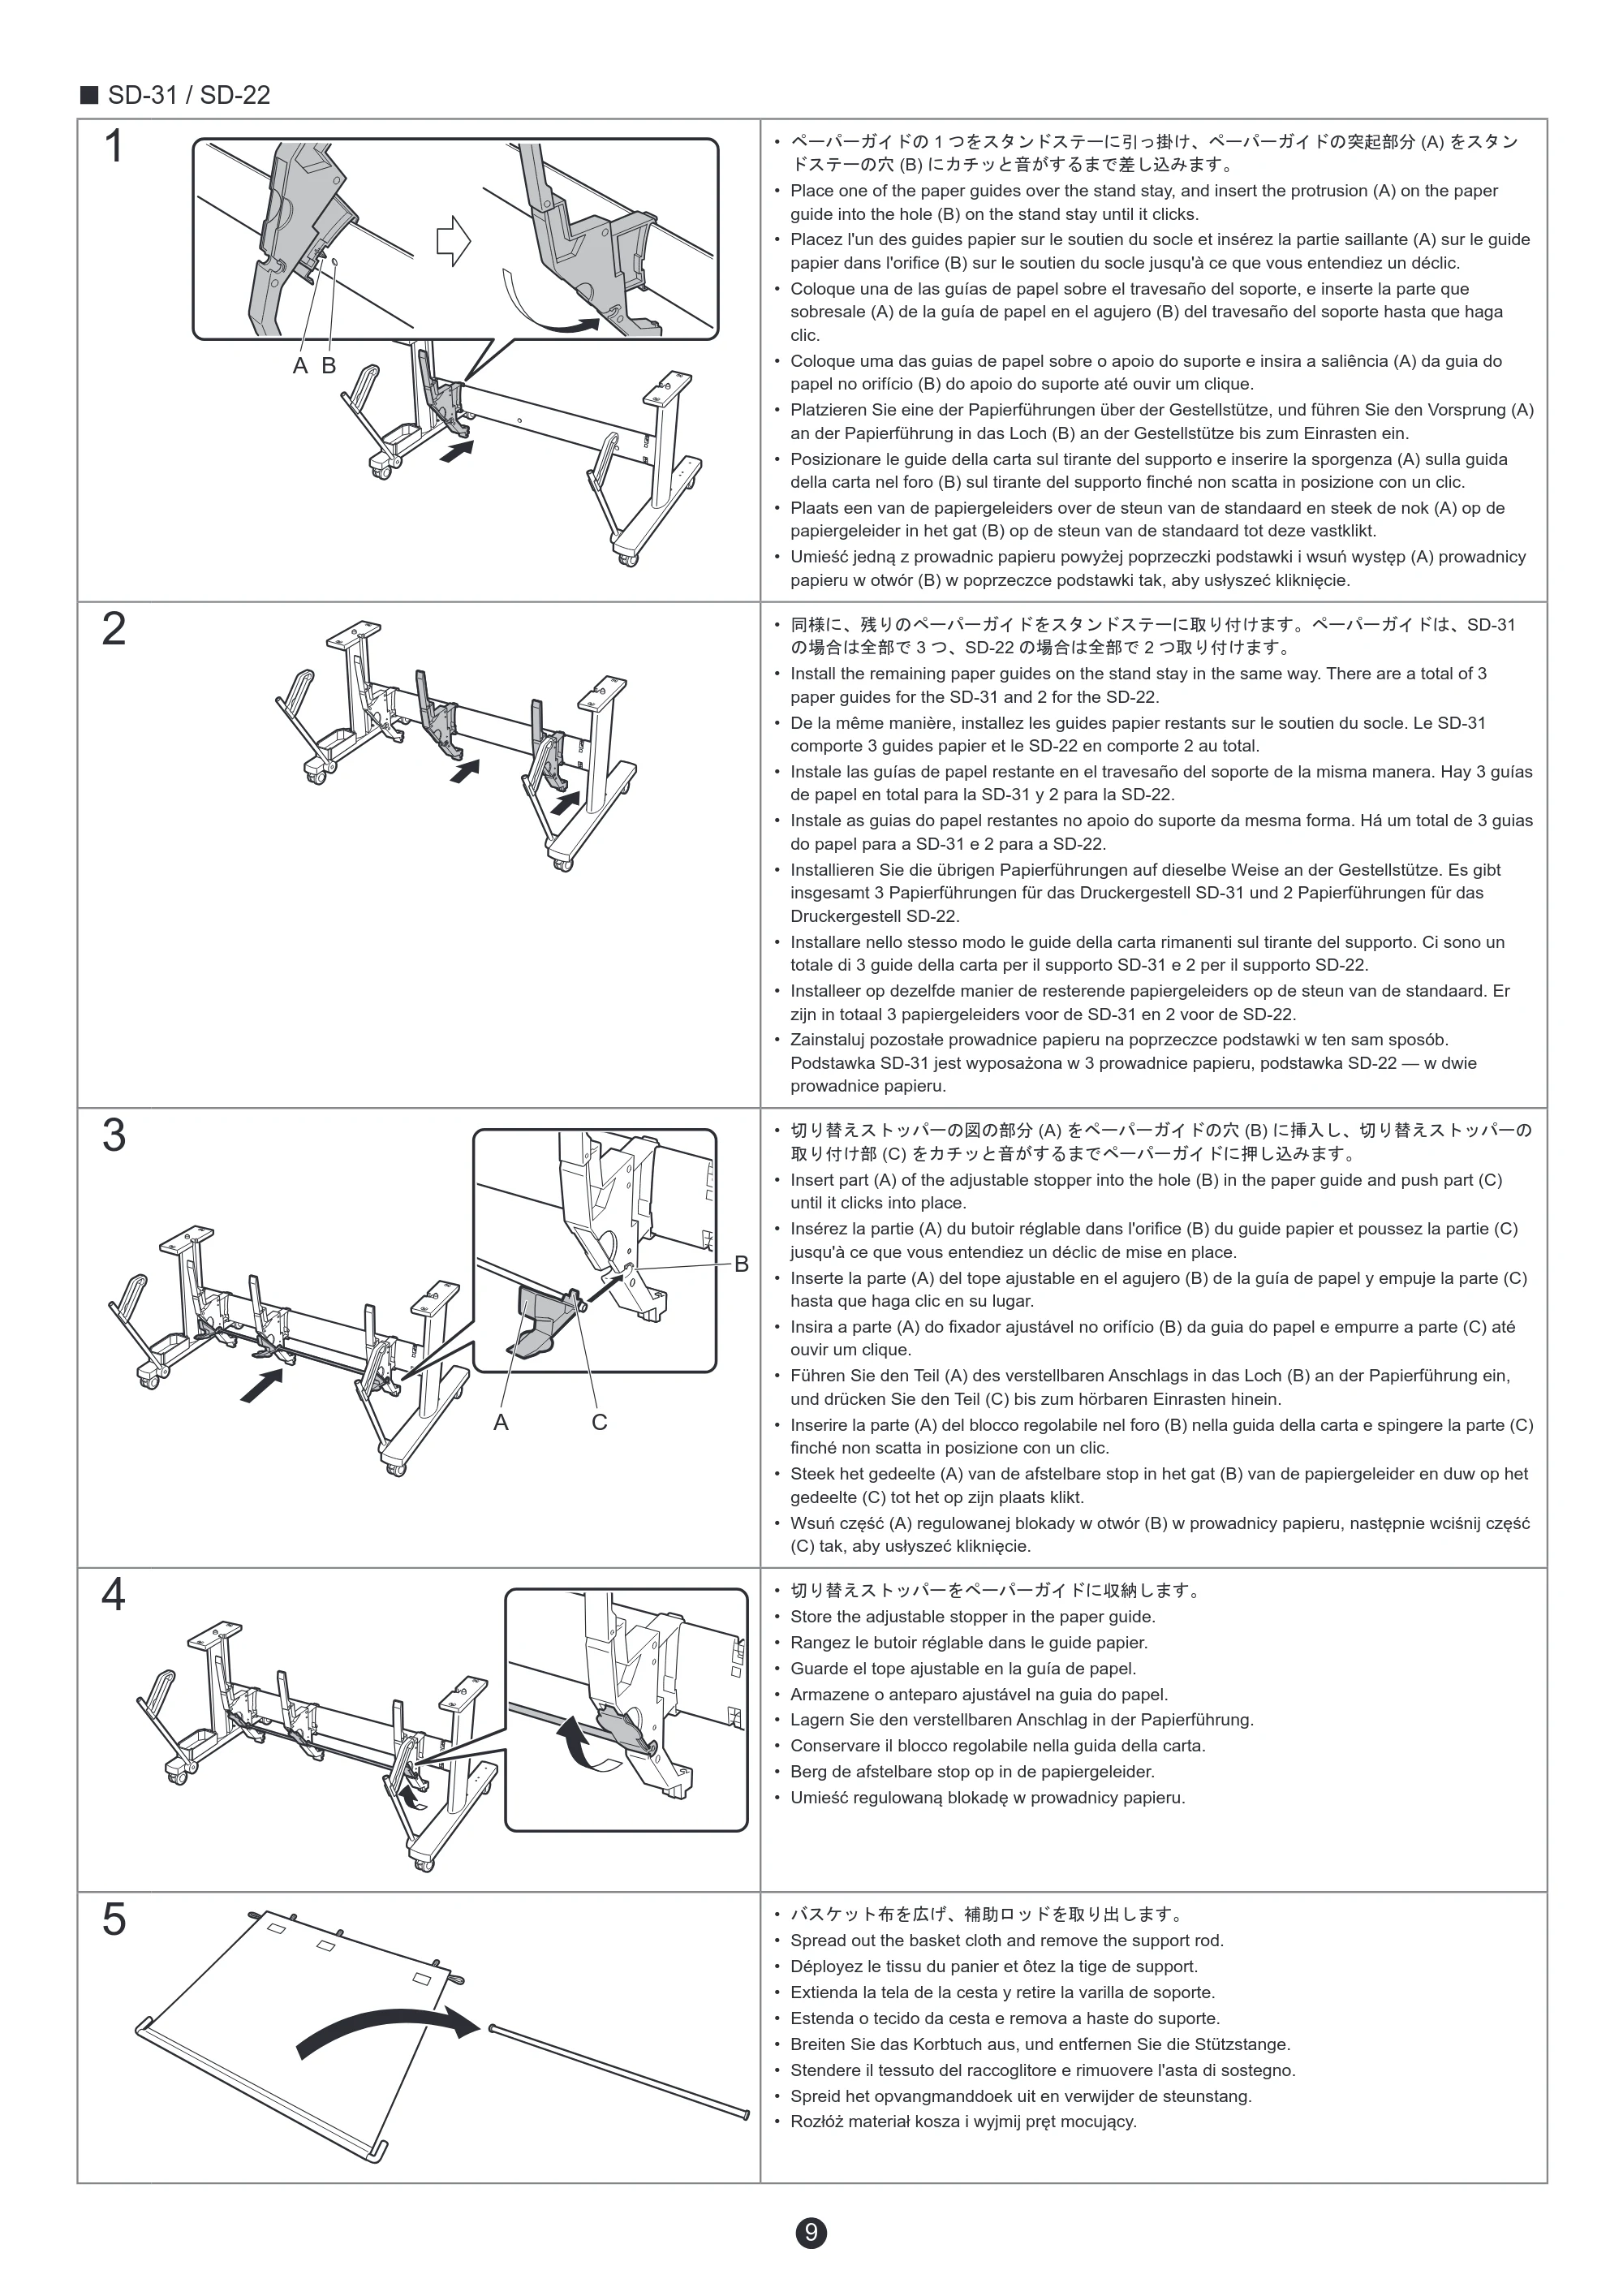
1
A B
- ペーパーガイドの 1 つをスタンドステーに引っ掛け、ペーパーガイドの突起部分 (A) をスタン
ドステーの穴 (B) にカチッと音がするまで差し込みます。
- Place one of the paper guides over the stand stay, and insert the protrusion (A) on the paper
guide into the hole (B) on the stand stay until it clicks.
- Placez l'un des guides papier sur le soutien du socle et insérez la partie saillante (A) sur le guide
papier dans l'orifice (B) sur le soutien du socle jusqu'à ce que vous entendiez un déclic.
- Coloque una de las guías de papel sobre el travesaño del soporte, e inserte la parte que
sobresale (A) de la guía de papel en el agujero (B) del travesaño del soporte hasta que haga
clic.
- Coloque uma das guias de papel sobre o apoio do suporte e insira a saliência (A) da guia do
papel no orifício (B) do apoio do suporte até ouvir um clique.
- Platzieren Sie eine der Papierführungen über der Gestellstütze, und führen Sie den Vorsprung (A)
an der Papierführung in das Loch (B) an der Gestellstütze bis zum Einrasten ein.
- Posizionare le guide della carta sul tirante del supporto e inserire la sporgenza (A) sulla guida
della carta nel foro (B) sul tirante del supporto finché non scatta in posizione con un clic.
- Plaats een van de papiergeleiders over de steun van de standaard en steek de nok (A) op de
papiergeleider in het gat (B) op de steun van de standaard tot deze vastklikt.
- Umieść jedną z prowadnic papieru powyżej poprzeczki podstawki i wsuń występ (A) prowadnicy
papieru w otwór (B) w poprzeczce podstawki tak, aby usłyszeć kliknięcie.
2
- 同様に、残りのペーパーガイドをスタンドステーに取り付けます。ペーパーガイドは、SD-31
の場合は全部で 3 つ、SD-22 の場合は全部で 2 つ取り付けます。
- Install the remaining paper guides on the stand stay in the same way. There are a total of 3
paper guides for the SD-31 and 2 for the SD-22.
- De la même manière, installez les guides papier restants sur le soutien du socle. Le SD-31
comporte 3 guides papier et le SD-22 en comporte 2 au total.
- Instale las guías de papel restante en el travesaño del soporte de la misma manera. Hay 3 guías
de papel en total para la SD-31 y 2 para la SD-22.
- Instale as guias do papel restantes no apoio do suporte da mesma forma. Há um total de 3 guias
do papel para a SD-31 e 2 para a SD-22.
- Installieren Sie die übrigen Papierführungen auf dieselbe Weise an der Gestellstütze. Es gibt
insgesamt 3 Papierführungen für das Druckergestell SD-31 und 2 Papierführungen für das
Druckergestell SD-22.
- Installare nello stesso modo le guide della carta rimanenti sul tirante del supporto. Ci sono un
totale di 3 guide della carta per il supporto SD-31 e 2 per il supporto SD-22.
- Installeer op dezelfde manier de resterende papiergeleiders op de steun van de standaard. Er
zijn in totaal 3 papiergeleiders voor de SD-31 en 2 voor de SD-22.
- Zainstaluj pozostałe prowadnice papieru na poprzeczce podstawki w ten sam sposób.
Podstawka SD-31 jest wyposażona w 3 prowadnice papieru, podstawka SD-22 — w dwie
prowadnice papieru.
3
B
CA
- 切り替えストッパーの図の部分 (A) をペーパーガイドの穴 (B) に挿入し、切り替えストッパーの
取り付け部 (C) をカチッと音がするまでペーパーガイドに押し込みます。
- Insert part (A) of the adjustable stopper into the hole (B) in the paper guide and push part (C)
until it clicks into place.
- Insérez la partie (A) du butoir réglable dans l'orifice (B) du guide papier et poussez la partie (C)
jusqu'à ce que vous entendiez un déclic de mise en place.
- Inserte la parte (A) del tope ajustable en el agujero (B) de la guía de papel y empuje la parte (C)
hasta que haga clic en su lugar.
- Insira a parte (A) do fixador ajustável no orifício (B) da guia do papel e empurre a parte (C) até
ouvir um clique.
- Führen Sie den Teil (A) des verstellbaren Anschlags in das Loch (B) an der Papierführung ein,
und drücken Sie den Teil (C) bis zum hörbaren Einrasten hinein.
- Inserire la parte (A) del blocco regolabile nel foro (B) nella guida della carta e spingere la parte (C)
finché non scatta in posizione con un clic.
- Steek het gedeelte (A) van de afstelbare stop in het gat (B) van de papiergeleider en duw op het
gedeelte (C) tot het op zijn plaats klikt.
- Wsuń część (A) regulowanej blokady w otwór (B) w prowadnicy papieru, następnie wciśnij część
(C) tak, aby usłyszeć kliknięcie.
4
- 切り替えストッパーをペーパーガイドに収納します。
- Store the adjustable stopper in the paper guide.
- Rangez le butoir réglable dans le guide papier.
- Guarde el tope ajustable en la guía de papel.
- Armazene o anteparo ajustável na guia do papel.
- Lagern Sie den verstellbaren Anschlag in der Papierführung.
- Conservare il blocco regolabile nella guida della carta.
- Berg de afstelbare stop op in de papiergeleider.
- Umieść regulowaną blokadę w prowadnicy papieru.
5
- バスケット布を広げ、補助ロッドを取り出します。
- Spread out the basket cloth and remove the support rod.
- Déployez le tissu du panier et ôtez la tige de support.
- Extienda la tela de la cesta y retire la varilla de soporte.
- Estenda o tecido da cesta e remova a haste do suporte.
- Breiten Sie das Korbtuch aus, und entfernen Sie die Stützstange.
- Stendere il tessuto del raccoglitore e rimuovere l'asta di sostegno.
- Spreid het opvangmanddoek uit en verwijder de steunstang.
- Rozłóż materiał kosza i wyjmij pręt mocujący.
11ページ
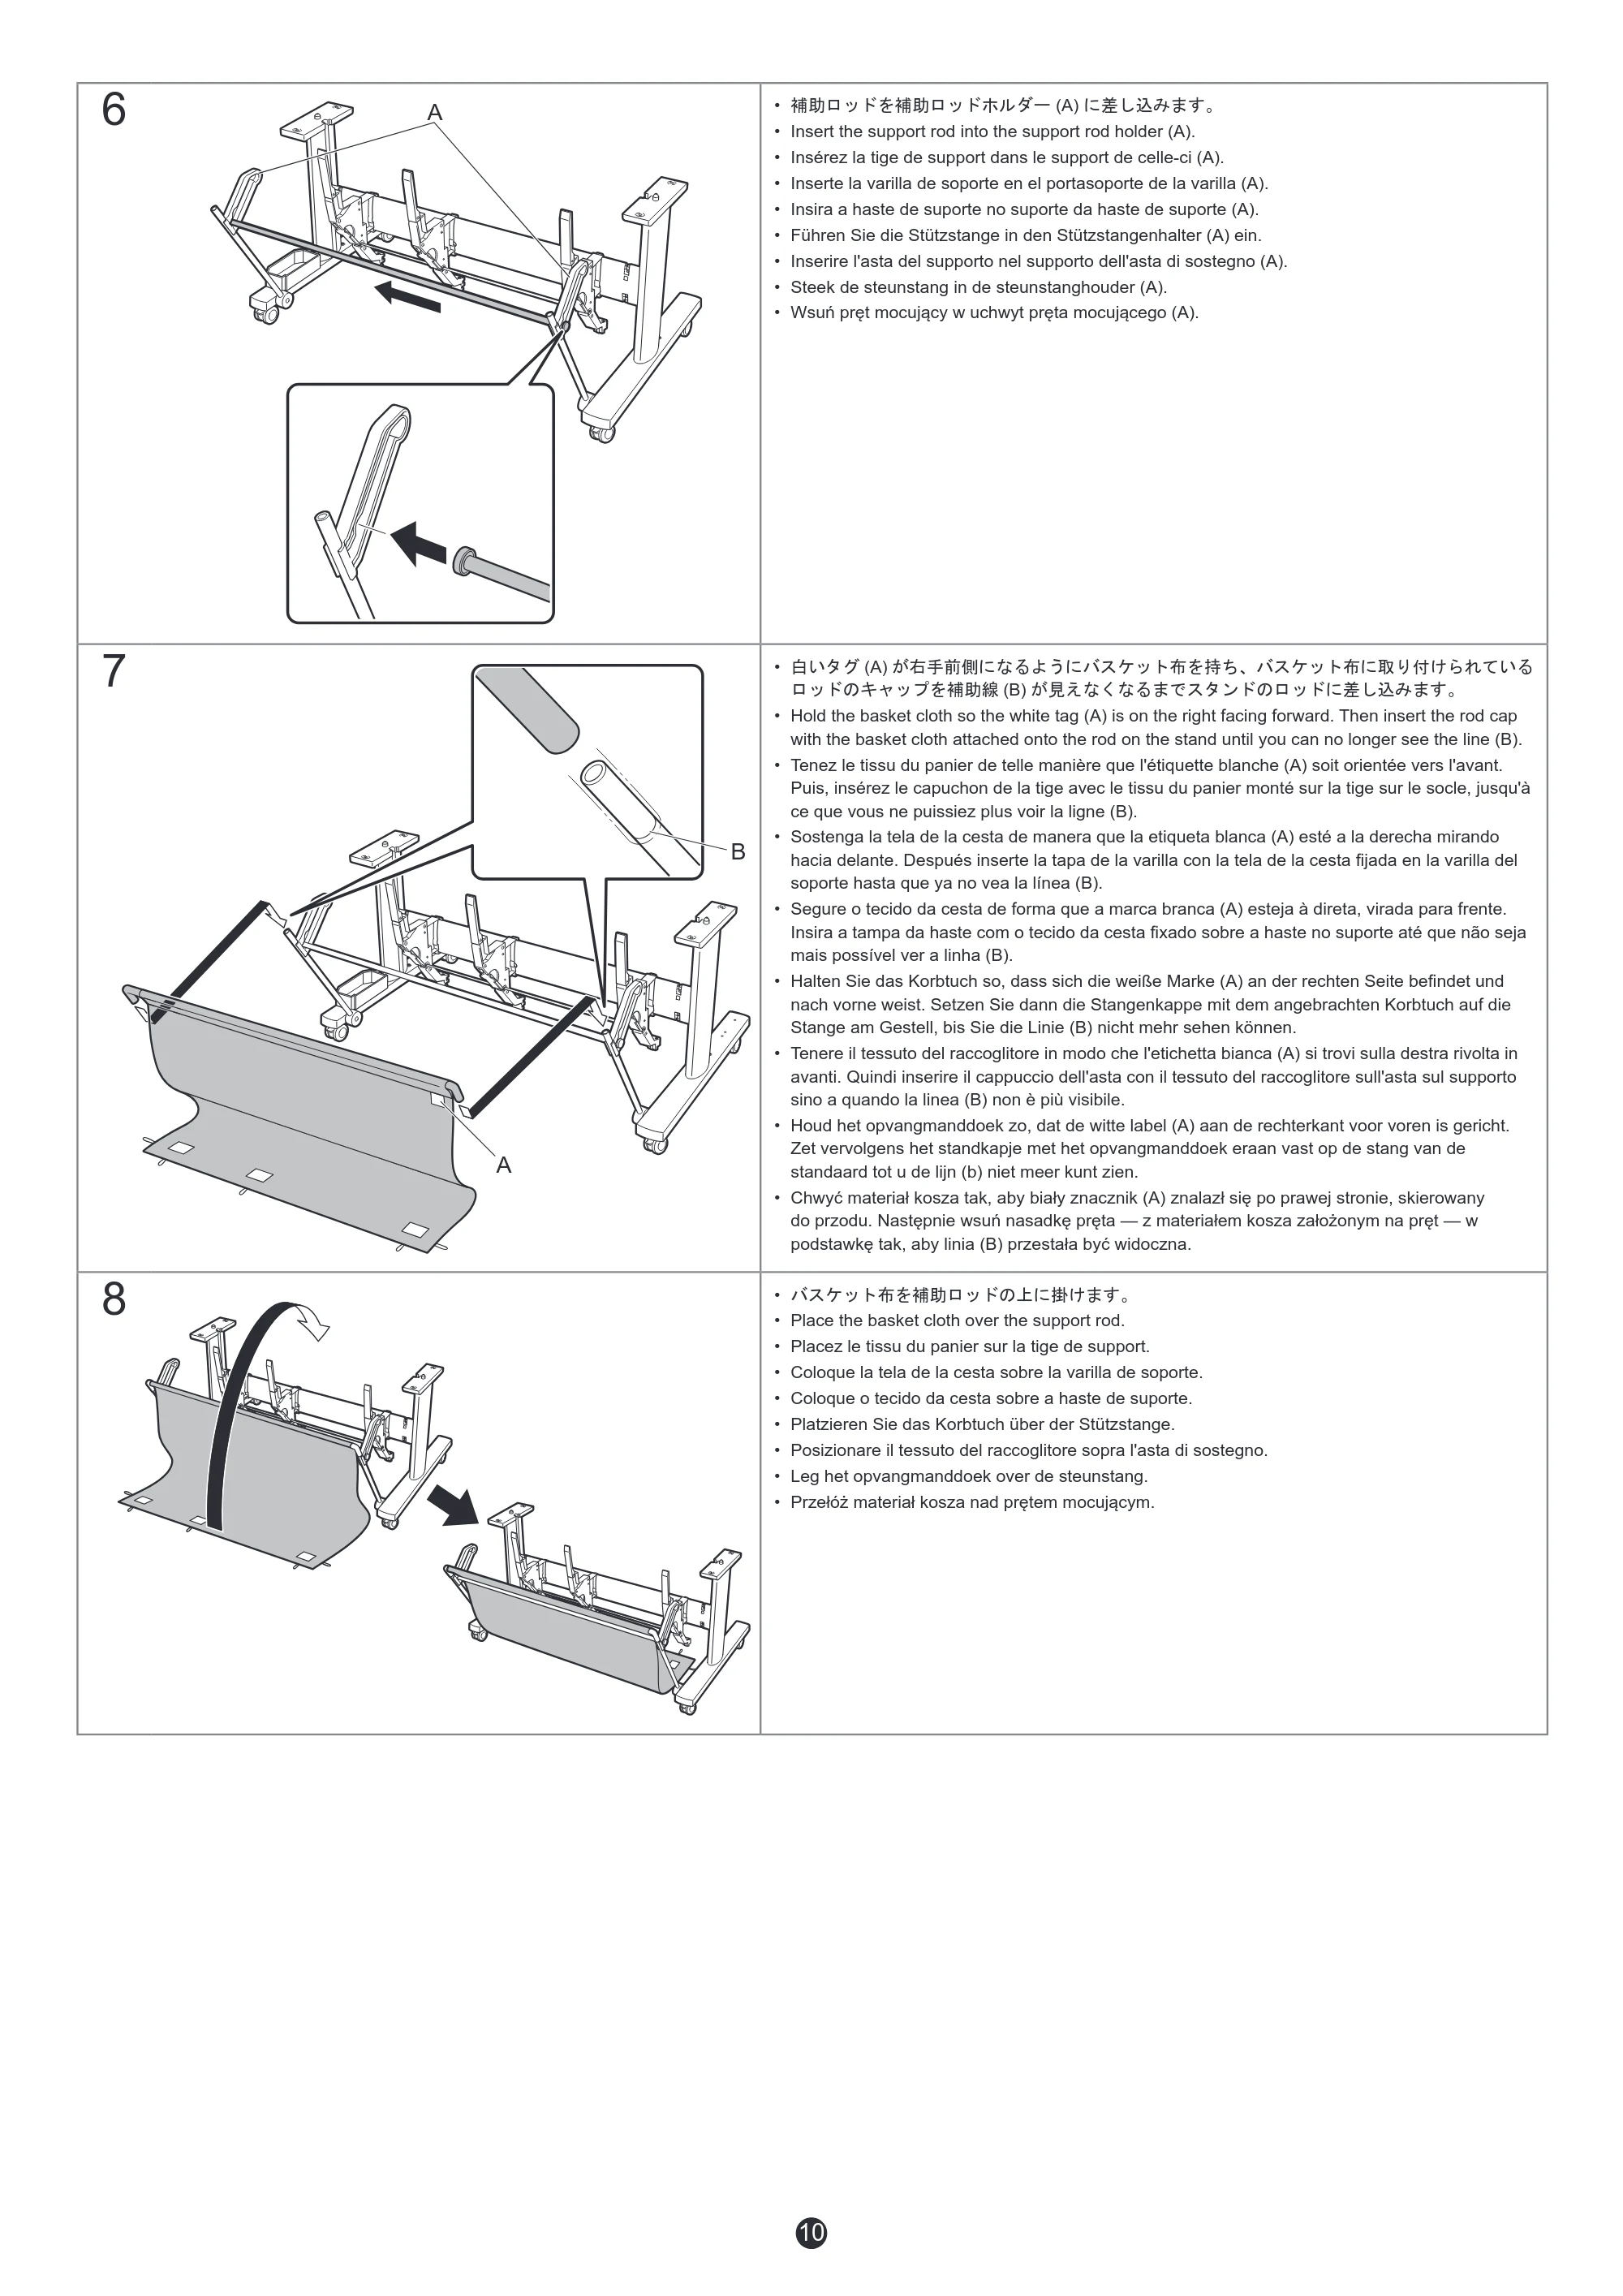
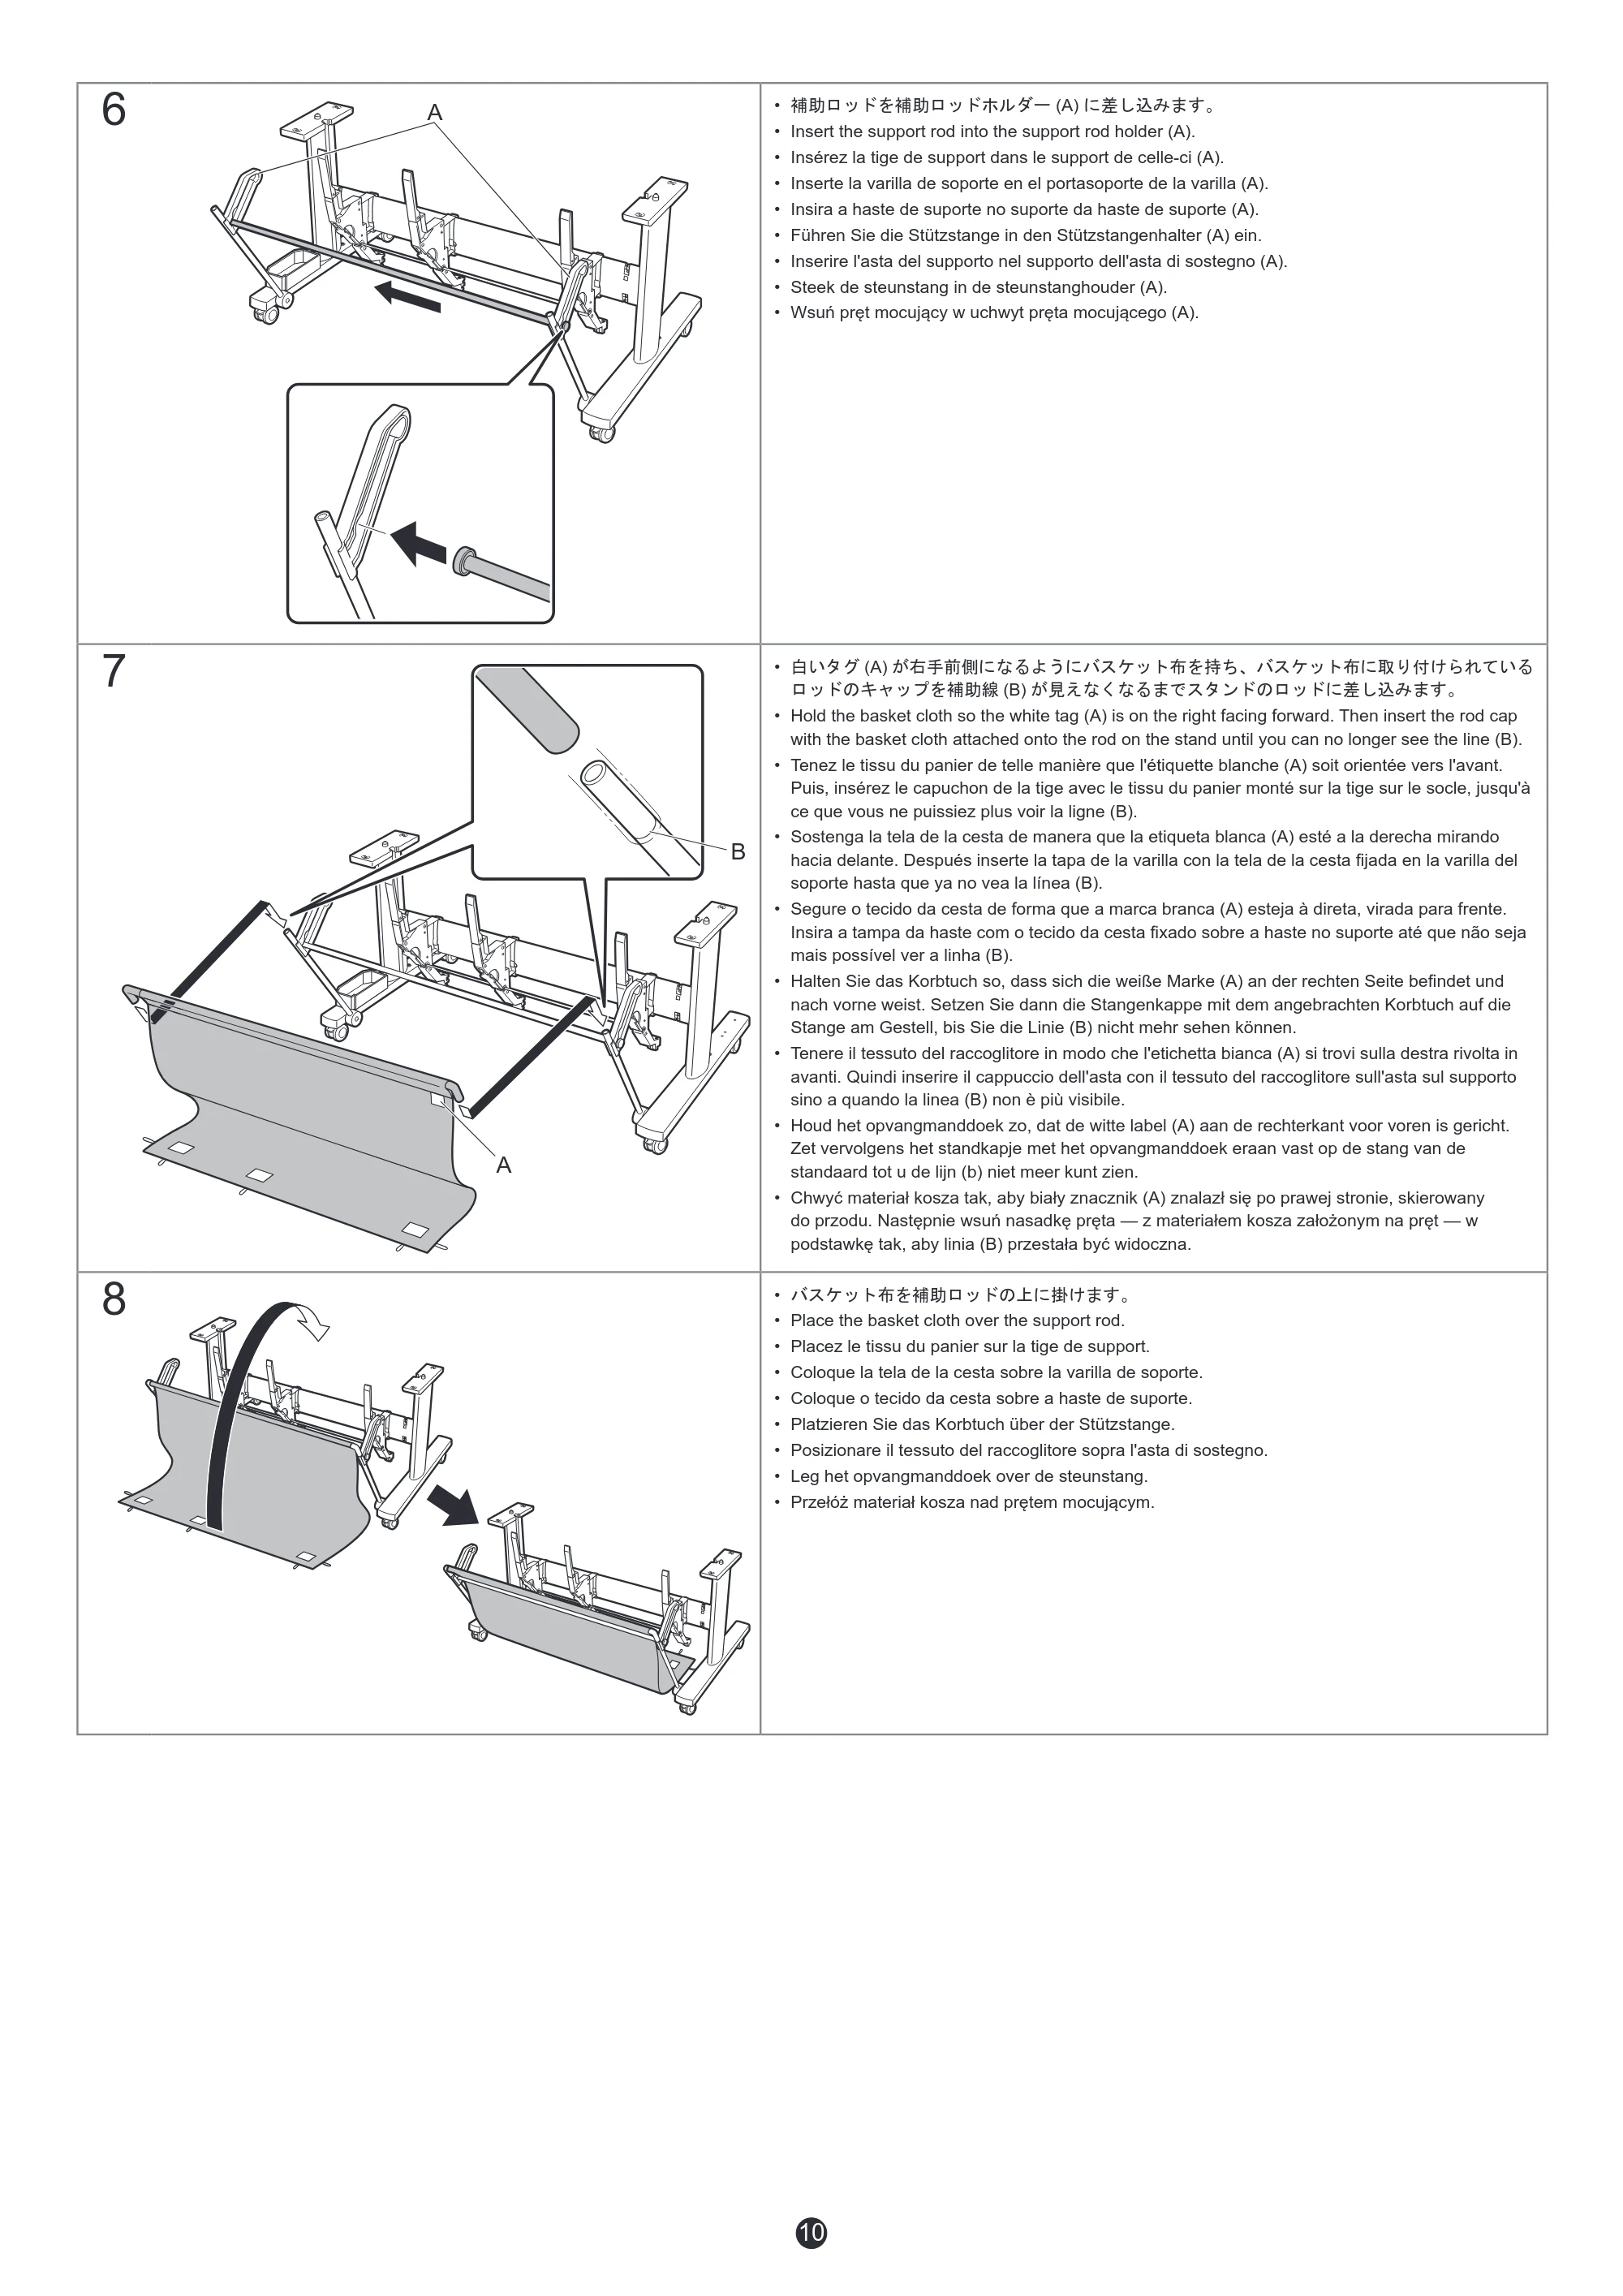
10
6 A
- 補助ロッドを補助ロッドホルダー (A) に差し込みます。
- Insert the support rod into the support rod holder (A).
- Insérez la tige de support dans le support de celle-ci (A).
- Inserte la varilla de soporte en el portasoporte de la varilla (A).
- Insira a haste de suporte no suporte da haste de suporte (A).
- Führen Sie die Stützstange in den Stützstangenhalter (A) ein.
- Inserire l'asta del supporto nel supporto dell'asta di sostegno (A).
- Steek de steunstang in de steunstanghouder (A).
- Wsuń pręt mocujący w uchwyt pręta mocującego (A).
7
B
A
- 白いタグ (A) が右手前側になるようにバスケット布を持ち、バスケット布に取り付けられている
ロッドのキャップを補助線 (B) が見えなくなるまでスタンドのロッドに差し込みます。
- Hold the basket cloth so the white tag (A) is on the right facing forward. Then insert the rod cap
with the basket cloth attached onto the rod on the stand until you can no longer see the line (B).
- Tenez le tissu du panier de telle manière que l'étiquette blanche (A) soit orientée vers l'avant.
Puis, insérez le capuchon de la tige avec le tissu du panier monté sur la tige sur le socle, jusqu'à
ce que vous ne puissiez plus voir la ligne (B).
- Sostenga la tela de la cesta de manera que la etiqueta blanca (A) esté a la derecha mirando
hacia delante. Después inserte la tapa de la varilla con la tela de la cesta fijada en la varilla del
soporte hasta que ya no vea la línea (B).
- Segure o tecido da cesta de forma que a marca branca (A) esteja à direta, virada para frente.
Insira a tampa da haste com o tecido da cesta fixado sobre a haste no suporte até que não seja
mais possível ver a linha (B).
- Halten Sie das Korbtuch so, dass sich die weiße Marke (A) an der rechten Seite befindet und
nach vorne weist. Setzen Sie dann die Stangenkappe mit dem angebrachten Korbtuch auf die
Stange am Gestell, bis Sie die Linie (B) nicht mehr sehen können.
- Tenere il tessuto del raccoglitore in modo che l'etichetta bianca (A) si trovi sulla destra rivolta in
avanti. Quindi inserire il cappuccio dell'asta con il tessuto del raccoglitore sull'asta sul supporto
sino a quando la linea (B) non è più visibile.
- Houd het opvangmanddoek zo, dat de witte label (A) aan de rechterkant voor voren is gericht.
Zet vervolgens het standkapje met het opvangmanddoek eraan vast op de stang van de
standaard tot u de lijn (b) niet meer kunt zien.
- Chwyć materiał kosza tak, aby biały znacznik (A) znalazł się po prawej stronie, skierowany
do przodu. Następnie wsuń nasadkę pręta — z materiałem kosza założonym na pręt — w
podstawkę tak, aby linia (B) przestała być widoczna.
8
- バスケット布を補助ロッドの上に掛けます。
- Place the basket cloth over the support rod.
- Placez le tissu du panier sur la tige de support.
- Coloque la tela de la cesta sobre la varilla de soporte.
- Coloque o tecido da cesta sobre a haste de suporte.
- Platzieren Sie das Korbtuch über der Stützstange.
- Posizionare il tessuto del raccoglitore sopra l'asta di sostegno.
- Leg het opvangmanddoek over de steunstang.
- Przełóż materiał kosza nad prętem mocującym.
12ページ
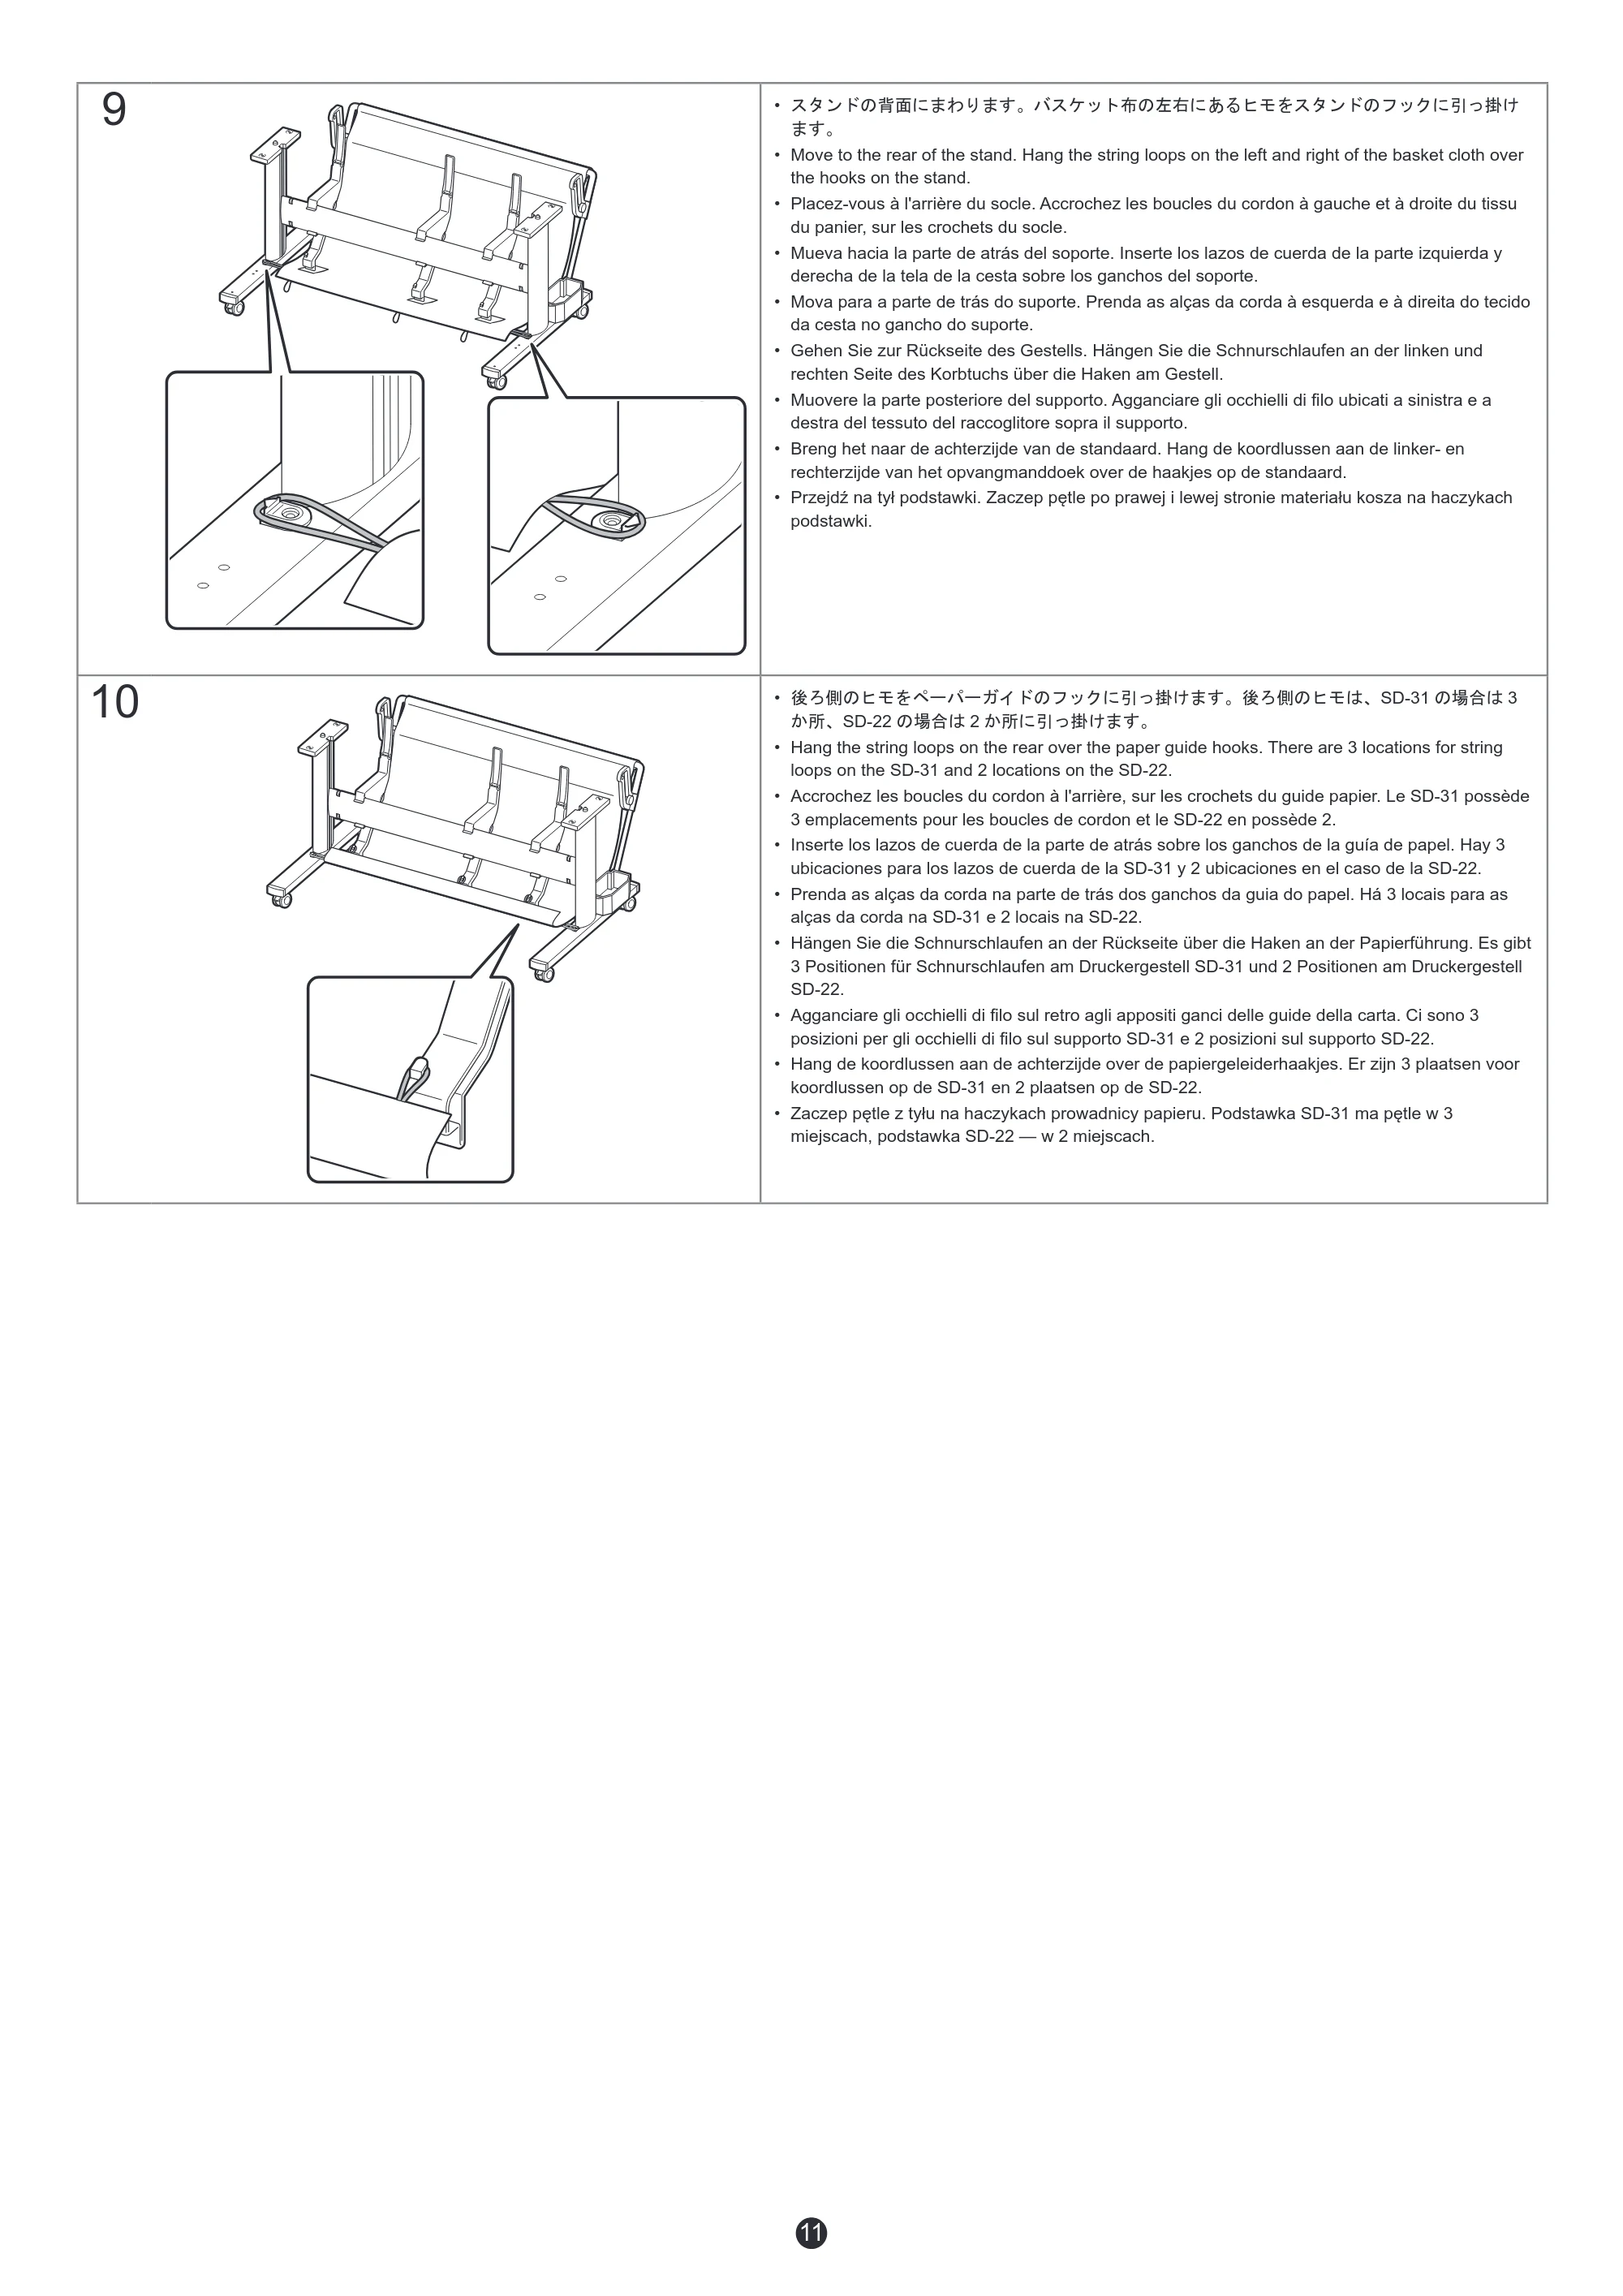
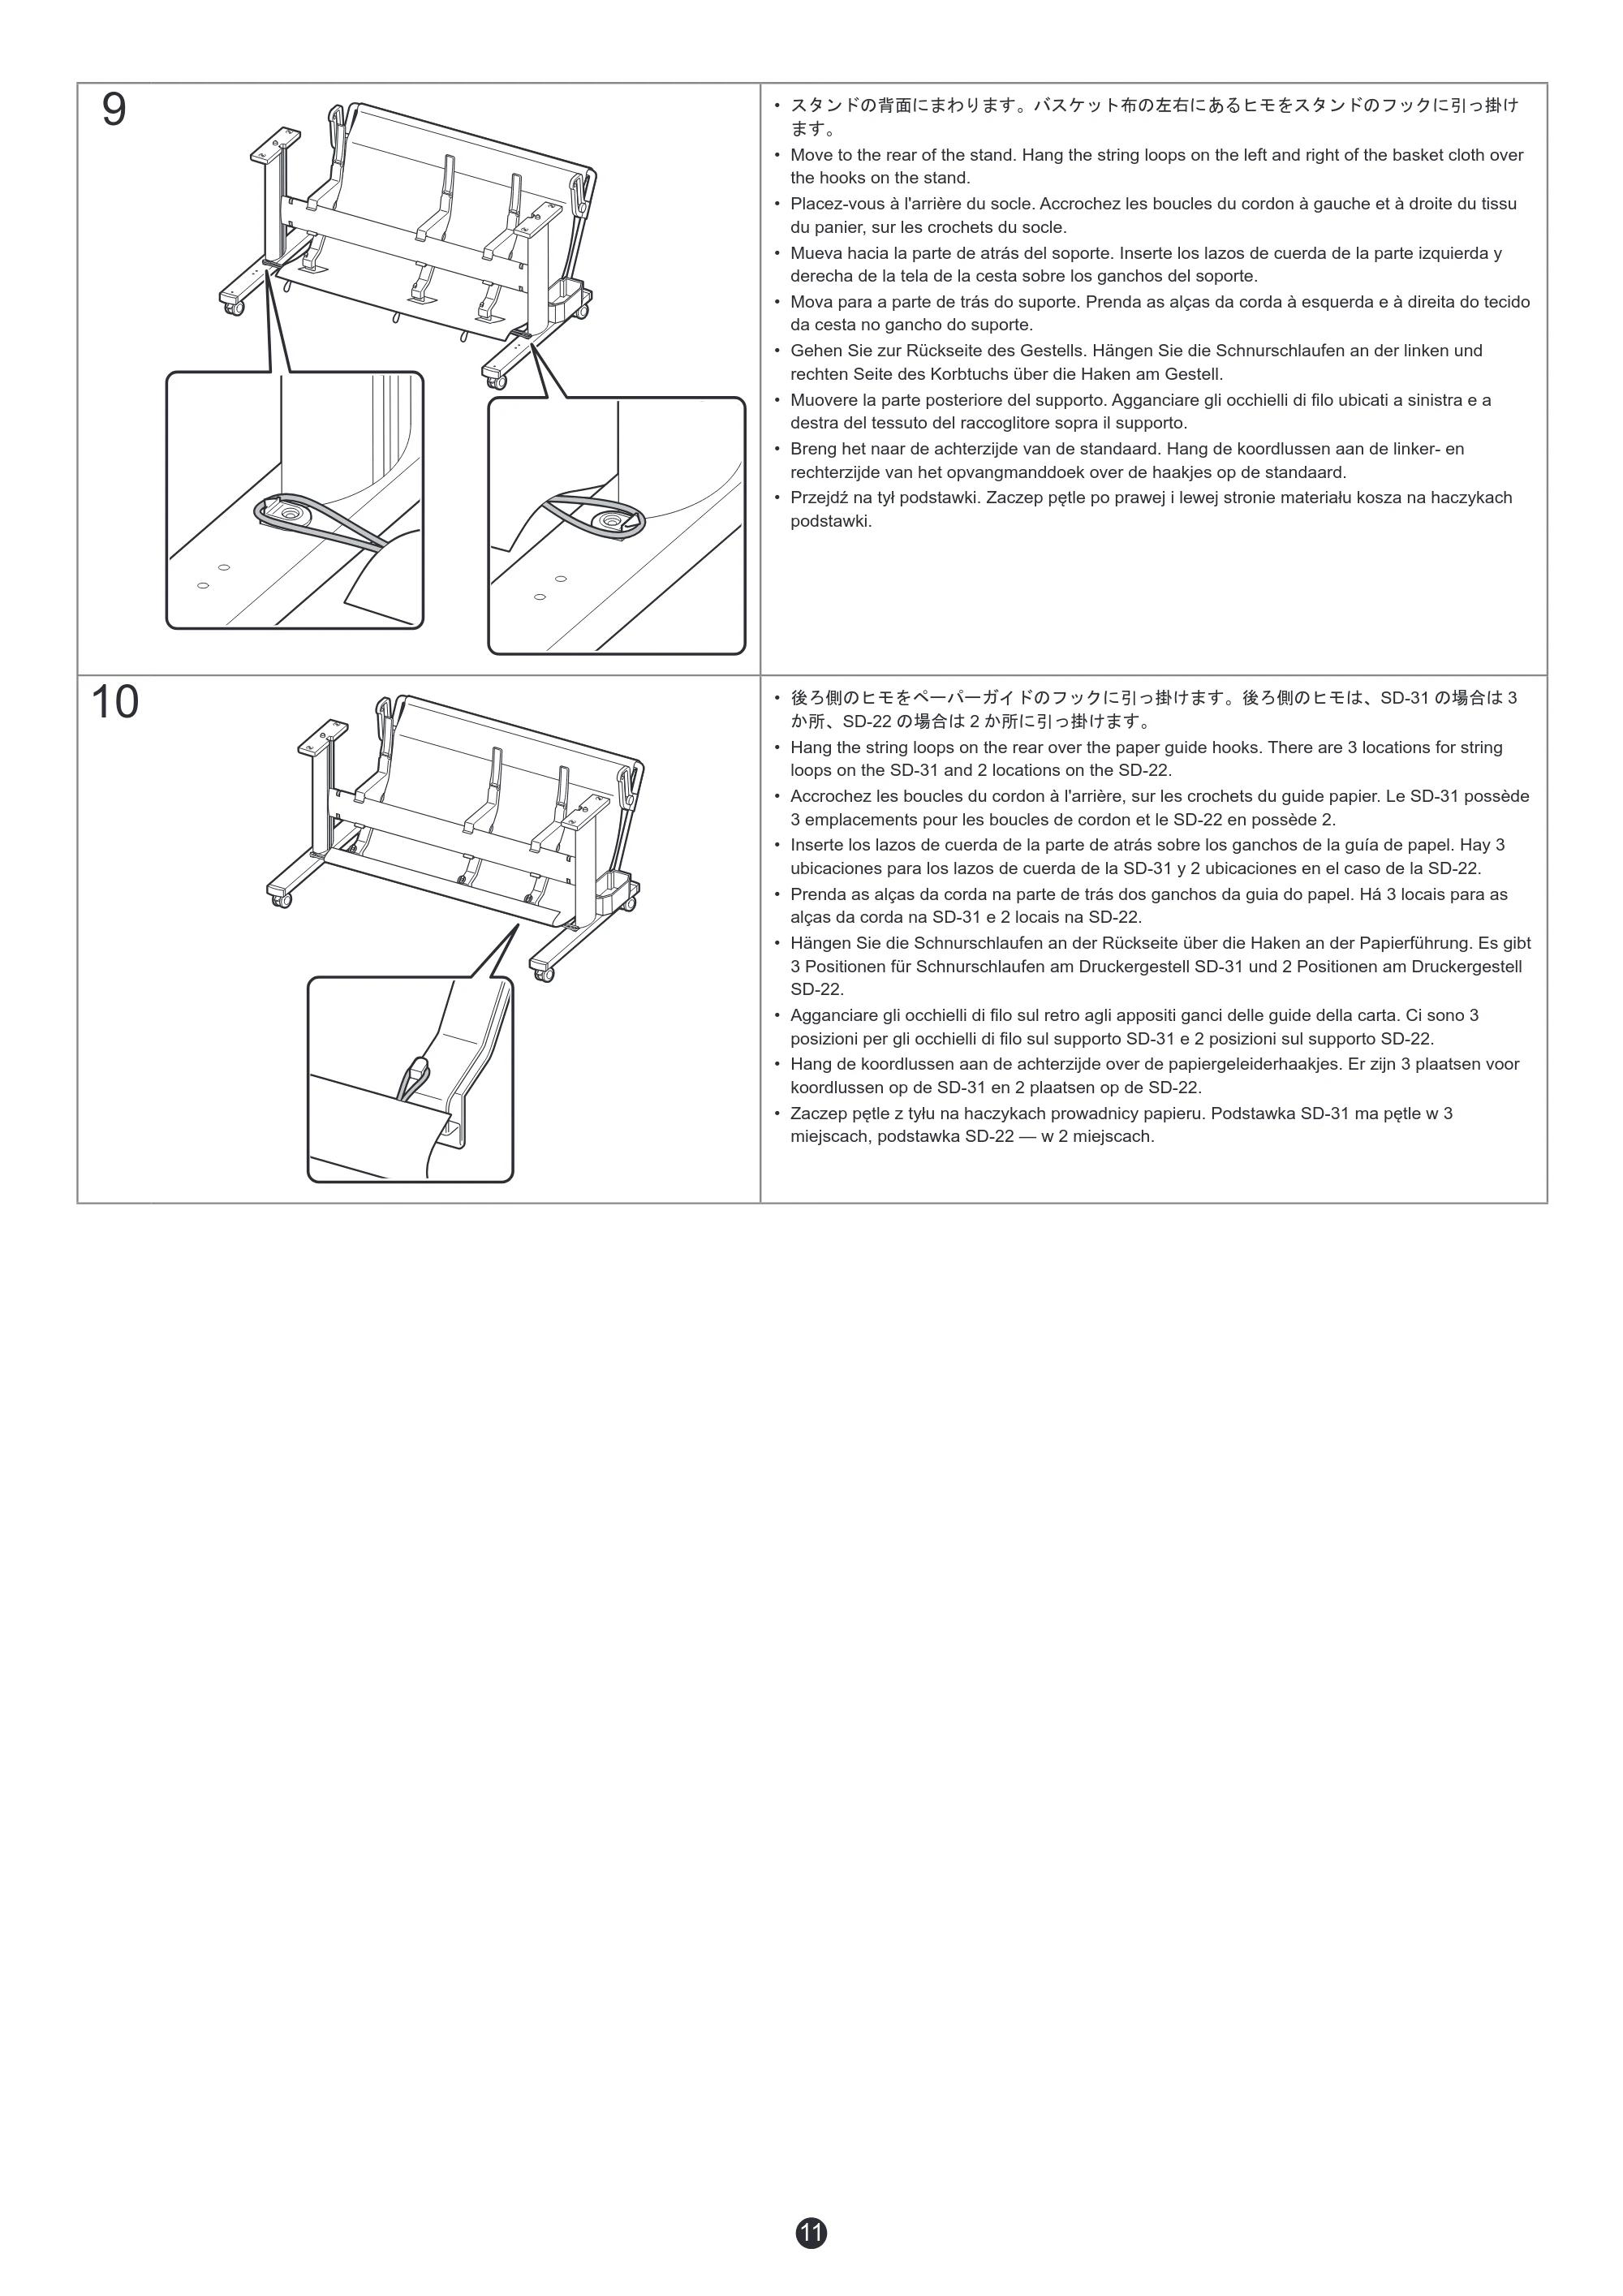
11
9
- スタンドの背面にまわります。バスケット布の左右にあるヒモをスタンドのフックに引っ掛け
ます。
- Move to the rear of the stand. Hang the string loops on the left and right of the basket cloth over
the hooks on the stand.
- Placez-vous à l'arrière du socle. Accrochez les boucles du cordon à gauche et à droite du tissu
du panier, sur les crochets du socle.
- Mueva hacia la parte de atrás del soporte. Inserte los lazos de cuerda de la parte izquierda y
derecha de la tela de la cesta sobre los ganchos del soporte.
- Mova para a parte de trás do suporte. Prenda as alças da corda à esquerda e à direita do tecido
da cesta no gancho do suporte.
- Gehen Sie zur Rückseite des Gestells. Hängen Sie die Schnurschlaufen an der linken und
rechten Seite des Korbtuchs über die Haken am Gestell.
- Muovere la parte posteriore del supporto. Agganciare gli occhielli di filo ubicati a sinistra e a
destra del tessuto del raccoglitore sopra il supporto.
- Breng het naar de achterzijde van de standaard. Hang de koordlussen aan de linker- en
rechterzijde van het opvangmanddoek over de haakjes op de standaard.
- Przejdź na tył podstawki. Zaczep pętle po prawej i lewej stronie materiału kosza na haczykach
podstawki.
10
- 後ろ側のヒモをペーパーガイドのフックに引っ掛けます。後ろ側のヒモは、SD-31 の場合は 3
か所、SD-22 の場合は 2 か所に引っ掛けます。
- Hang the string loops on the rear over the paper guide hooks. There are 3 locations for string
loops on the SD-31 and 2 locations on the SD-22.
- Accrochez les boucles du cordon à l'arrière, sur les crochets du guide papier. Le SD-31 possède
3 emplacements pour les boucles de cordon et le SD-22 en possède 2.
- Inserte los lazos de cuerda de la parte de atrás sobre los ganchos de la guía de papel. Hay 3
ubicaciones para los lazos de cuerda de la SD-31 y 2 ubicaciones en el caso de la SD-22.
- Prenda as alças da corda na parte de trás dos ganchos da guia do papel. Há 3 locais para as
alças da corda na SD-31 e 2 locais na SD-22.
- Hängen Sie die Schnurschlaufen an der Rückseite über die Haken an der Papierführung. Es gibt
3 Positionen für Schnurschlaufen am Druckergestell SD-31 und 2 Positionen am Druckergestell
SD-22.
- Agganciare gli occhielli di filo sul retro agli appositi ganci delle guide della carta. Ci sono 3
posizioni per gli occhielli di filo sul supporto SD-31 e 2 posizioni sul supporto SD-22.
- Hang de koordlussen aan de achterzijde over de papiergeleiderhaakjes. Er zijn 3 plaatsen voor
koordlussen op de SD-31 en 2 plaatsen op de SD-22.
- Zaczep pętle z tyłu na haczykach prowadnicy papieru. Podstawka SD-31 ma pętle w 3
miejscach, podstawka SD-22 — w 2 miejscach.
プリンター設置の準備をする
12
プリンター設置の準備をする
Preparación para la instalación de la
impresora
Preparazione all'installazione della
stampante
Preparing to Install the Printer Preparação para instalar a impressora
Voorbereidingen treffen voor het
installeren van de printer
Préparation de l'installation de
l'imprimante
Vorbereitung für die Installation des
Druckers
Przygotowanie do instalacji drukarki
1 A
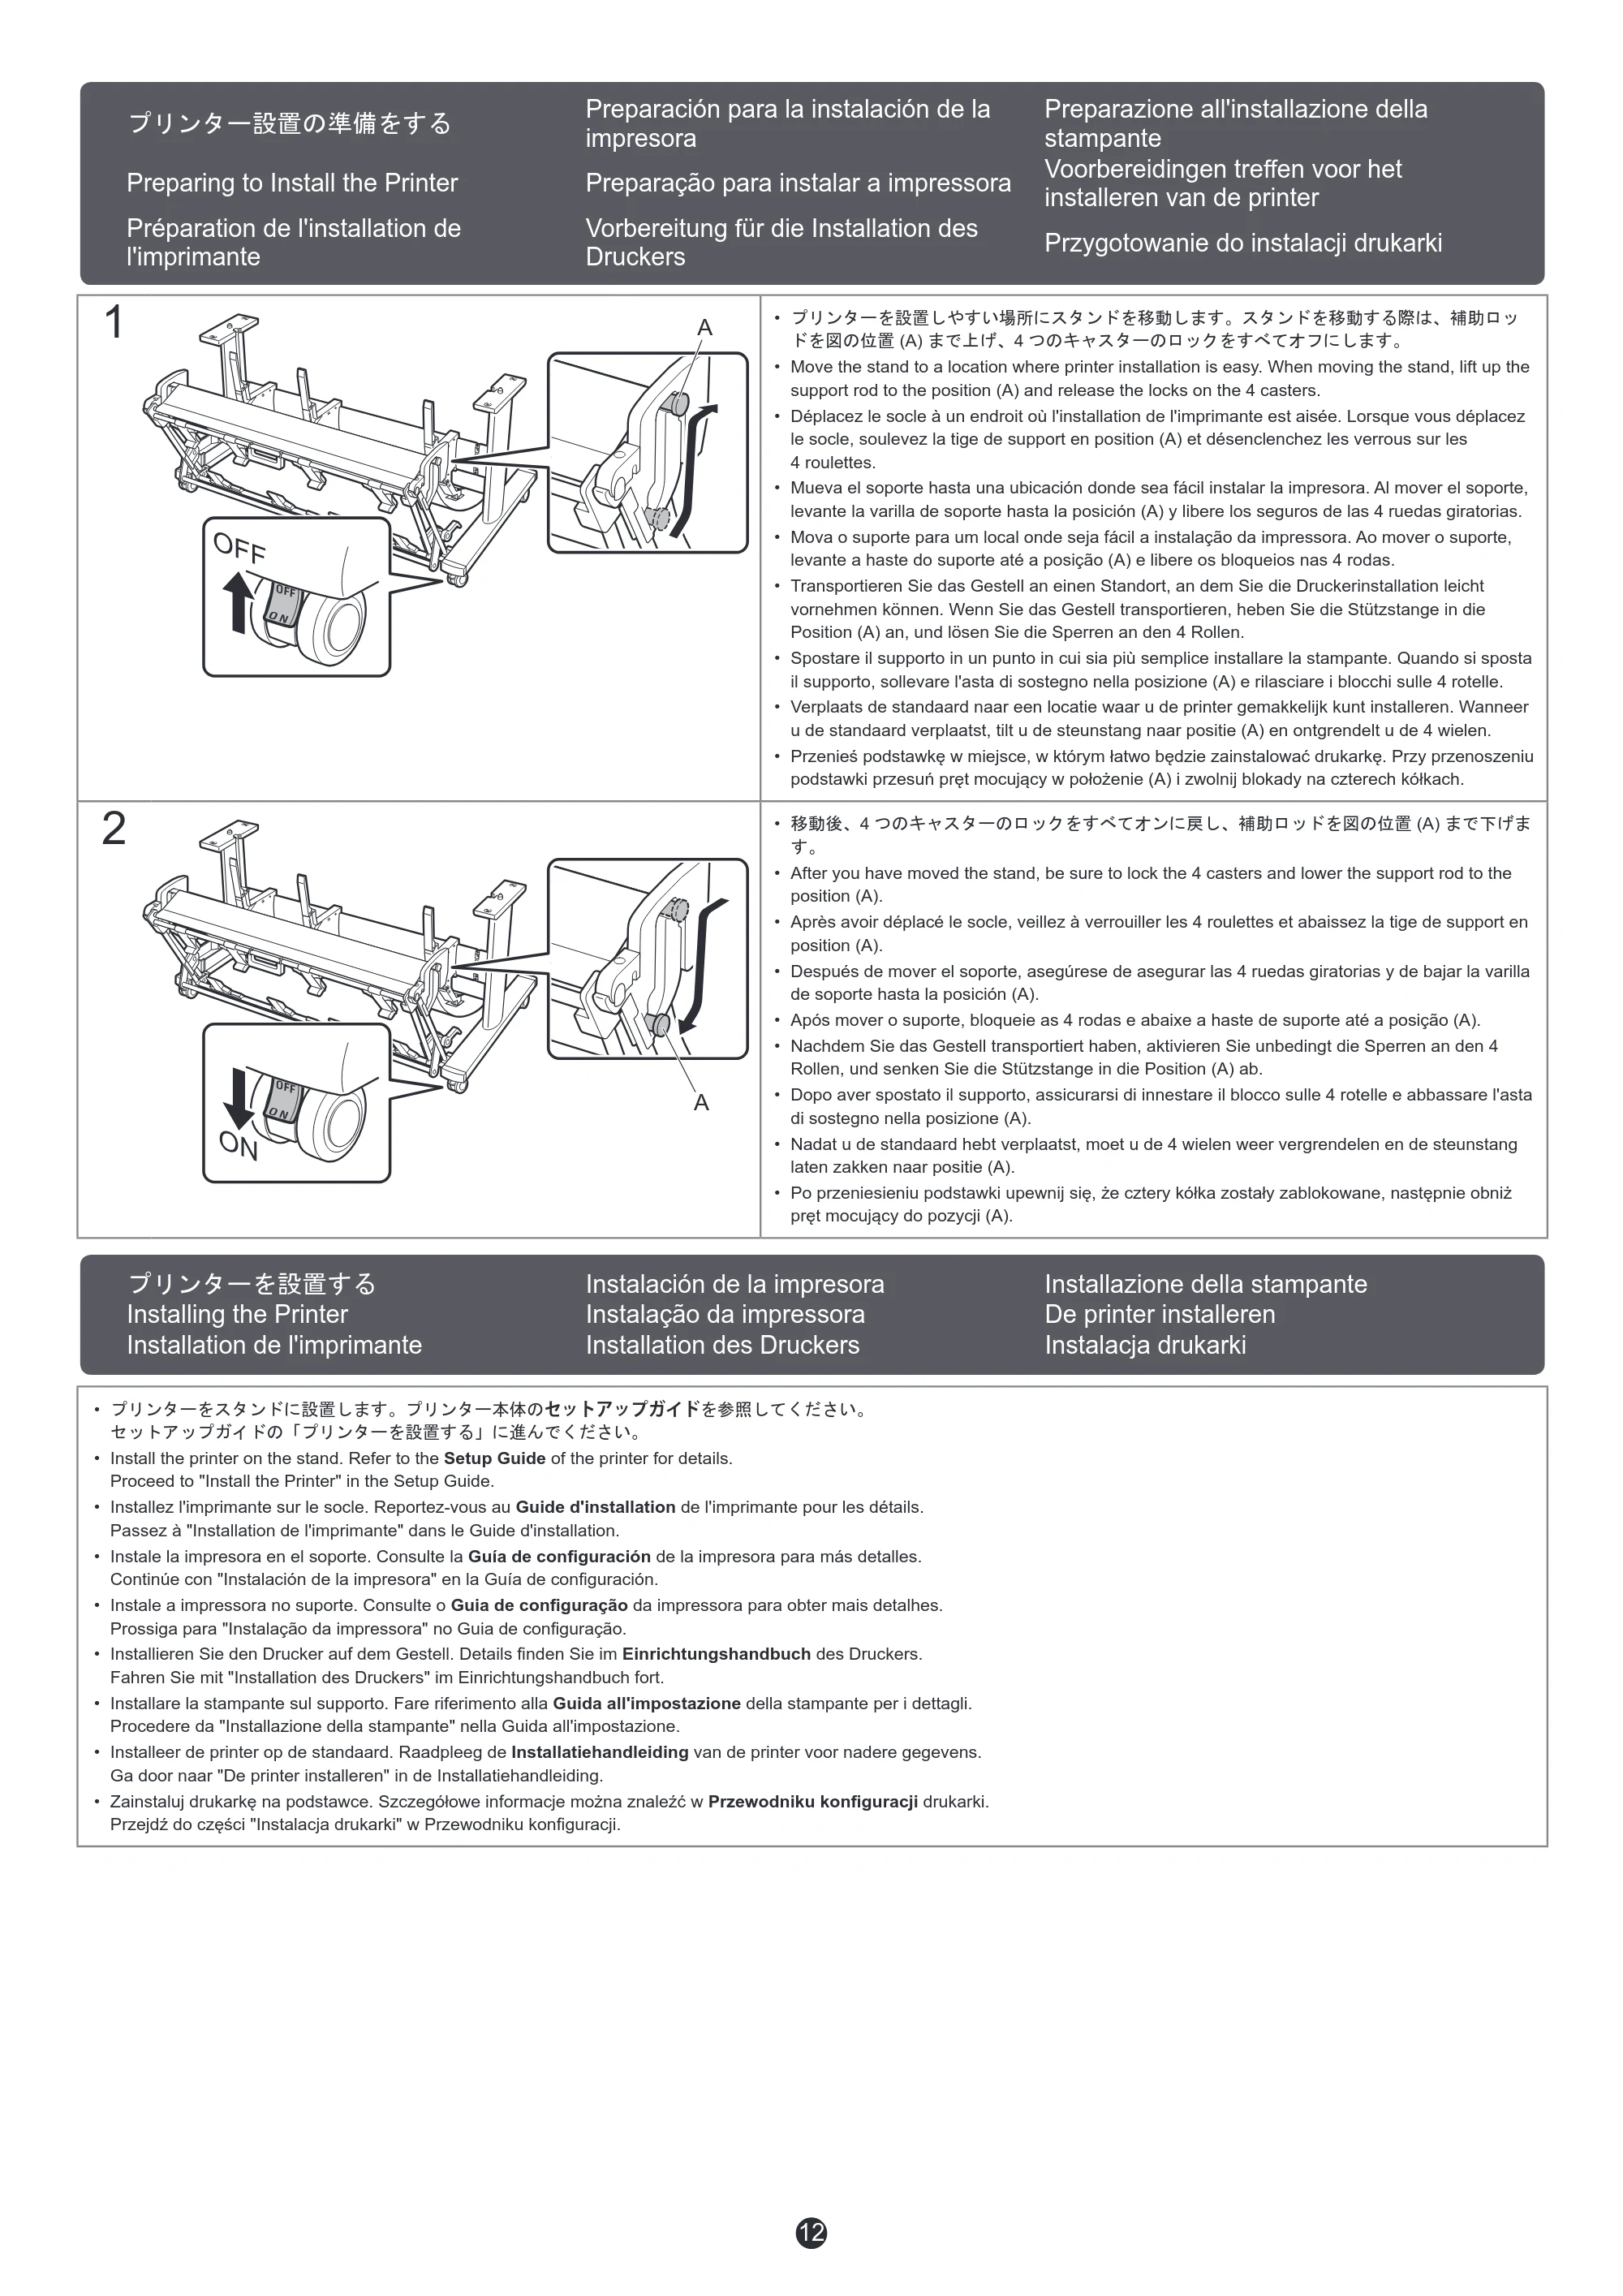
- プリンターを設置しやすい場所にスタンドを移動します。スタンドを移動する際は、補助ロッ
ドを図の位置 (A) まで上げ、4 つのキャスターのロックをすべてオフにします。
- Move the stand to a location where printer installation is easy. When moving the stand, lift up the
support rod to the position (A) and release the locks on the 4 casters.
- Déplacez le socle à un endroit où l'installation de l'imprimante est aisée. Lorsque vous déplacez
le socle, soulevez la tige de support en position (A) et désenclenchez les verrous sur les
4 roulettes.
- Mueva el soporte hasta una ubicación donde sea fácil instalar la impresora. Al mover el soporte,
levante la varilla de soporte hasta la posición (A) y libere los seguros de las 4 ruedas giratorias.
- Mova o suporte para um local onde seja fácil a instalação da impressora. Ao mover o suporte,
levante a haste do suporte até a posição (A) e libere os bloqueios nas 4 rodas.
- Transportieren Sie das Gestell an einen Standort, an dem Sie die Druckerinstallation leicht
vornehmen können. Wenn Sie das Gestell transportieren, heben Sie die Stützstange in die
Position (A) an, und lösen Sie die Sperren an den 4 Rollen.
- Spostare il supporto in un punto in cui sia più semplice installare la stampante. Quando si sposta
il supporto, sollevare l'asta di sostegno nella posizione (A) e rilasciare i blocchi sulle 4 rotelle.
- Verplaats de standaard naar een locatie waar u de printer gemakkelijk kunt installeren. Wanneer
u de standaard verplaatst, tilt u de steunstang naar positie (A) en ontgrendelt u de 4 wielen.
- Przenieś podstawkę w miejsce, w którym łatwo będzie zainstalować drukarkę. Przy przenoszeniu
podstawki przesuń pręt mocujący w położenie (A) i zwolnij blokady na czterech kółkach.
2
A
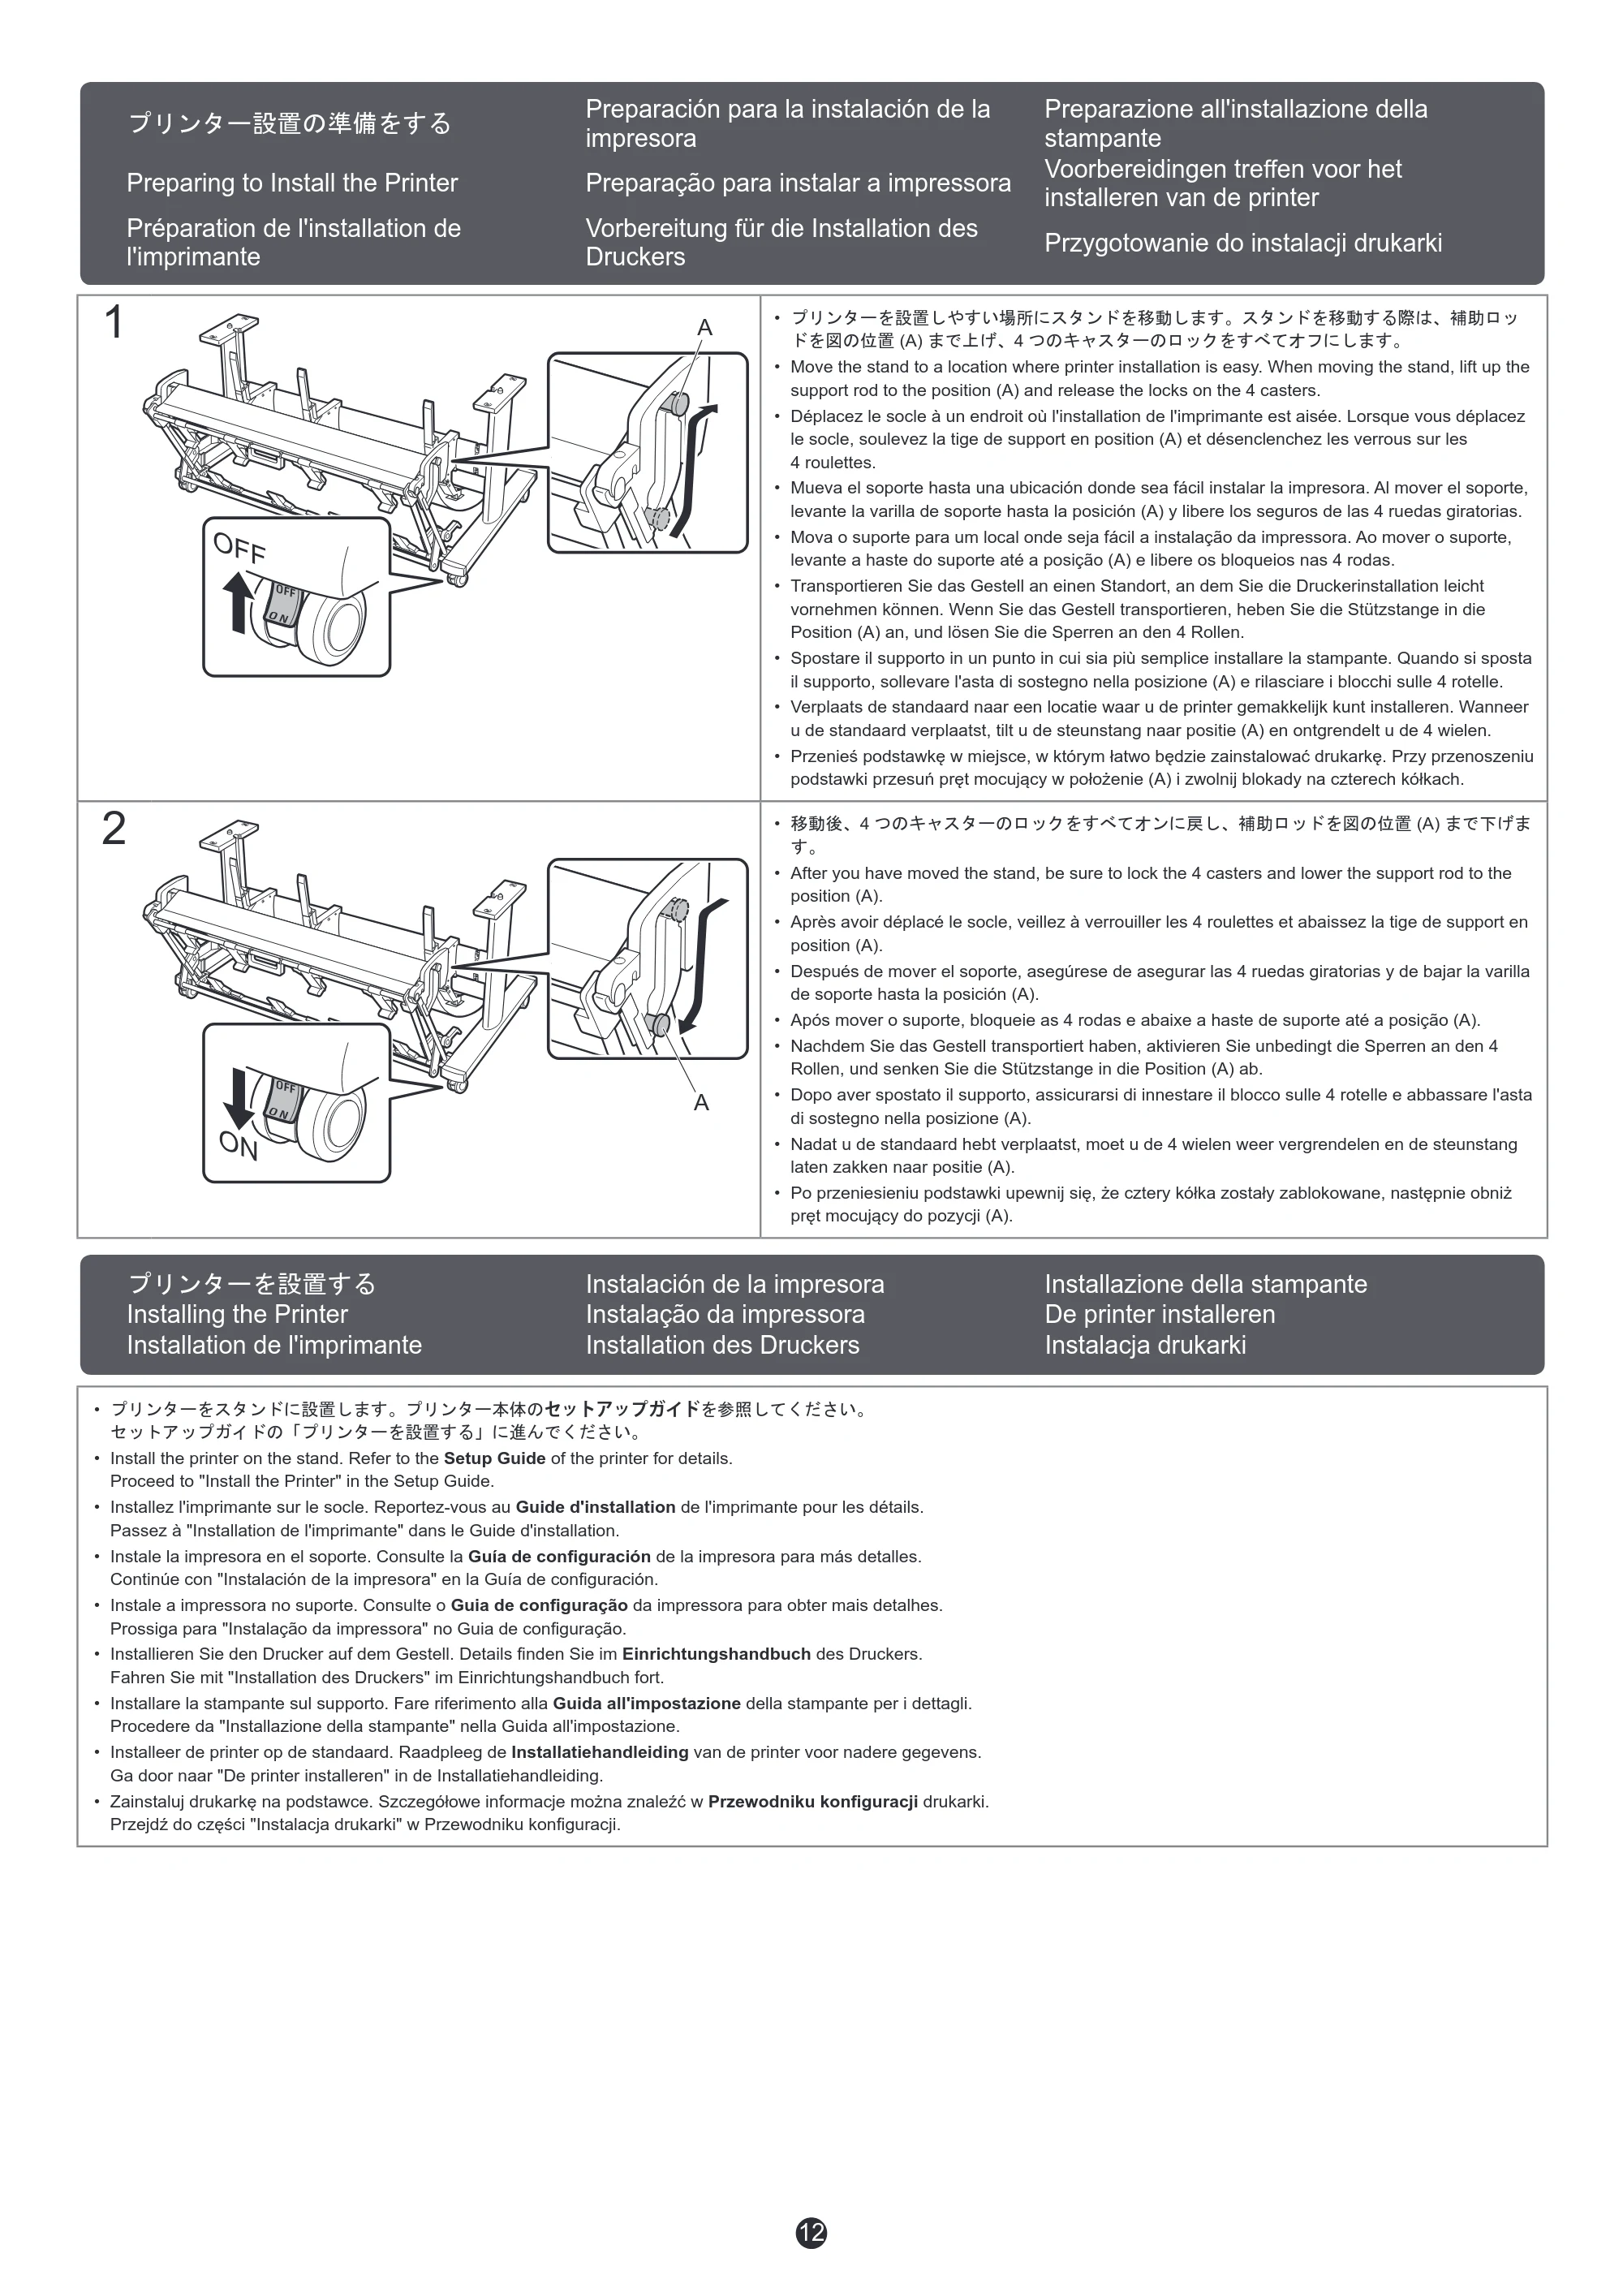
- 移動後、4 つのキャスターのロックをすべてオンに戻し、補助ロッドを図の位置 (A) まで下げま
す。
- After you have moved the stand, be sure to lock the 4 casters and lower the support rod to the
position (A).
- Après avoir déplacé le socle, veillez à verrouiller les 4 roulettes et abaissez la tige de support en
position (A).
- Después de mover el soporte, asegúrese de asegurar las 4 ruedas giratorias y de bajar la varilla
de soporte hasta la posición (A).
- Após mover o suporte, bloqueie as 4 rodas e abaixe a haste de suporte até a posição (A).
- Nachdem Sie das Gestell transportiert haben, aktivieren Sie unbedingt die Sperren an den 4
Rollen, und senken Sie die Stützstange in die Position (A) ab.
- Dopo aver spostato il supporto, assicurarsi di innestare il blocco sulle 4 rotelle e abbassare l'asta
di sostegno nella posizione (A).
- Nadat u de standaard hebt verplaatst, moet u de 4 wielen weer vergrendelen en de steunstang
laten zakken naar positie (A).
- Po przeniesieniu podstawki upewnij się, że cztery kółka zostały zablokowane, następnie obniż
pręt mocujący do pozycji (A).
プリンターを設置する Instalación de la impresora Installazione della stampante
Installing the Printer Instalação da impressora De printer installeren
Installation de l'imprimante Installation des Druckers Instalacja drukarki
- プリンターをスタンドに設置します。プリンター本体のセットアップガイドを参照してください。
セットアップガイドの「プリンターを設置する」に進んでください。
- Install the printer on the stand. Refer to the Setup Guide of the printer for details.
Proceed to "Install the Printer" in the Setup Guide.
- Installez l'imprimante sur le socle. Reportez-vous au Guide d'installation de l'imprimante pour les détails.
Passez à "Installation de l'imprimante" dans le Guide d'installation.
- Instale la impresora en el soporte. Consulte la Guía de configuración de la impresora para más detalles.
Continúe con "Instalación de la impresora" en la Guía de configuración.
- Instale a impressora no suporte. Consulte o Guia de configuração da impressora para obter mais detalhes.
Prossiga para "Instalação da impressora" no Guia de configuração.
- Installieren Sie den Drucker auf dem Gestell. Details finden Sie im Einrichtungshandbuch des Druckers.
Fahren Sie mit "Installation des Druckers" im Einrichtungshandbuch fort.
- Installare la stampante sul supporto. Fare riferimento alla Guida all'impostazione della stampante per i dettagli.
Procedere da "Installazione della stampante" nella Guida all'impostazione.
- Installeer de printer op de standaard. Raadpleeg de Installatiehandleiding van de printer voor nadere gegevens.
Ga door naar "De printer installeren" in de Installatiehandleiding.
- Zainstaluj drukarkę na podstawce. Szczegółowe informacje można znaleźć w Przewodniku konfiguracji drukarki.
Przejdź do części "Instalacja drukarki" w Przewodniku konfiguracji.
バスケットのポジション例
13QT6-2768-V01 PRINTED IN XXXXXXXX
IMPRIMÉ XX XXXXXXXX
© CANON INC. 2018XXXXXXXX
バスケットのポジション例 Uso de la cesta Utilizzo del raccoglitore
Using the Basket Uso da cesta De opvangmand gebruiken
Utilisation du panier Verwenden des Korbs Korzystanie z kosza
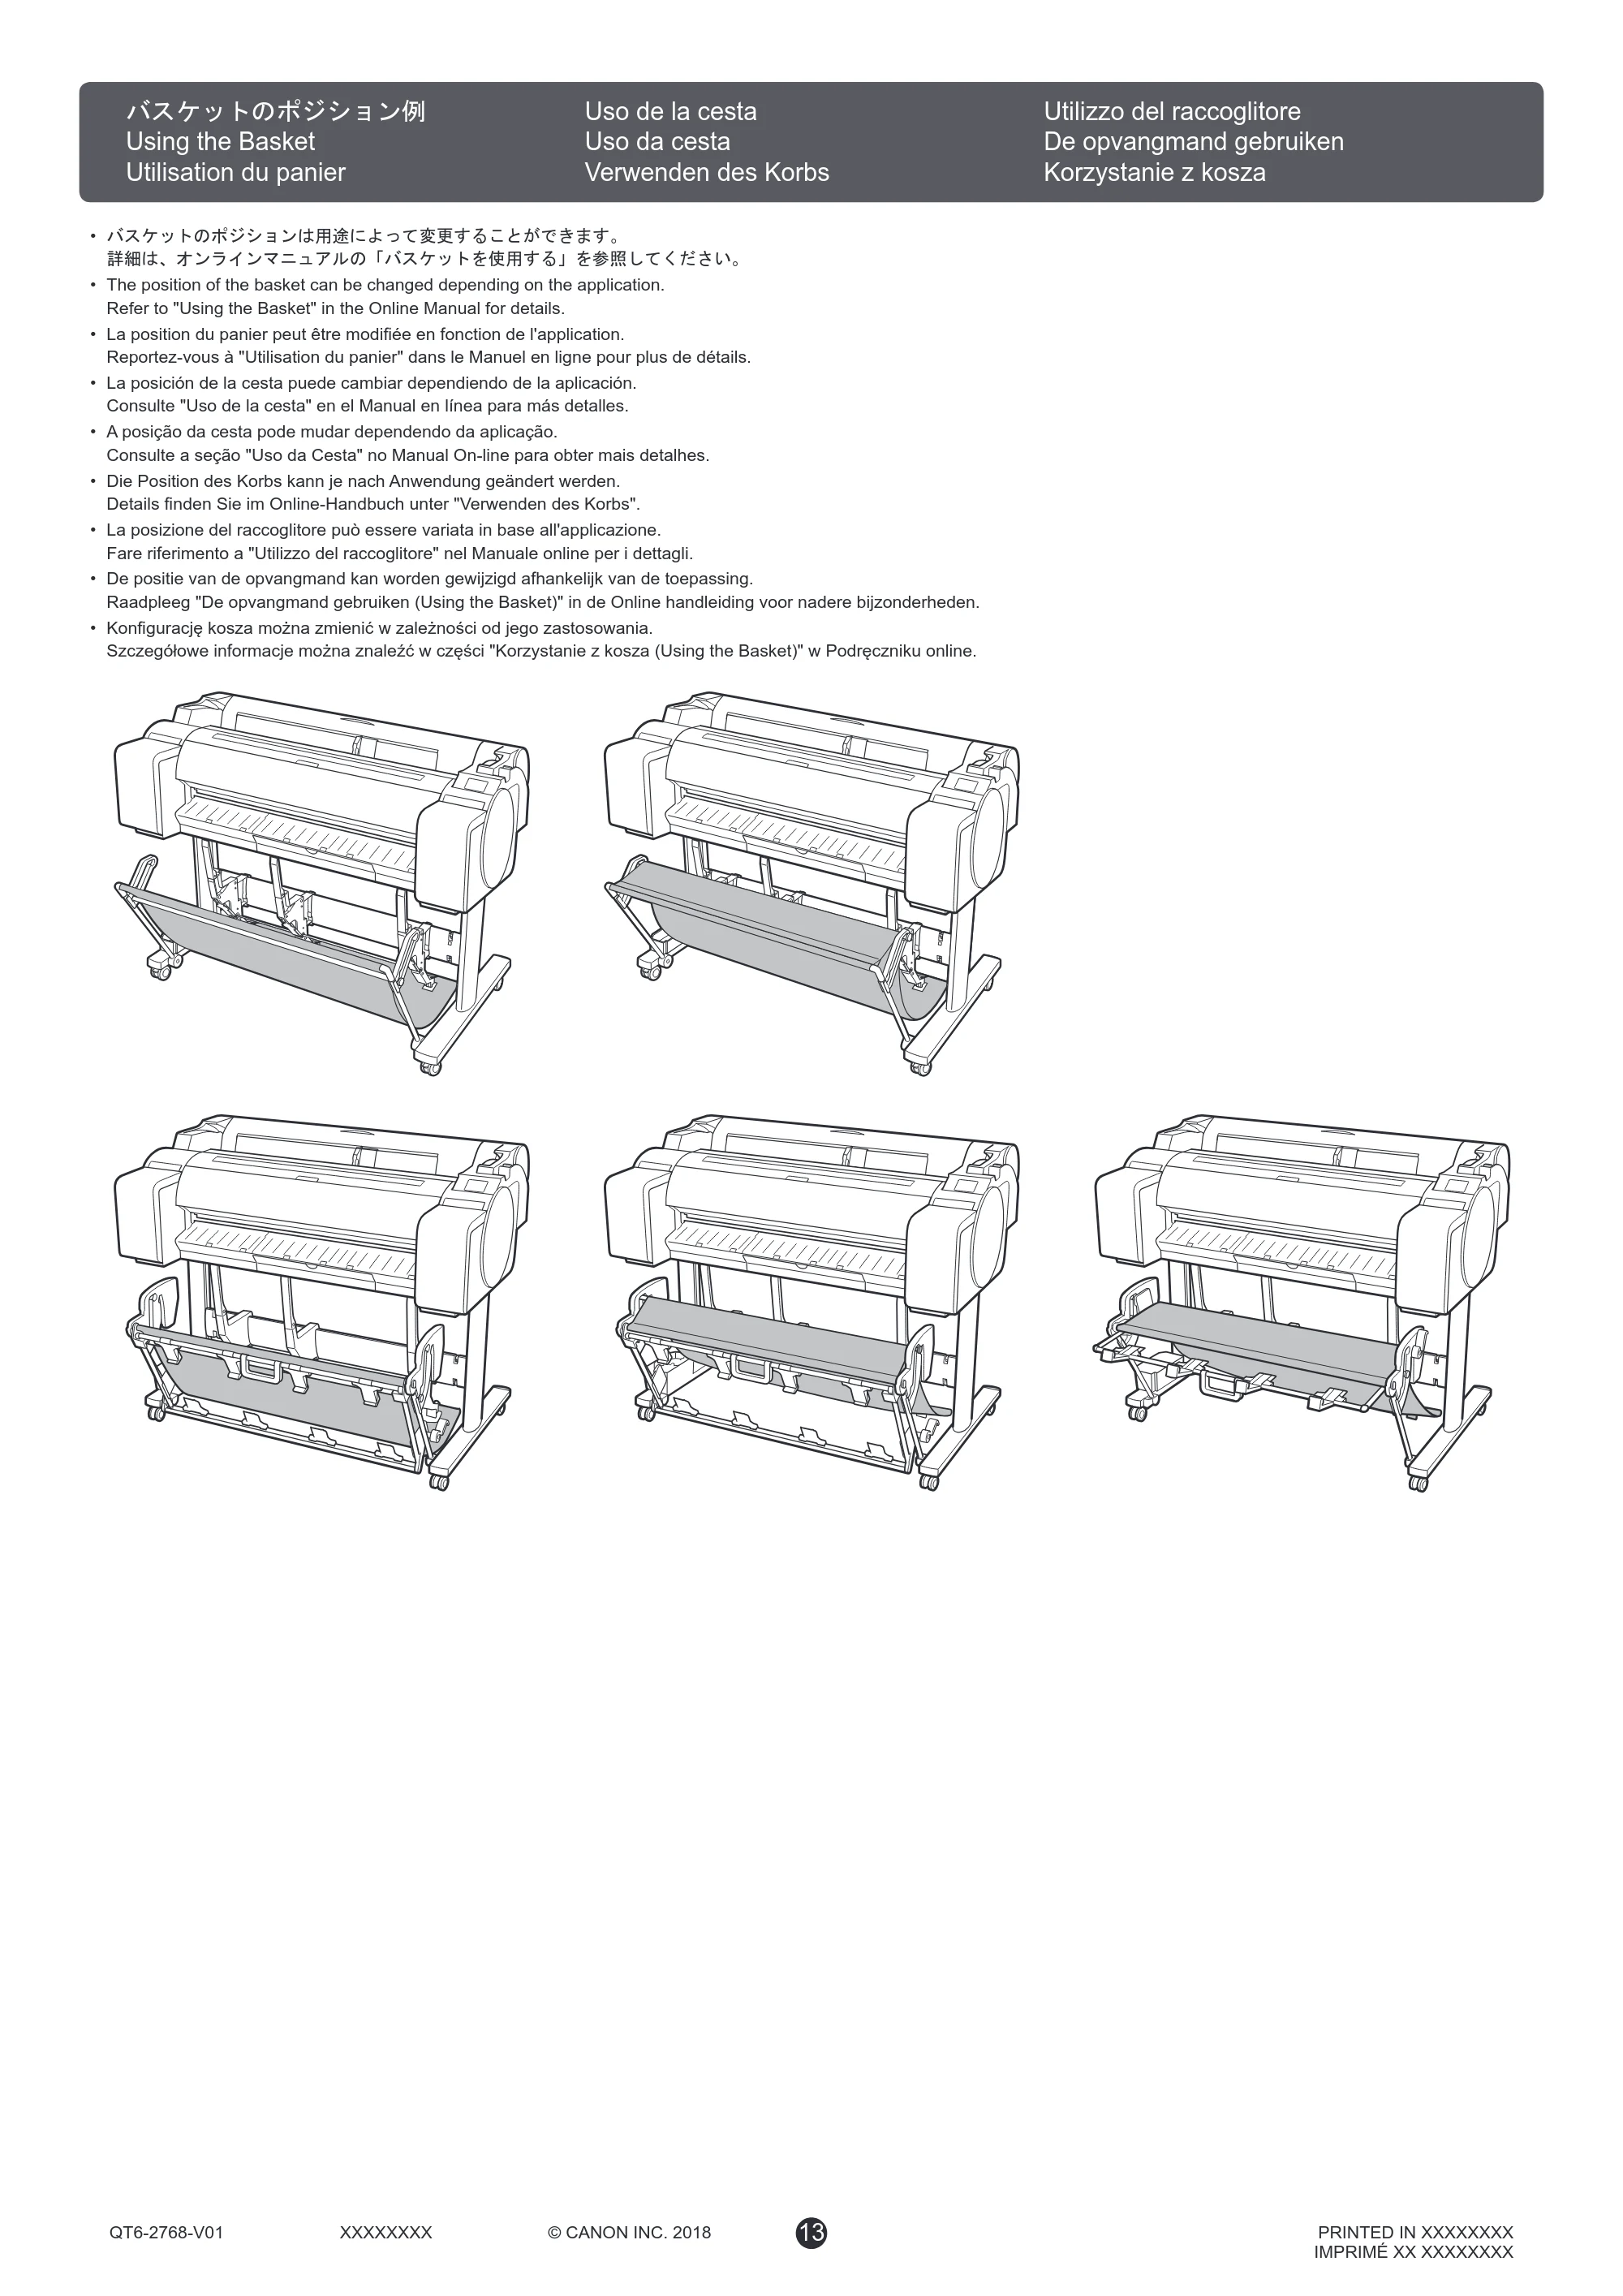
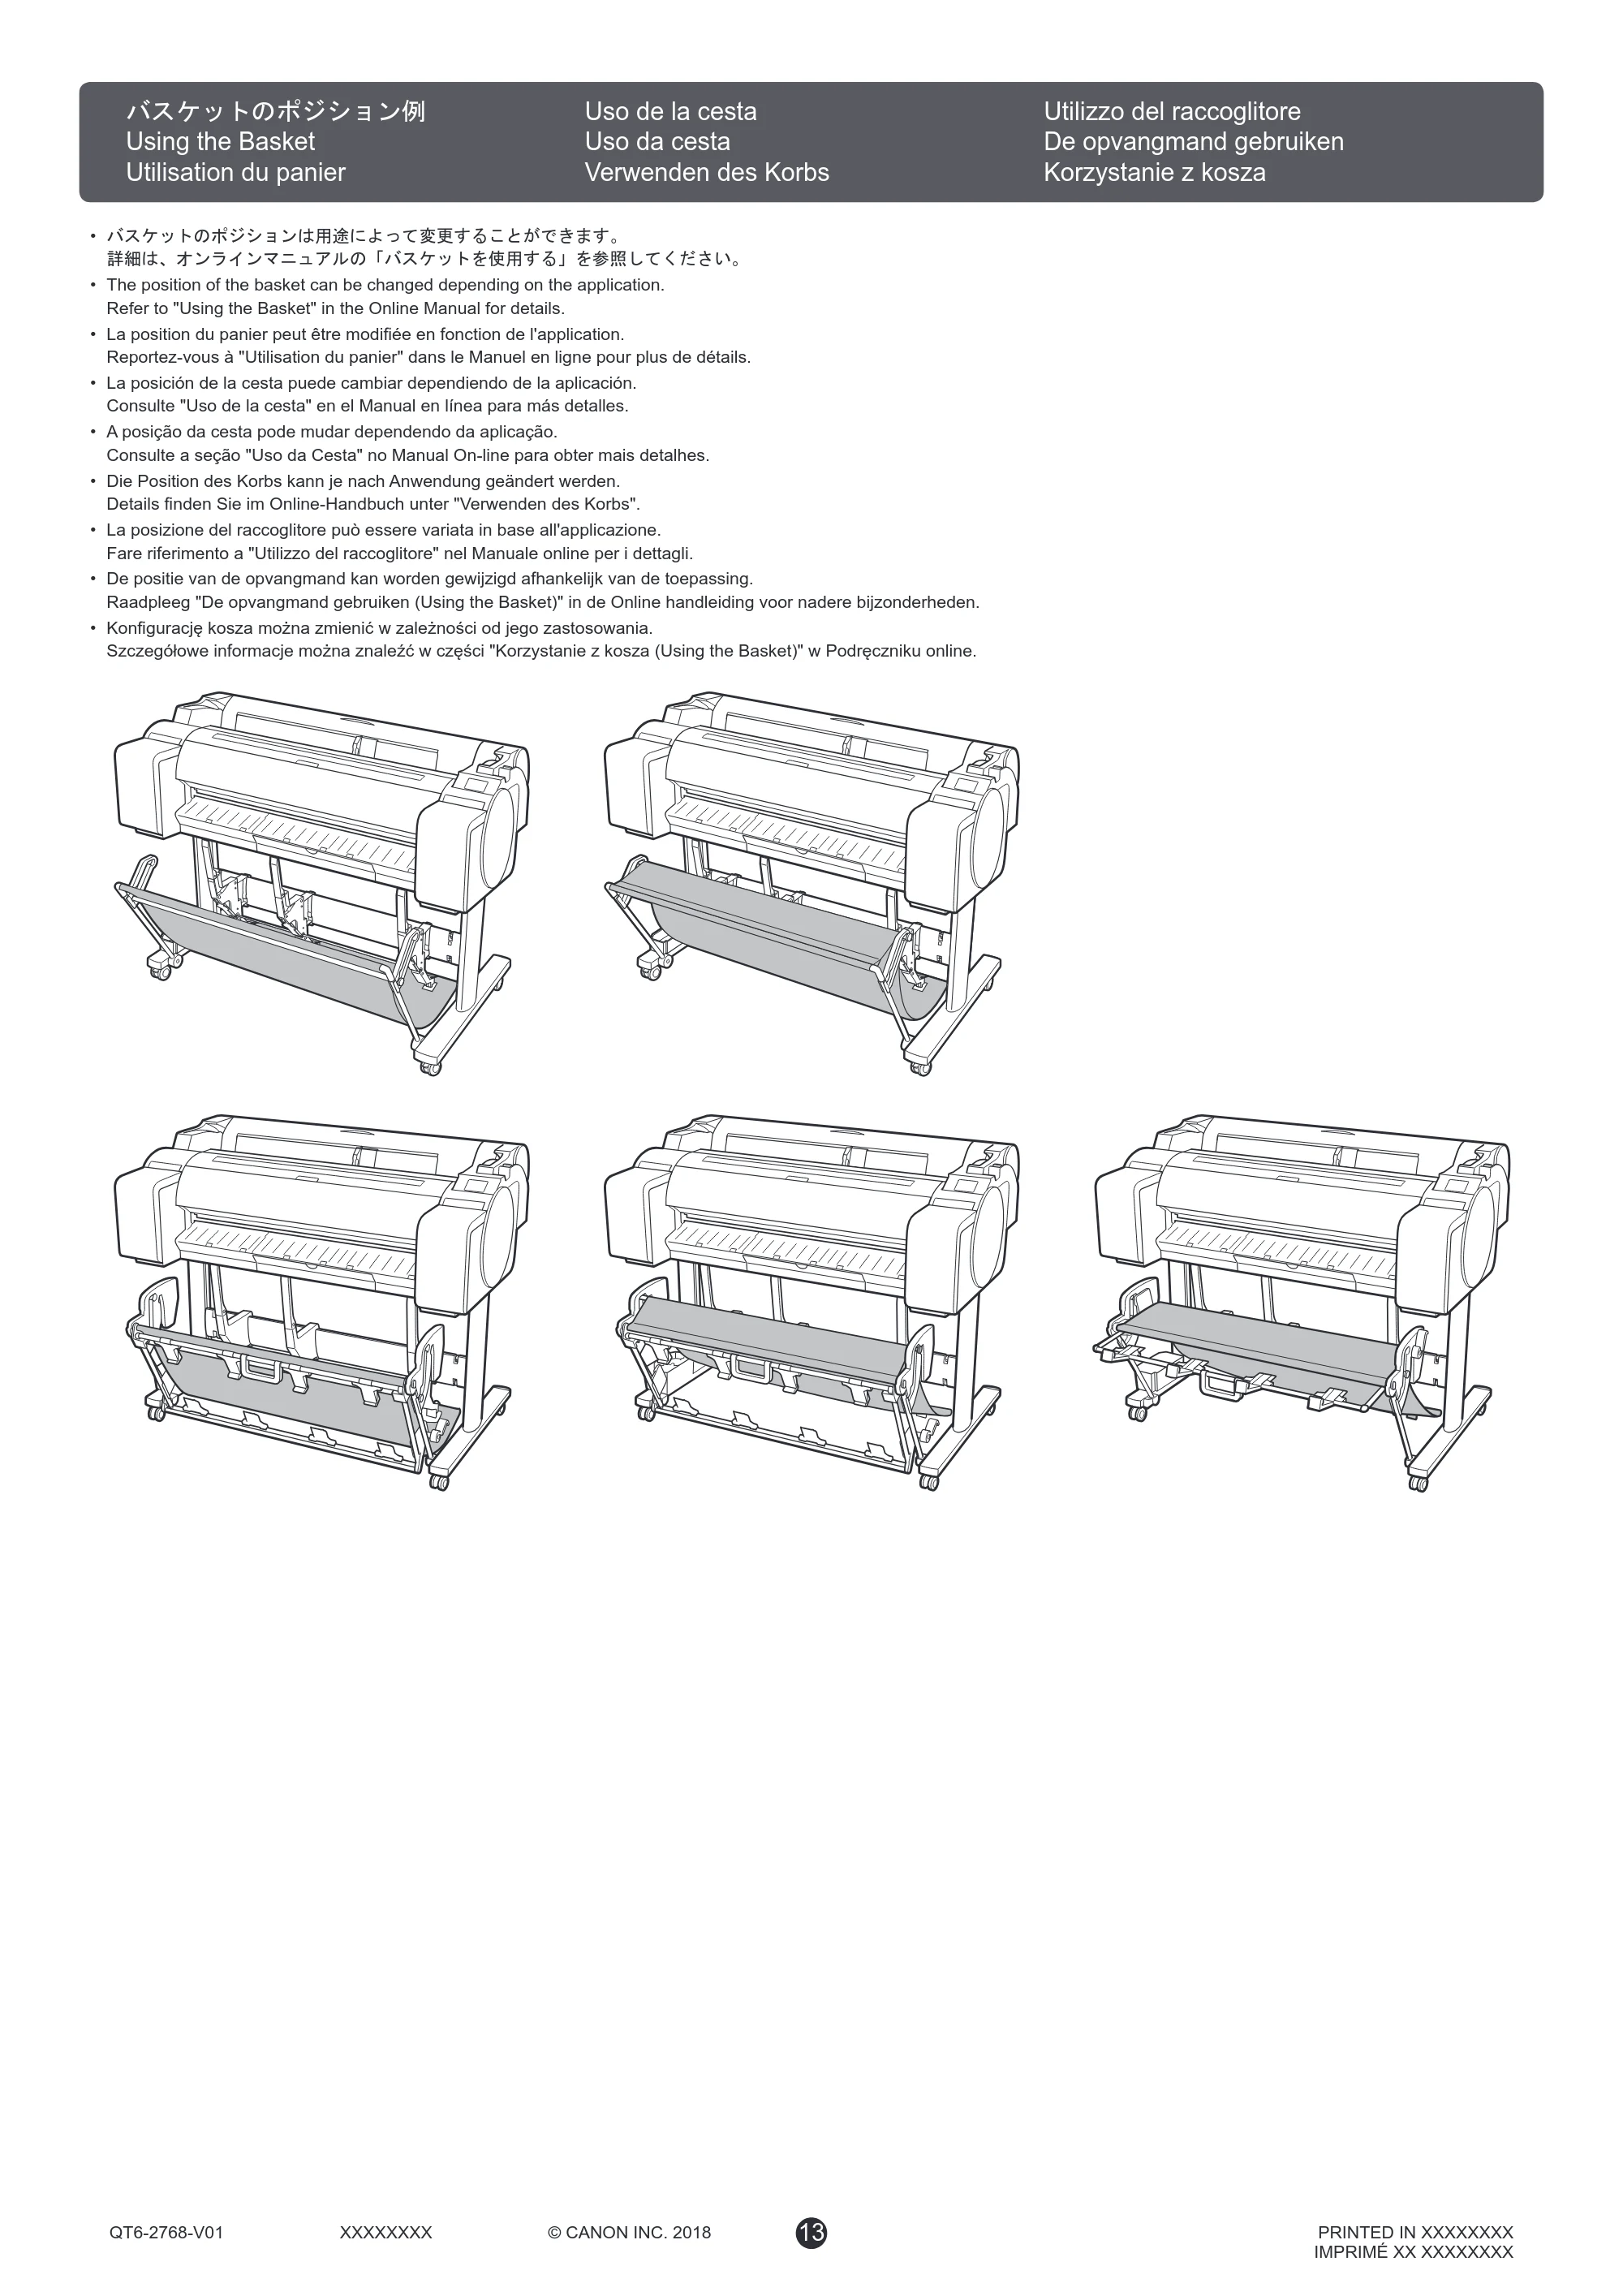
- バスケットのポジションは用途によって変更することができます。
詳細は、オンラインマニュアルの「バスケットを使用する」を参照してください。
- The position of the basket can be changed depending on the application.
Refer to "Using the Basket" in the Online Manual for details.
- La position du panier peut être modifiée en fonction de l'application.
Reportez-vous à "Utilisation du panier" dans le Manuel en ligne pour plus de détails.
- La posición de la cesta puede cambiar dependiendo de la aplicación.
Consulte "Uso de la cesta" en el Manual en línea para más detalles.
- A posição da cesta pode mudar dependendo da aplicação.
Consulte a seção "Uso da Cesta" no Manual On-line para obter mais detalhes.
- Die Position des Korbs kann je nach Anwendung geändert werden.
Details finden Sie im Online-Handbuch unter "Verwenden des Korbs".
- La posizione del raccoglitore può essere variata in base all'applicazione.
Fare riferimento a "Utilizzo del raccoglitore" nel Manuale online per i dettagli.
- De positie van de opvangmand kan worden gewijzigd afhankelijk van de toepassing.
Raadpleeg "De opvangmand gebruiken (Using the Basket)" in de Online handleiding voor nadere bijzonderheden.
- Konfigurację kosza można zmienić w zależności od jego zastosowania.
Szczegółowe informacje można znaleźć w części "Korzystanie z kosza (Using the Basket)" w Podręczniku online.